
In this topic, we will be discussing how to use natural light to enhance your photography. Natural light can be a powerful tool in photography, and understanding how to use it effectively can take your photos to the next level. From understanding the direction and quality of light to using windows as a light source, we will be exploring various tips and techniques for using natural light to create beautiful and compelling images.
Whether you're a beginner or an experienced photographer, this topic will provide you with valuable insights and practical advice on how to use natural light to enhance your photography.
How to Use Natural Light to Enhance Your Photography
Natural light can be a powerful tool in photography, and there are many ways to use it to enhance your images. Here are some tips to get you started:
Also Read This: Selling photos online: A complete Beginner’s Guide to Selling Photos Online
Understand the direction and quality of light:
Understanding the direction and quality of light is the first step in using natural light to enhance your photography. The direction of light refers to where the light is coming from, whether it's direct, diffused, or reflected. The quality of light refers to its color and intensity.
Direct light, such as sunlight, can create harsh shadows and highlights, which can be great for creating dramatic images. Diffused light, on the other hand, is softer and more even, which can be ideal for portraits and still life photography. Reflected light is light that bounces off surfaces and can create interesting and unique effects.
Look for the best lighting conditions
The best time to shoot with natural light is during the golden hour, which is the hour after sunrise and the hour before sunset. During these times, the light is warm and soft, creating a beautiful glow on your subjects. However, this is not always possible, and shooting at other times of the day can also create interesting and unique effects.
Position your subject
When shooting with natural light, it's important to position your subject in a way that makes the most of the available light. For example, if you're shooting outdoors, try positioning your subject so that the sun is behind them. This will create a beautiful halo effect around them and can help to create a dramatic and striking image.
Use reflectors
Reflectors are a great tool for enhancing natural light photography. They can help to bounce light back onto your subject and fill in shadows, creating a more even and flattering light. You can use a white reflector for a softer light or a silver reflector for a more dramatic effect.
Experiment with different settings
Finally, don't be afraid to experiment with different settings and angles when shooting with natural light. Try shooting from different angles and distances to see how the light changes. You can also adjust your camera settings, such as your aperture and shutter speed, to create different effects with the available light.
Also Read This: Unlocking International Opportunities on Adobe Stock: Expanding Your Reach Beyond Borders
Use golden hour: 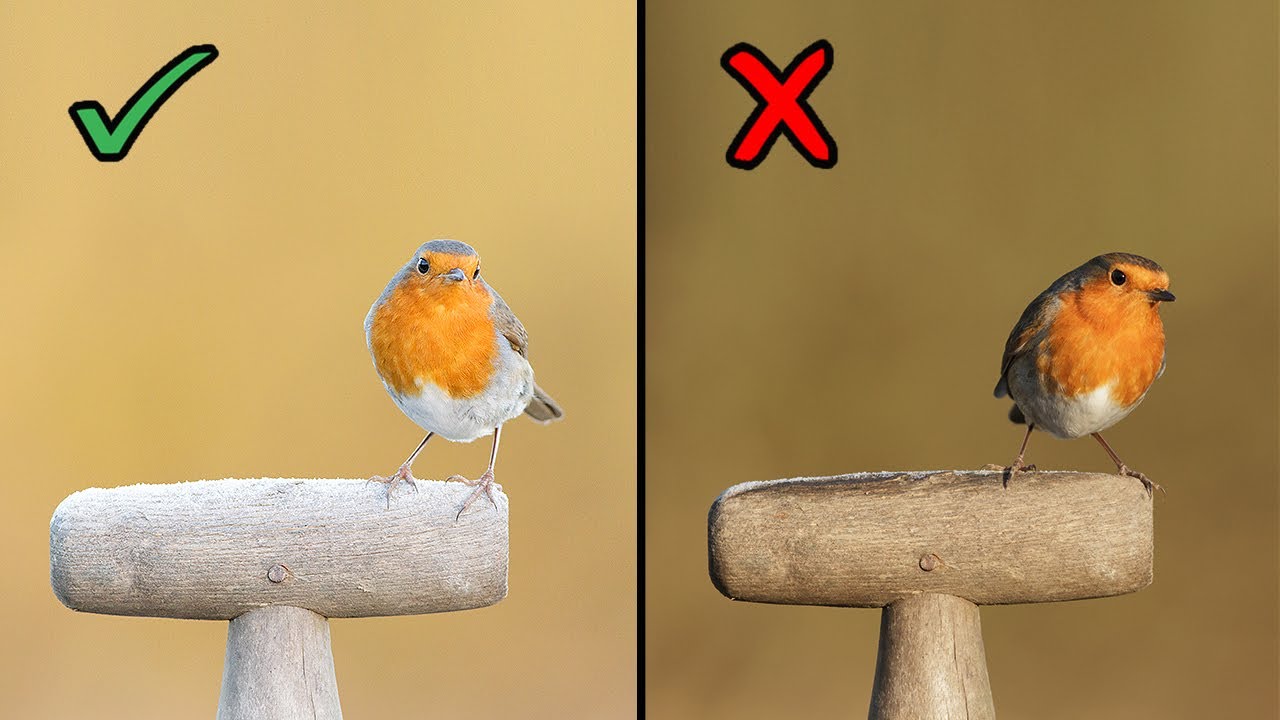
The golden hour is a period of time during the day when the light is soft and warm, and it's often considered the best time to shoot with natural light. During the golden hour, the sun is low on the horizon, creating a soft and diffused light that can be very flattering for portraits, landscapes, and still life photography.
To make the most of the golden hour, plan your shoot in advance and arrive at your location early to allow time to set up. Look for interesting subjects and compositions that will be enhanced by the soft and warm light. Keep in mind that the light will change quickly during the golden hour, so be prepared to adjust your settings and angles as the light changes.
When shooting during the golden hour, it's important to pay attention to the direction of the light. Position your subject in a way that allows the light to fall on their face or the front of the subject. Avoid shooting directly into the sun, as this can create harsh shadows and make it difficult to get a properly exposed image.
Overall, shooting during the golden hour can be a great way to enhance your photography with natural light. With some careful planning and a little experimentation, you can create stunning images that capture the beauty of this magical time of day.
Also Read This: Word Wipeout: Deleting Files in Microsoft Word
Look for reflective surfaces:
Looking for reflective surfaces is a great way to enhance your photography with natural light. Reflective surfaces can bounce light back onto your subject, creating interesting and unique lighting effects.
When looking for reflective surfaces, keep an eye out for water, glass, mirrors, and other shiny surfaces. These surfaces can reflect the natural light in different ways, depending on their angle and position. For example, shooting a portrait of someone standing near a body of water can create a beautiful reflection of the subject in the water.
When shooting with reflective surfaces, it's important to pay attention to the direction of the light. Position yourself and your subject in a way that allows the light to reflect back onto your subject in a flattering way. You can also experiment with different angles and positions to see how the light changes.
It's also important to be mindful of any unwanted reflections or glare that can appear in your image. To minimize unwanted reflections, try using a polarizing filter, which can help to reduce glare and enhance the colors in your image.
Overall, incorporating reflective surfaces into your natural light photography can add a creative and interesting element to your images. Keep an eye out for these surfaces during your shoots and experiment with different angles and positions to create unique and beautiful images.
Also Read This: PS5 Symphony: Connecting Spotify to Your PlayStation 5 – The Ultimate Setup
Use windows as a light source:
It's not recommended to use a computer screen or any electronic device as a primary light source, as they are not designed for this purpose and can cause eye strain and fatigue. However, if you need to use your computer screen as a temporary light source, here are some steps you can follow:
- Adjust your screen brightness: Turn up the brightness on your computer screen to its maximum setting. This will increase the amount of light emitted by the screen.
- Use a white screen: Open a blank white document or image on your computer screen to maximize the amount of light emitted. You can also use a website with a white background, such as Google's homepage.
- Angle the screen: Angle the screen to face the area where you need the light. You can also move the screen closer to the area for a more focused light source.
- Avoid prolonged use: Remember that computer screens are not designed to be used as light sources for extended periods of time. If you need a consistent light source, consider using a lamp or other appropriate lighting fixture.
Also Read This: Exploring the Most Searched Images on Getty Images: Understanding User Preferences and Trends
Create shadows:
To create shadows using a light source, follow these steps:
- Position the light source: Position the light source in such a way that it shines on the object you want to create a shadow of. The angle of the light source will determine the length and direction of the shadow.
- Position the object: Position the object you want to create a shadow of in front of the light source.
- Observe the shadow: Observe the shadow created by the object. The shape and size of the shadow will depend on the shape and size of the object, as well as the distance and angle of the light source.
- Adjust the position of the object and light source: You can adjust the position of the object and light source to create different types of shadows. For example, moving the object closer to the light source will create a smaller, sharper shadow, while moving the object further away will create a larger, softer shadow.
It's important to note that the intensity and angle of the light source will affect the appearance of the shadow.
Also Read This: Here is How You Can Block Annoying People on SoundCloud
Be aware of color temperature: 
Color temperature refers to the color appearance of light, usually measured in degrees of Kelvin (K). It is an important consideration when choosing lighting for different environments, as it can affect the mood and ambiance of a space.
Light sources with a color temperature of 2700K to 3000K are considered warm or soft white, and tend to create a cozy and comfortable atmosphere. This type of lighting is often used in residential settings, such as living rooms and bedrooms.
Light sources with a color temperature of 3500K to 4000K are considered neutral or cool white, and are often used in commercial settings, such as offices and hospitals. This type of lighting can help increase focus and productivity.
Light sources with a color temperature of 5000K to 6500K are considered daylight or cool white, and tend to create a bright and energizing atmosphere. This type of lighting is often used in areas where people need to be alert and focused, such as in schools and factories.
It's important to choose the right color temperature for your specific needs, as the wrong temperature can have a negative impact on productivity, mood, and even sleep patterns. When selecting lighting, consider the space and the activities that will be taking place in it, and choose a color temperature that will enhance the environment and meet the needs of those using it.
Also Read This: List of Top Linkedin Companies of Malaysia in 2023
Experiment with back lighting:
Back lighting can be a fun and creative way to enhance your photography or videography. Here's a simple experiment you can try to get started with back lighting:
- Choose your subject: Find an object or person that you want to photograph or film. Keep in mind that back lighting works best with subjects that are translucent or have some texture to them.
- Set up your lighting: Position your light source behind your subject, so that it is shining directly towards the camera. You can use natural light from a window or artificial light from a lamp or studio light.
- Adjust your camera settings: To properly capture the back lighting, you may need to adjust your camera's settings. Increase your exposure compensation to brighten the image, or decrease your aperture to create a shallower depth of field.
- Experiment with angles: Try shooting your subject from different angles to see how the back lighting changes the look and feel of the image. You may find that shooting from a low angle or a high angle creates a more dramatic effect.
- Add a reflector: If you want to add more light to the front of your subject, you can use a reflector to bounce light back onto them. Place the reflector opposite your light source, and experiment with different angles until you achieve the desired effect.
Remember, back lighting is all about experimenting and having fun. Don't be afraid to try different lighting setups and camera settings until you find the perfect shot!
Also Read This: The Chrome Extension You Need for Seamless Instagram Video Downloads
FAQ
Here are some frequently asked questions about using natural light in photography:
What is natural light photography?
A: Natural light photography is a type of photography that uses natural light sources, such as sunlight or ambient light, to illuminate the subject.
What are the benefits of using natural light in photography?
A: Natural light can create beautiful, soft light that is flattering to the subject, and can also add a sense of depth and dimension to your photos.
What is the best time of day for natural light photography?
A: The best time of day for natural light photography is often referred to as the golden hour, which is the hour after sunrise or the hour before sunset when the light is soft and warm.
How can I control natural light in my photos?
A: While you can't control natural light itself, you can control the direction and quality of the light by adjusting the position of your subject or using reflectors and diffusers to manipulate the light.
What are some common mistakes to avoid when using natural light in photography?
A: Common mistakes include shooting in harsh light, not paying attention to the direction of the light, and forgetting to adjust your camera's white balance to account for variations in color temperature.
How can I make the most of natural light in my photography?
A: Experiment with different angles and positioning, look for reflective surfaces and use windows as a light source, and pay attention to the direction and quality of the light to create beautiful and compelling images.
Conclusion
In conclusion, natural light can be a valuable tool in photography, and understanding how to use it effectively can help you create stunning and impact images. By paying attention to the direction and quality of the light, using reflective surfaces and windows as light sources, and experimenting with different angles and positioning, you can make the most of natural light and enhance your photography.
Remember to also adjust your camera's white balance to account for variations in color temperature and avoid common mistakes such as shooting in harsh light. With practice and experimentation, you can take your photography skills to the next level and capture beautiful moments with the help of natural light.