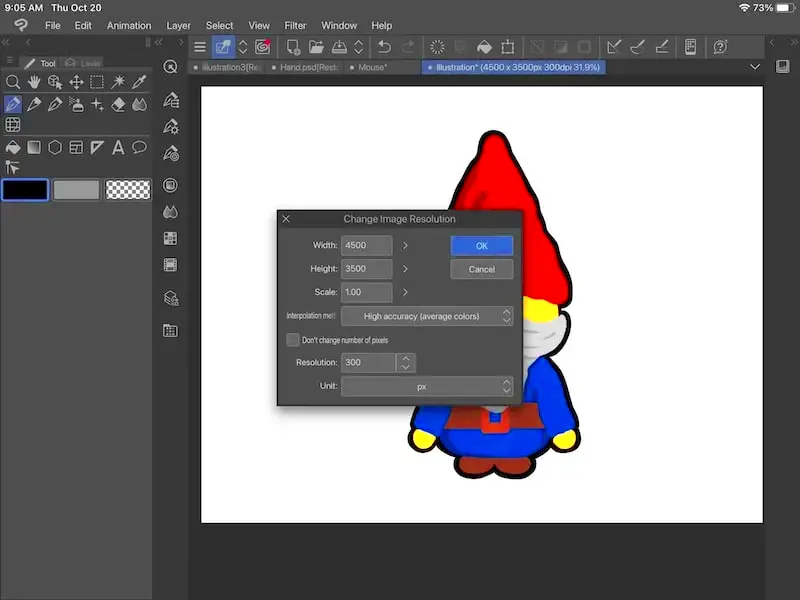
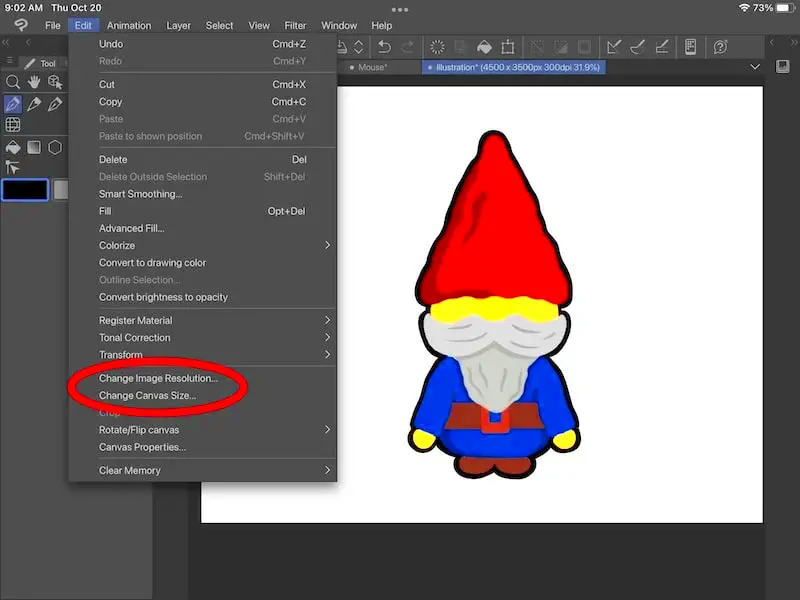
Resizing images in Clip Studio Paint is an essential skill for any artist. Whether you’re preparing artwork for social media, printing, or simply adjusting for better composition, knowing how to resize effectively can make a big difference. This guide will help you understand the tools and settings available for resizing images, ensuring you maintain quality and proportions.
Understanding the Image Size Settings

Before diving into resizing, it’s crucial to grasp the different image size settings in Clip Studio Paint. Here are some key terms you should know:
- Pixel Dimensions: This refers to the width and height of your image measured in pixels. A higher pixel count generally means better quality.
- Resolution: This indicates how many pixels are displayed in a given area, typically in dots per inch (DPI). Standard print resolution is 300 DPI.
- Aspect Ratio: This is the ratio of the width to the height of the image. Keeping the aspect ratio consistent prevents distortion during resizing.
Understanding these settings will help you make informed decisions when resizing your images.
Also Read This: Tips for Capturing Photos That Sell on Getty Images
Using the Canvas Size Tool
The Canvas Size Tool in Clip Studio Paint allows you to change the size of your canvas without altering the image itself. Here’s how to use it:
- Open your image in Clip Studio Paint.
- Go to the menu and select Canvas, then choose Change Canvas Size.
- A dialog box will appear. Here, you can enter new dimensions for your canvas.
- If you want to keep the aspect ratio, make sure to check the Maintain Aspect Ratio box.
- Click OK to apply the changes.
Using the Canvas Size Tool is particularly useful when you need to adjust your workspace without modifying the artwork itself. This way, you can add more space for elements or simply change the overall size for specific purposes.
Also Read This: Editing Text Within an Image
Resizing Images with the Transform Tool
The Transform Tool in Clip Studio Paint is a powerful feature for resizing images directly. This tool not only allows you to change the dimensions of your artwork but also gives you the flexibility to rotate and skew it if needed. Here’s how you can use the Transform Tool:
- Select the layer containing the image you want to resize.
- Go to the menu and choose Edit, then select Transform or simply press Ctrl + T (or Cmd + T on Mac).
- A bounding box will appear around your image. You can click and drag the corners to resize the image.
- To maintain the aspect ratio, hold the Shift key while dragging a corner handle.
- Once satisfied with the new size, press Enter to apply the transformation.
The Transform Tool is especially handy when you need precise control over your image’s size and position. However, always remember to check the image quality after resizing to ensure it meets your needs.
Also Read This: Hidden Gems: Finding the Best Offer Accepted on eBay
Maintaining Image Quality When Resizing
Maintaining image quality during resizing is crucial to ensure your artwork looks sharp and professional. Here are some tips to keep in mind:
- Start with a high-resolution image: The higher the original resolution, the better the quality after resizing.
- Avoid excessive resizing: Trying to enlarge a small image too much can lead to pixelation and blurriness. Stick to resizing images within a reasonable range.
- Use interpolation methods: Clip Studio Paint offers different methods for resizing. For example, using Auto or Best Quality can help preserve detail.
- Check your DPI settings: If you plan to print your image, ensure that the DPI is set to 300 for best results.
By following these tips, you can maintain the integrity of your images and ensure they look great, no matter how you resize them.
Also Read This: How to Take a High-Quality Still Image from Video
Common Mistakes to Avoid
When resizing images, it's easy to make a few common mistakes that can affect the outcome of your artwork. Here are some pitfalls to watch out for:
- Not checking the aspect ratio: Failing to maintain the aspect ratio can distort your image, making it look stretched or squished.
- Ignoring image resolution: Resizing without considering resolution can lead to poor quality, especially for prints.
- Resizing multiple times: Continuously resizing the same image can degrade its quality over time. Always save a copy of the original.
- Using low-quality images: Starting with a low-resolution image can limit your options when resizing. Always aim for high-quality sources.
- Not previewing changes: Before finalizing your resized image, always preview it at 100% zoom to catch any issues.
Avoiding these mistakes will help you create stunning, high-quality artwork that looks great in any size!
Also Read This: Filling Text with an Image for a Creative Effect
Tips for Efficient Image Resizing
Efficient image resizing can save you time and improve your workflow in Clip Studio Paint. Here are some practical tips to help you resize images quickly and effectively:
- Set Up Shortcuts: Familiarize yourself with keyboard shortcuts for resizing tools. This will speed up your workflow. For instance, Ctrl + T for Transform Tool can make a big difference.
- Use Layer Folders: Organize your layers in folders. This allows you to resize multiple images at once without losing track of your work.
- Plan Your Dimensions: Before you start resizing, know the exact dimensions you need. Having a clear plan helps avoid unnecessary adjustments later.
- Utilize Guides: Use guides and grids to maintain alignment while resizing. This ensures your artwork remains balanced and well-composed.
- Batch Processing: If you need to resize multiple images, consider using batch processing features or exporting settings to save time.
By following these tips, you’ll streamline your image resizing process, allowing you to focus more on creating art rather than adjusting sizes.
Also Read This: Guide to Using Adobe Stock on 99designs
FAQ
Here are some frequently asked questions about resizing images in Clip Studio Paint:
- Can I resize images without losing quality? Yes, if you start with a high-resolution image and avoid excessive resizing, you can maintain quality.
- What is the best resolution for printing? A resolution of 300 DPI is recommended for printing to ensure high quality.
- How do I keep the aspect ratio when resizing? Hold the Shift key while dragging the corners of your image in the Transform Tool.
- Can I resize a canvas and an image separately? Yes, you can adjust the canvas size using the Canvas Size Tool without affecting the image size directly.
- What should I do if my image looks pixelated after resizing? Try resizing it back to a smaller dimension or use a higher resolution source image.
Conclusion
Resizing images in Clip Studio Paint doesn’t have to be a daunting task. By understanding the tools and techniques available, you can efficiently adjust your artwork to meet various needs. Remember to keep quality in mind, maintain aspect ratios, and avoid common mistakes. With these tips and insights, you’re well-equipped to resize images confidently and effectively. Happy creating!

 admin
admin


