Steps to Label a Gel Electrophoresis Image

Labeling a gel electrophoresis image involves a series of steps to make sure that each part of the gel is clearly identified. Whether you are using software or manual methods, it's essential to follow a consistent process. Here are the key steps to label your gel electrophoresis image effectively:
- Open the Image: Start by opening the gel electrophoresis image in your chosen image editing software. Most people use tools like Photoshop, ImageJ, or even free online editors.
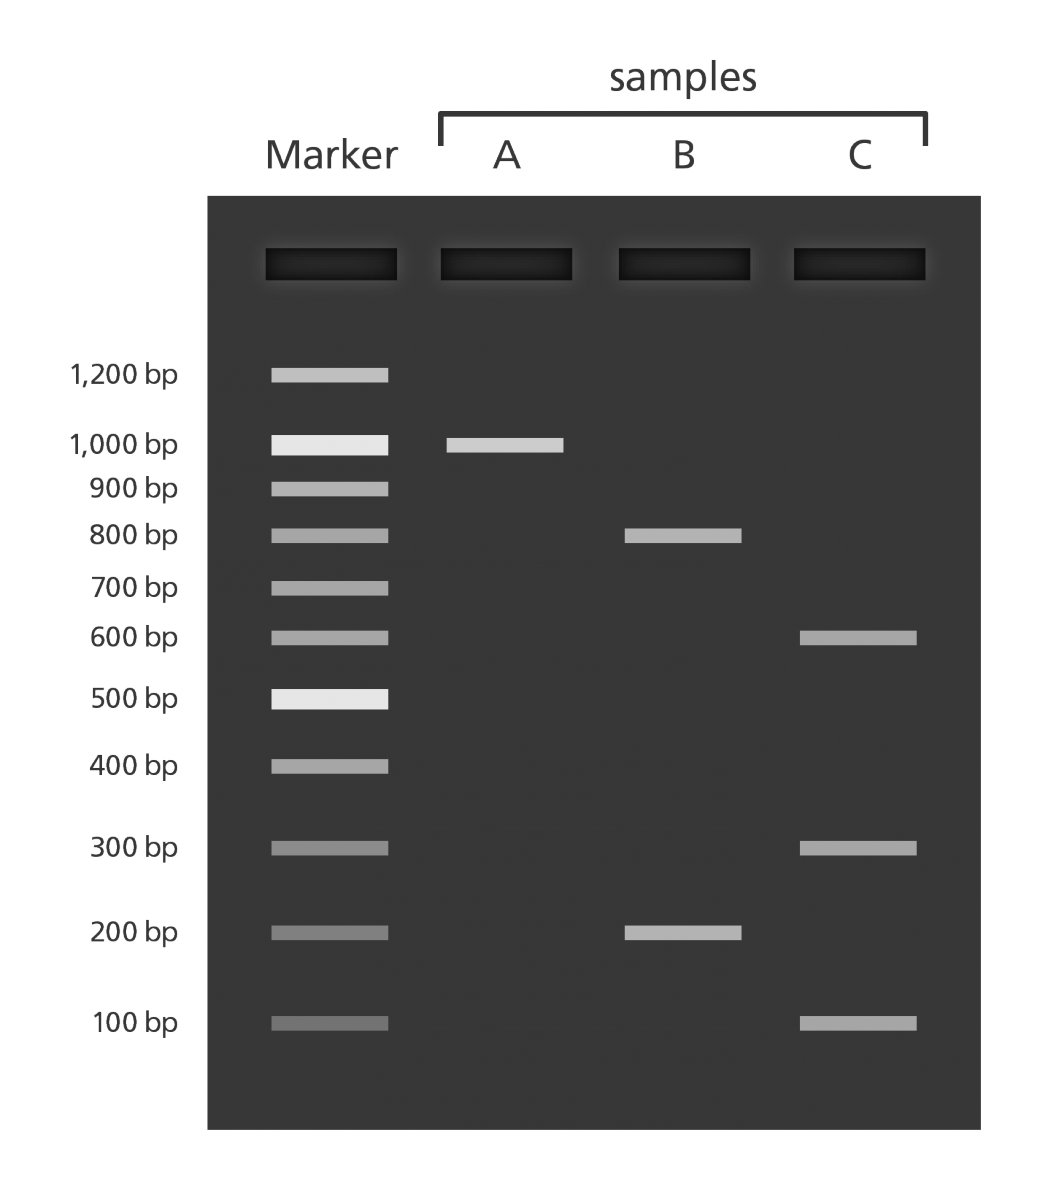
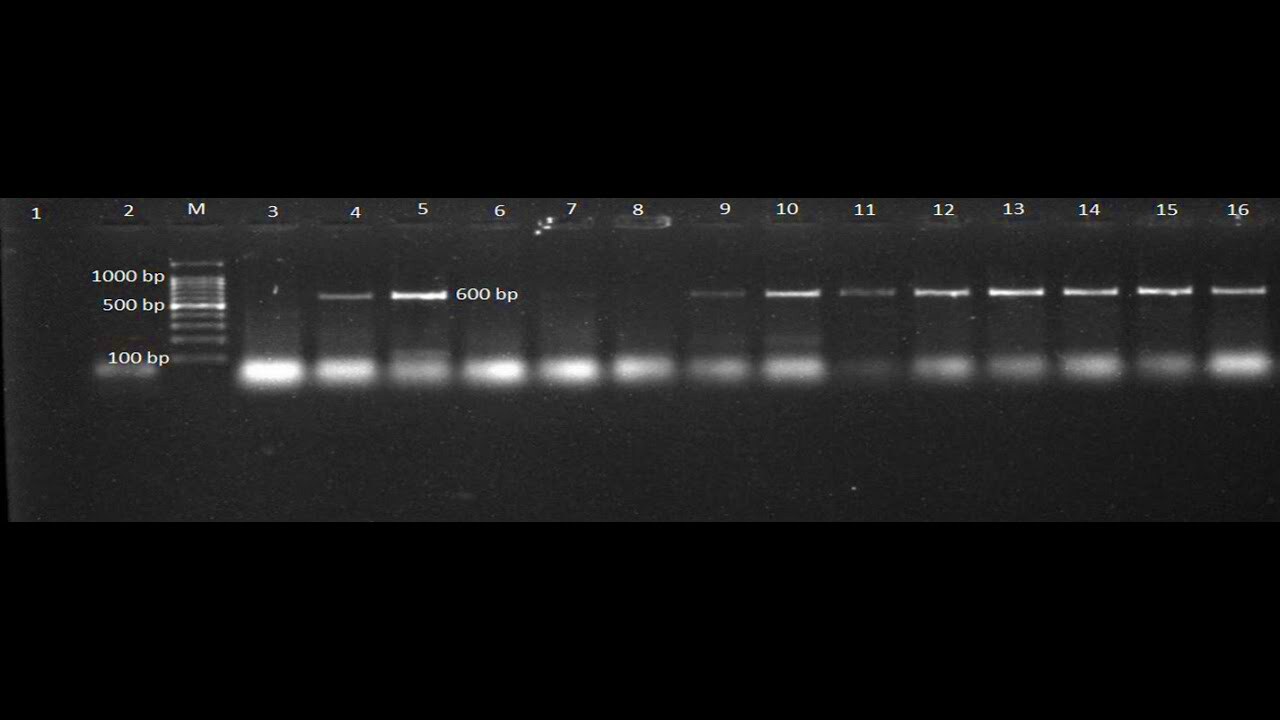
- Identify the Bands: Carefully review the image and identify the bands. These bands represent different sizes of molecules in your sample, and it’s important to label them clearly.
- Label the Lanes: Each lane in your gel represents a different sample. Label each lane with an appropriate identifier, such as a sample name or number. Ensure the text is clear and easy to read.
- Mark the Molecular Weight Marker: If you are using a molecular weight marker (ladder), be sure to label it too. This will help in determining the size of the molecules in your samples by providing reference points.
- Use Clear Text: Choose a legible font, such as Arial or Helvetica. Use a contrasting color, so the labels stand out against the background of the gel. Avoid cluttering the image with too much text.
- Double-check for Accuracy: Before finalizing, double-check all the labels. Ensure that every lane and marker is correctly identified and that there are no mistakes.
Once you're done, save the image in a high-resolution format, such as PNG or TIFF, to ensure the quality remains intact. Proper labeling makes your gel electrophoresis results much more interpretable and useful for analysis.
Also Read This: 123RF’s Top Selling Images of 2022: Examining the Trendsetters and High Performers
Common Tools for Labeling Gel Electrophoresis Images

There are a variety of tools available for labeling gel electrophoresis images, ranging from basic free software to professional-grade programs. The tool you choose will depend on your needs, budget, and level of expertise. Below are some of the most commonly used tools for labeling gel electrophoresis images:
- Photoshop: Adobe Photoshop is a powerful tool for editing images, including gel electrophoresis images. It offers a wide range of features, such as adding text, arrows, and markers. However, it requires a paid subscription.
- ImageJ: ImageJ is a free, open-source software widely used in scientific research. It allows for precise editing and labeling of gel images, with options to add scale bars, markers, and text. It's ideal for scientific applications.
- GIMP: GIMP (GNU Image Manipulation Program) is a free alternative to Photoshop. It offers many similar features, such as layers and text tools, making it a great choice for those on a budget.
- Canva: Canva is an online design tool that offers a simple interface for adding text and graphics to images. It’s user-friendly and great for those who need quick edits but don’t require advanced scientific tools.
- Microsoft Paint: While basic, Microsoft Paint can be used for simple labeling tasks. It’s free and easy to use, but lacks advanced features like precise text placement or layer control.
Each of these tools has its own strengths and weaknesses, but they all allow for clear labeling of gel electrophoresis images. Choose the one that fits your needs best—whether it’s for quick edits, precise scientific work, or professional presentation.
Also Read This: How to Incorporate PDF Files into Your Behance Portfolio
Best Practices for Labeling Gel Electrophoresis Images

When it comes to labeling gel electrophoresis images, following best practices ensures clarity and accuracy. Here are some helpful guidelines to make your labeling process more effective and professional:
- Use Consistent Labeling: Maintain consistency throughout the image. Use the same font, font size, and color for similar items (e.g., all lanes, markers, and bands). Consistency helps prevent confusion and makes your image easier to read.
- Avoid Overcrowding: Don’t overcrowd the image with too much text or too many labels. Keep it simple and clear. If you have a lot of lanes or bands, consider grouping them or using smaller fonts, but make sure everything is still legible.
- Choose Contrasting Colors: Ensure that the text color contrasts well with the background of the gel. For example, use white or black text on a colored background. This makes labels stand out and enhances readability.
- Label the Markers: Always label molecular weight markers or ladders. This is essential for determining the size of the bands in your samples. Be sure to clearly indicate which marker is which.
- Label Bands Clearly: Label each band with a unique identifier (e.g., sample name, size, or concentration) and ensure the text doesn’t overlap the bands. Use arrows or lines to point directly to the bands to avoid confusion.
- Keep a High Resolution: Always work with a high-resolution image to ensure that your labels remain clear and sharp, especially if you plan to use the image for presentations or publications.
- Proofread the Labels: After labeling, carefully check for any errors. A small mistake in labeling, such as the wrong lane number or band size, could lead to misinterpretation of the data.
By following these best practices, you can ensure that your gel electrophoresis images are professionally labeled, easy to interpret, and suitable for scientific analysis and publication.
Also Read This: Top E-Commerce Image Editing Services Available in the USA
Common Mistakes to Avoid While Labeling

Labeling a gel electrophoresis image may seem straightforward, but there are several common mistakes that can lead to confusion or misinterpretation of the data. Being aware of these pitfalls can help ensure that your labeling process is both accurate and effective. Here are some of the most frequent mistakes to avoid:
- Incorrect Placement of Labels: One of the most common mistakes is placing labels in the wrong position. Labels should never overlap with the bands themselves, as this can obscure important data. Instead, position your labels either above or below the bands, making sure they are clearly distinguishable from the gel’s content.
- Using Hard-to-Read Fonts or Colors: Another mistake is using fonts or colors that are difficult to read. Ensure that your text contrasts well with the gel background. Avoid overly decorative fonts and stick with simple, legible ones like Arial or Helvetica. Also, ensure that the color of the text is bold enough to stand out against the background.
- Overloading the Image with Information: While it’s important to label everything clearly, overloading the image with too much information can make it look cluttered and difficult to interpret. Keep labels concise and use arrows or lines where necessary to connect the labels to the bands or lanes.
- Inconsistent Labeling: Consistency is key. If you change the font size, style, or color in different parts of the image, it can make the image look disorganized and confusing. Always use the same style for similar types of labels (such as lane numbers, sample names, or markers).
- Forgetting to Label the Markers: Molecular weight markers or ladders are essential for interpreting your results, but sometimes they are overlooked. Ensure that you label these markers clearly, including their size or the range of sizes they represent.
- Not Proofreading: A simple oversight can make a big difference. After labeling the image, always take the time to proofread and double-check the accuracy of your labels. Verify that each lane is correctly identified and that the molecular markers are properly labeled.
By being mindful of these common mistakes, you can improve the clarity and accuracy of your gel electrophoresis images, making your data more reliable and easier to interpret.
Also Read This: how to make an image slideshow for anniversary
Frequently Asked Questions (FAQ)
- How do I label a gel electrophoresis image without specialized software?
If you don't have access to specialized image editing software, you can use free tools like GIMP or even online platforms like Canva. These tools allow you to add text and markers to your image, though they may not have all the advanced features found in professional software.
- What font should I use for labeling gel electrophoresis images?
It’s best to use simple, easy-to-read fonts like Arial, Helvetica, or Times New Roman. Avoid overly stylized fonts as they may be hard to read, especially in smaller sizes or on complex backgrounds.
- Can I label bands with specific molecular sizes?
Yes, it’s very important to label bands with their approximate molecular size based on the molecular weight markers. This helps with the interpretation of the gel image and makes your data more precise.
- How can I ensure my gel electrophoresis image is clear enough for publication?
To ensure your image is clear for publication, use high-resolution settings, ensure that labels are legible, and make sure the image is not overcrowded with information. Double-check the labeling of lanes, markers, and bands, and make sure the overall layout is neat and easy to follow.
- Is it necessary to label every lane on the gel?
Yes, it’s essential to label every lane to indicate what sample it contains. This includes labeling any controls, experimental samples, and molecular markers, so the reader can easily interpret the results.
Conclusion
Labeling a gel electrophoresis image is more than just a simple task; it's a crucial step in ensuring the accuracy, clarity, and usefulness of your scientific data. Proper labeling helps others quickly interpret your results, making your work more accessible and reliable. By following the right steps, using the correct tools, and avoiding common mistakes, you can create high-quality, professional gel electrophoresis images that will stand up to scrutiny in the lab, in reports, or in publications.
Remember, clarity is key. Keep labels concise, consistent, and easy to read, and always proofread before finalizing your image. With these best practices, your gel electrophoresis images will be both informative and professional.

 admin
admin


