Welcome to the exciting world of video splicing on YouTube! If you're here, you’re probably eager to learn how to enhance your videos by cutting and combining clips seamlessly. Whether you're a budding content creator or just looking to edit your personal videos, mastering the art of splicing can elevate your storytelling. In this guide, we'll break down the essentials and help you get started on your video editing journey.
Understanding the Basics of Video Editing

Before diving into splicing, let’s familiarize ourselves with the basics of video editing. Think of video editing as a way to arrange your clips to tell a story or convey a message. Here are some fundamental concepts to grasp:
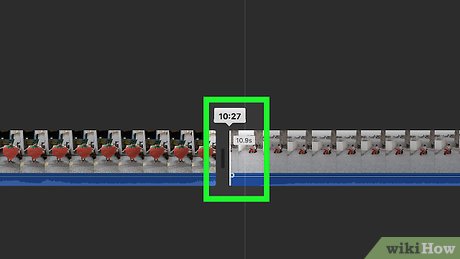
- Timeline: This is where you arrange your video clips. It’s like a digital storyboard where you can see the flow of your video.
- Cutting: This involves trimming parts of your video. You cut out the sections you don’t need to keep your content engaging.
- Transitions: These are effects that help move from one clip to another smoothly. Examples include fades, wipes, and dissolves.
- Audio Editing: Sound matters! Editing audio includes adding background music or voiceovers to complement your visuals.
Now, let’s talk about some tools you can use for video editing:
| Editing Software | Platform | Skill Level |
|---|---|---|
| iMovie | Mac/iOS | Beginner |
| Adobe Premiere Pro | Windows/Mac | Intermediate |
| Final Cut Pro | Mac | Advanced |
| DaVinci Resolve | Windows/Mac/Linux | Intermediate-Advanced |
Choosing the right software depends on your comfort level and goals. For beginners, iMovie is user-friendly and perfect for quick edits. As you gain confidence, you might explore more advanced tools like Adobe Premiere Pro or DaVinci Resolve.
In summary, understanding these basics will give you a solid foundation for splicing videos on YouTube. The key is to practice and experiment with different techniques. The more you edit, the better you’ll become!
Also Read This: Exploring the Earning Potential for 100000 Views on YouTube in 2024
3. Essential Tools for Splicing Videos

When it comes to splicing videos, having the right tools can make a world of difference. Whether you’re looking to create engaging content for your YouTube channel or just want to piece together some memorable moments, here are some essential tools you’ll need:
- Video Editing Software: This is your primary tool. Programs like Adobe Premiere Pro and Final Cut Pro offer advanced features, but if you’re a beginner, you might want to start with something simpler like iMovie or HitFilm Express. These provide user-friendly interfaces while still offering powerful editing capabilities.
- Screen Recording Software: If you're looking to splice together tutorials or gameplay footage, tools like OBS Studio or Camtasia can help you capture high-quality video directly from your screen.
- Audio Editing Tools: Don’t overlook the audio! Software like Audacity is free and makes it easy to enhance or edit your audio tracks before merging them with your video.
- Graphics and Animation Software: If you want to add some flair to your videos, consider using tools like Canva or Adobe After Effects for creating engaging thumbnails and animations.
Choosing the right tools depends on your specific needs and budget. Experimenting with free versions can also help you determine what works best for you before committing to a purchase.
Also Read This: A Prairie Home Companion’s Journey on YouTube
4. Step-by-Step Process of Splicing Videos on YouTube
Now that you have your tools ready, let’s dive into the step-by-step process of splicing videos for your YouTube content. It might seem daunting initially, but once you get the hang of it, you’ll be splicing like a pro in no time!
- Import Your Footage: Open your chosen video editing software and import all the video clips you want to splice together. This usually involves dragging and dropping files into the software or using an “Import” function.
- Organize Your Clips: Arrange your clips in the order you want them to appear in your final video. You might find it helpful to create a rough timeline or storyboard to visualize the flow.
- Trim Clips: Once you have your clips in order, start trimming them to remove any unnecessary parts. Most software will have a razor tool or trim function. Focus on keeping the best moments!
- Add Transitions: To make your video flow smoothly, consider adding transitions between clips. These can be simple fades or more dynamic effects, depending on your style.
- Incorporate Audio: Don’t forget about sound! Layer in background music or voiceovers. Make sure to adjust the audio levels so they’re balanced with the video content.
- Finalize Your Edits: Review your video thoroughly. Look for any awkward cuts or distracting elements. Make necessary adjustments to timing, audio, and transitions to ensure a polished final product.
- Export Your Video: Once you’re satisfied, export your video. Choose the appropriate settings for YouTube, generally a 1080p resolution is ideal. Save your project in a location you can easily access!
And there you have it! With these steps, you’re well on your way to creating engaging, spliced video content for your YouTube channel. Happy editing!
Also Read This: Transferring Your YouTube Channel to a New Email
5. Tips for Enhancing Your Spliced Videos
Congratulations on taking the plunge into video splicing! Now that you’ve learned the basics, let’s explore some tips to take your videos from good to great. Enhancing your spliced videos can significantly impact viewer engagement and overall quality. Here are some strategies to consider:
- Add Background Music: Music sets the mood! Choose a track that complements your video’s theme. Websites like Bensound or Epidemic Sound offer great royalty-free options.
- Incorporate Text and Graphics: Use text overlays to emphasize key points or add subtitles for clarity. Tools like Canva or Adobe Spark can help you create eye-catching graphics.
- Utilize Transitions Wisely: Smooth transitions can enhance the flow of your video. Experiment with different types, but avoid overdoing it—too many can be distracting!
- Color Correction: Adjust the brightness, contrast, and saturation of your footage. A consistent color palette boosts professionalism. Software like DaVinci Resolve offers powerful color grading tools.
- Engage with Call-to-Actions (CTAs): Encourage viewers to like, comment, or subscribe by including CTAs at strategic points in your video. This can foster a community around your content.
By implementing these tips, you’ll not only enhance the aesthetic appeal of your videos but also keep your audience coming back for more. Remember, the goal is to create a compelling viewing experience that resonates with your target audience.
6. Common Mistakes to Avoid When Splicing
As a beginner, it’s easy to make a few missteps while splicing your videos. To help you sidestep some common pitfalls, here’s a list of mistakes to watch out for:
- Overloading with Effects: While it’s tempting to use all available effects, remember that less is often more. Using too many effects can confuse viewers and detract from your content.
- Ignoring Audio Quality: Poor audio can ruin an otherwise great video. Always check the sound levels and clarity—consider investing in a good microphone or using audio editing software to clean up your sound.
- Neglecting Your Story: Every video should tell a story. Avoid splicing to the point where the narrative is lost. Ensure your edits make sense and contribute to the storyline.
- Skipping the Editing Process: Rushing through the editing process can lead to missed errors and awkward cuts. Take your time to review your spliced footage and make necessary adjustments.
- Forgetting to Optimize for YouTube: Always consider YouTube’s best practices. This includes proper video titles, descriptions, and tags. Use keywords to make your videos more discoverable.
Avoiding these common mistakes will help you create polished, engaging videos that your audience will love. Remember, practice makes perfect, so keep experimenting and learning as you go!
 admin
admin


