When it comes to creating or editing images, one term that often pops up is "DPI" (dots per inch). This term is crucial when it comes to determining the quality and sharpness of an image, especially if you are looking to print it. Understanding the relationship between image resolution and DPI can help you make better decisions for various projects, from graphic design to photography. In this guide, we’ll explore the importance of DPI, how it affects
Understanding DPI and Its Impact on Image Quality

DPI stands for "dots per inch," and it measures how many individual dots of color a printer or screen can display within a given area, typically one inch. The higher the DPI, the more dots are packed into that inch, leading to sharper and clearer images. This concept is especially important for printing, as low DPI can make images appear blurry or pixelated.
Here’s how DPI impacts image quality:
- Higher DPI: More dots per inch mean more detail in the image, which results in a sharper and crisper print. Ideal for printing professional images like photographs and posters.
- Lower DPI: Fewer dots per inch result in a less detailed, blurry image, especially noticeable when printed large. Images may look pixelated when viewed up close.
Whether you're printing a photo or designing a brochure, adjusting the DPI can make all the difference in how the final product turns out. DPI settings should be adjusted based on the type of print and the size of the image you want to achieve.
Also Read This: How to Craft Stunning Rolled Paper Roses
Why 300 DPI Is the Standard for High-Quality Images
300 DPI is often referred to as the gold standard for high-quality prints. It’s the most commonly used DPI setting for professional printing because it provides excellent clarity and detail, making images appear sharp and well-defined even in large formats. At 300 DPI, images have enough information to avoid pixelation and maintain their integrity when printed in high resolution.
Here’s why 300 DPI is preferred:
- Clarity: A 300 DPI image contains enough data to produce crisp and clear prints, especially for images like photos, illustrations, and text-heavy designs.
- Professional Standard: Printers and printing companies commonly use 300 DPI because it meets industry standards for most professional printing tasks.
- Size Versatility: Images at 300 DPI are suitable for both small and large prints, providing flexibility for various media types such as brochures, posters, and books.
When in doubt, 300 DPI ensures your prints will look their best. Anything lower might result in noticeable quality loss when printed at large sizes. It's always safe to work with 300 DPI if you want your final image to look sharp, detailed, and professionally produced.
Also Read This: how to upload images on tiktok pc
How to Check the DPI of an Image
Before making any changes to your image, it's important to check its current DPI. Fortunately, it's easy to check the DPI of an image using different software tools. Knowing the DPI ensures that you are working with the right quality before printing or editing. Let’s look at how you can check an
Here’s how to check the DPI of an image:
- Using Photoshop: Open the image in Photoshop. Click on "Image" in the top menu, then select "Image Size." A window will pop up showing the DPI under "Resolution."
- Using GIMP: Open the image in GIMP. Go to "Image" in the menu, then click on "Scale Image." In the window, you will see the DPI under "X Resolution" and "Y Resolution."
- Using Windows: Right-click on the image file and select "Properties." Go to the "Details" tab, where you will see the DPI listed under the "Resolution" section (if available).
- Using macOS: Open the image in Preview. Go to "Tools" in the top menu, then select "Show Inspector" (or press Command-I). Under the "Info" tab, you will find the DPI listed.
Checking the DPI is simple, but it’s important to ensure the image is suitable for your needs, especially if you plan to print it at a large size. If it’s lower than 300 DPI, you may want to consider changing the resolution to maintain quality.
Also Read This: How to Cut Out an Image in Photoshop
Steps to Make an Image 300 DPI in Photoshop
Photoshop is one of the most powerful tools for editing images, and adjusting the DPI is a quick and easy process. If you have an image that’s lower than 300 DPI and need to increase it for high-quality prints, here’s how you can do it:
Follow these steps to change the DPI in Photoshop:
- Open the Image: Launch Photoshop and open the image you want to edit.
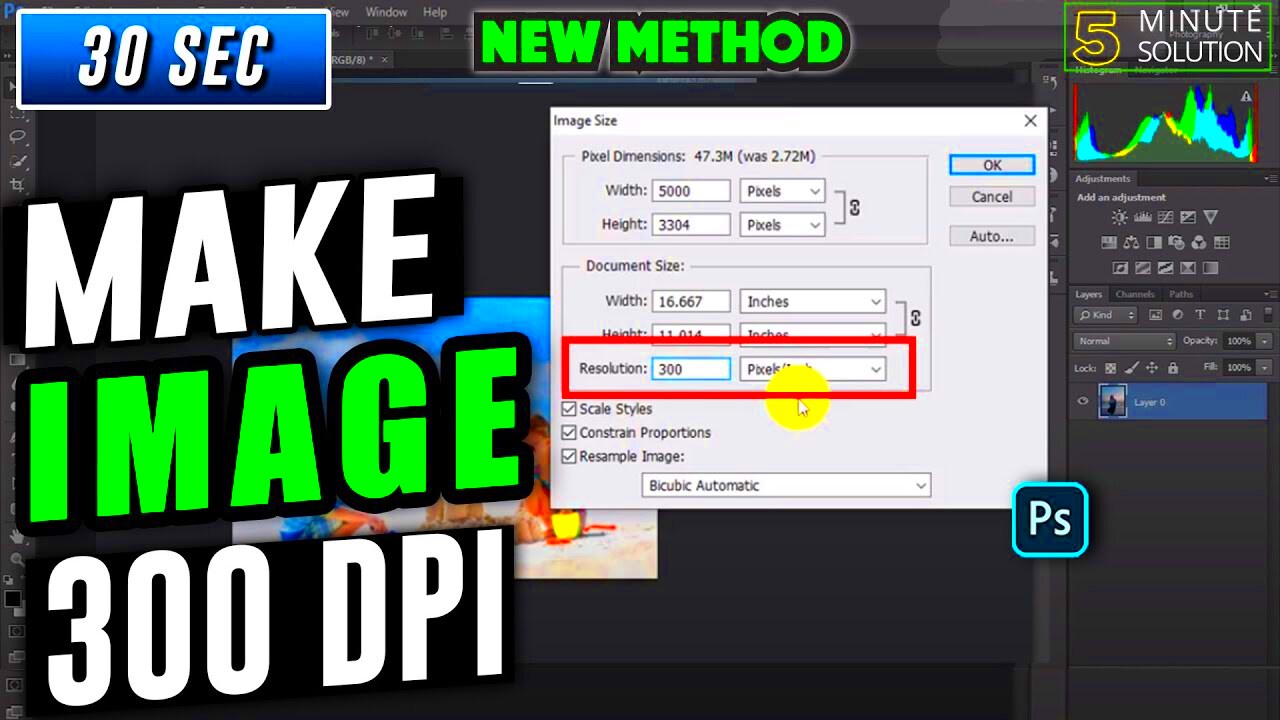
- Access Image Size: Click on "Image" in the top menu, then select "Image Size."
- Adjust the Resolution: In the Image Size window, look for the "Resolution" field. Enter "300" in the box. Make sure "Pixels/Inch" is selected.
- Resample Image (if needed): If you want to keep the image dimensions the same while increasing the DPI, make sure "Resample" is checked. You can select a resampling method like "Preserve Details" to avoid image distortion.
- Save the Image: Once you've set the DPI to 300, click "OK" to apply the changes. Save the image in your desired format.
By following these simple steps, you can increase the DPI of your image without compromising its quality too much. Remember, though, that increasing DPI on a very low-resolution image might result in some quality loss, so it’s always better to start with a higher resolution image if possible.
Also Read This: How to Record YouTube Videos Exploring Different Methods
Steps to Make an Image 300 DPI in GIMP
If you prefer free software, GIMP is a great alternative to Photoshop. While it may not be as feature-rich, it can still handle DPI adjustments for your images. Here’s how you can set an image to 300 DPI in GIMP:
Follow these steps to make an image 300 DPI in GIMP:
- Open the Image: Launch GIMP and open the image you wish to change.
- Access Image Scaling: In the top menu, click on "Image," then select "Scale Image."
- Set the Resolution: In the "Scale Image" window, find the "X Resolution" and "Y Resolution" fields. Change both to "300" to set the DPI to 300.
- Adjust Image Dimensions (if needed): If you want to increase the DPI without affecting the overall size of the image, uncheck "Lock Aspect Ratio" and adjust the width or height. This ensures the image won't become pixelated.
- Save the Image: After setting the resolution, click "Scale" to apply the changes. Then, save the image in your preferred file format.
GIMP makes it easy to adjust the DPI without having to worry about complicated settings. Just keep in mind that if you increase the DPI too much on an image with a low resolution, you may still see some quality loss.
Also Read This: When Did Storyblocks Launch Enterprise Unlimited for Business Clients
Tips for Maintaining Image Quality When Changing DPI
Changing the DPI of an image can be tricky, especially if you're aiming to keep the quality intact. Increasing the DPI can lead to a loss of sharpness, while decreasing it might cause pixelation. Here are some tips to help you maintain the best possible quality when adjusting the DPI of your image:
- Start with High-Resolution Images: It’s always easier to adjust the DPI of a high-resolution image. Starting with an image that has plenty of detail will help you retain quality even if you change its DPI.
- Resample Carefully: If you need to resample your image to fit a new DPI, choose the "Preserve Details" resampling method in Photoshop or GIMP. This option helps maintain sharpness while adjusting resolution.
- Avoid Excessive Enlargement: Increasing DPI on a small image can cause blurriness. Try to avoid enlarging the image too much. If you need a larger image, it’s better to start with a larger file with higher resolution.
- Check for Noise and Artifacts: When increasing DPI, the image might introduce unwanted noise or artifacts. Zoom in and inspect the image carefully for any irregularities or pixelation and adjust as necessary.
- Use Vector Formats for Logos or Graphics: If you're working with graphics like logos or illustrations, it's better to use vector formats (such as SVG or EPS). These files are resolution-independent and won’t lose quality when resized.
By following these tips, you can better manage your images and ensure that they remain sharp and detailed, even when making changes to the DPI.
Also Read This: How to Add Photos to Your Board in iStock
Frequently Asked Questions
Here are some of the most common questions about DPI adjustments, along with their answers, to help you better understand the process:
- What happens if I increase the DPI of a low-resolution image?
When you increase the DPI of a low-resolution image, you’re essentially stretching the existing pixels. While this increases the pixel density, it doesn't add any new detail. As a result, the image might look blurry or pixelated. - Can I decrease the DPI of an image without losing quality?
Yes, you can decrease the DPI without much loss in quality, especially if the image is meant for online use. However, if you plan to print it, lower DPI may result in poor print quality. - How do I know if my image is high enough quality for printing?
For most high-quality prints, aim for a DPI of 300. If the DPI is lower, the image may appear pixelated or blurry when printed at larger sizes. To check, you can use Photoshop or GIMP to see the image’s DPI. - Can I increase the DPI of an image in any software?
Yes, you can increase the DPI in many image editing programs like Photoshop, GIMP, or even some online tools. However, always be cautious when increasing the DPI of an image, as it may degrade quality if the resolution is too low.
Conclusion: Achieving High-Quality Images with 300 DPI
Achieving a high-quality image starts with understanding the importance of DPI and how it affects the sharpness and clarity of prints. By setting the DPI to 300, you ensure that your images are crisp and well-defined, perfect for professional-quality printing. Whether you’re working in Photoshop, GIMP, or another editing tool, adjusting the DPI is a simple process that can significantly improve the results of your print projects.
Remember, the key to maintaining quality is starting with a high-resolution image and being mindful of resampling techniques. If you need to print your image at a large size, always ensure it has sufficient DPI (300 is the ideal standard for most print projects). By following the tips and techniques outlined here, you can confidently produce high-quality images that look sharp, detailed, and professional.

 admin
admin


