Are you looking to submit your stunning JPG images to Adobe Stock? You've come to the right place! In this guide, we’ll walk you through the essential steps to successfully save your JPGs for submission, ensuring they meet Adobe Stock's standards. Whether you're a seasoned photographer or just starting, understanding the requirements will help you increase your chances of getting your images accepted, boosting your portfolio and income along the way.
Understanding Adobe Stock Requirements

Before diving into the technical details of saving your JPG files, it's crucial to understand Adobe Stock’s submission requirements. The quality of your images plays a significant role in how they will be received, so let’s break down the key factors you need to keep in mind:
- File Format: Images must be saved in JPG format. This widely-used format offers the right balance between image quality and file size, making it perfect for stock submission.
- Image Size: Adobe Stock requires images to have a minimum size of 4 MP (megapixels). Ideally, larger sizes will enhance your chances of acceptance as they provide better resolution for potential buyers.
- Color Mode: Always save your images in RGB color mode. This mode is best suited for online use and ensures that your images display vividly across various devices.
- File Naming: When naming your files, opt for descriptive names that reflect the content of the image. Avoid using generic names such as "IMG_1234.jpg."
- Metadata: Including relevant keywords and descriptions can improve the visibility of your images within the Adobe Stock marketplace.
By familiarizing yourself with these requirements, you'll be well on your way to preparing your JPGs for a successful submission to Adobe Stock. Make sure to follow these guidelines closely to maximize your chances of getting your work featured!
Also Read This: 5 Ways to Use Social Media to Showcase Your Photography Portfolio
Preparing Your JPG Images
The preparation of your JPG images is a crucial step in ensuring they meet Adobe Stock's quality and technical requirements. By spending time on this phase, you can significantly enhance your chances of acceptance on the platform. Here are some tips to prepare your images effectively:
- Resolution Matters: Make sure your images are at least 4 MP in size. Ideally, shoot for higher resolutions, as this helps maintain quality when viewed at larger sizes.
- Image Quality: Always shoot in RAW format if possible, as this retains more detail. When converting to JPG, choose a high-quality setting to minimize compression artifacts.
- Editing and Retouching: Use software like Adobe Photoshop or Lightroom to edit your images. Ensure you adjust color balance, contrast, and sharpness. Remember to keep it natural; overly edited images may be rejected.
- Check for Noise: Use noise reduction tools if necessary. Noisy images can decrease visual appeal and affect acceptance rates.
- Crop and Compose: Consider the crop and composition of your image. Adobe Stock prefers images that are well-composed and fill the frame effectively.
- Embargo and Watermarks: Ensure your images are free of watermarks or distractions, as these reduce professionalism and may lead to rejection.
Once you’ve followed these steps, you’ll have a collection of high-quality JPG images ready for submission to Adobe Stock!
Also Read This: How to Upload Public Videos on Dailymotion Safely and Effectively
Saving JPG Files in Adobe Software
Saving your images as JPG files within Adobe software is generally a straightforward process, but there are a few best practices you should keep in mind to ensure optimal results. Here’s how to do it:
- Open Your Image: Start by opening your photo in Adobe Photoshop or any other Adobe software. Make sure it's the final version you plan to save.
- Select “Save As”: Navigate to the top menu and click on File > Save As. This will allow you to create a new file rather than overwriting your original file.
- Choose JPG Format: In the format dropdown menu, select JPEG (or JPG). This option compresses your image while maintaining quality.
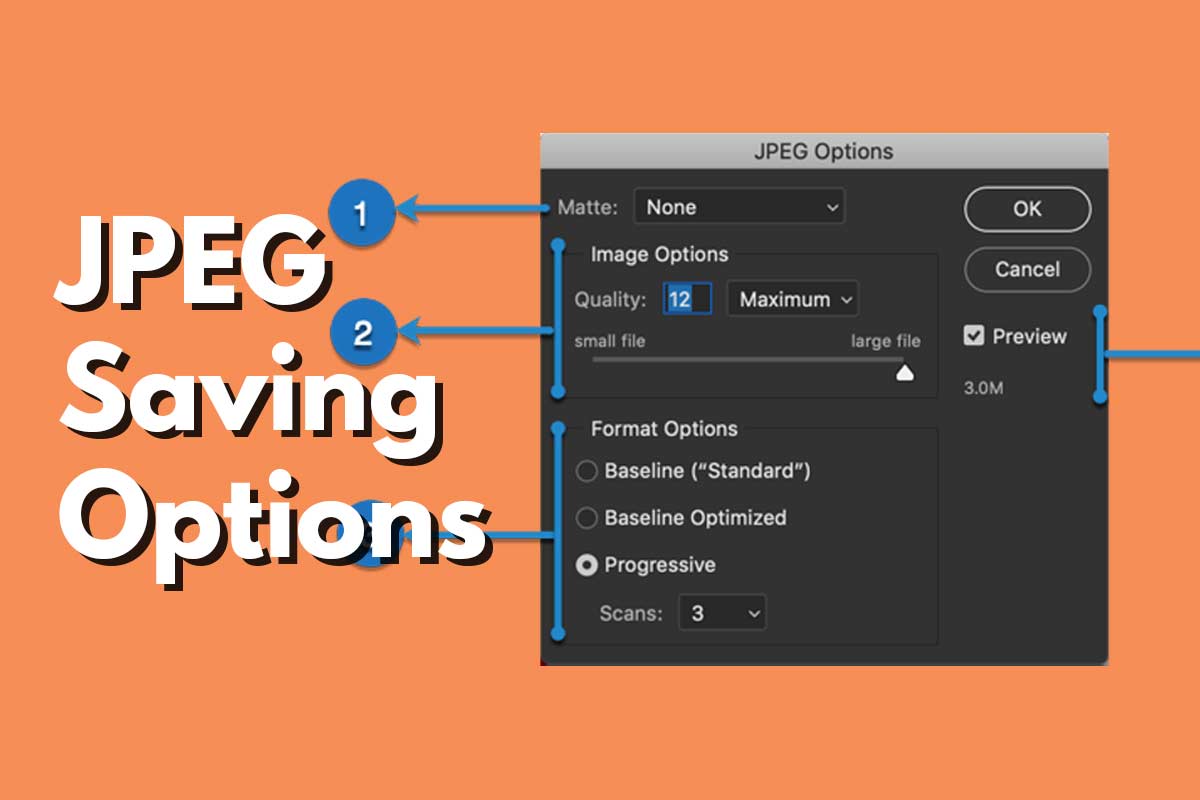
- Adjust Quality Settings: A dialog box will appear where you can set the quality. It’s typically best to choose high or maximum quality (around 10-12). This helps ensure good visual fidelity.
- File Naming: Give your file a clear and descriptive name. This will help you easily locate your images later.
- Metadata Entry: If prompted, add any relevant metadata, including keywords and description. This enhances searchability on Adobe Stock.
By following these steps, you’ll create JPG files that are ready for upload, ensuring you meet Adobe Stock's standards!
Also Read This: Sharing Your Favorite YouTube Clips on Instagram
5. Testing Your JPG Files
Before you submit your JPG files to Adobe Stock, it’s crucial to ensure they meet all the necessary requirements. Testing your files is like giving them a final check-up to confirm they’re ready for the big leagues. Here’s how you can go about it:
- Resolution Check: Make sure your images are high quality. Adobe Stock prefers images to be at least 4MP. Use a tool like Photoshop or any image viewer to check the resolution.
- Color Profile: Ensure your JPGs are saved with the sRGB color profile. This helps maintain color consistency across different devices and platforms. Most image editing software allows you to specify the color profile when saving.
- File Size Limits: Adobe Stock has a file size limit of 100 MB for images. Keep an eye on your file size and make adjustments if necessary, perhaps by compressing the image using software like TinyPNG or similar.
- Noise and Artifacts: Look out for noise or unwanted artifacts in your JPG. Use image editing software to remove any blemishes or distractions that could detract from the quality of your image.
- Test Upload: Some users find it helpful to do a test upload to see if the system accepts their file without any issues. This gives you a heads-up about any potential problems.
By taking these steps, you can confidently ensure your JPG files will stand out and comply with Adobe Stock’s submission guidelines!
Also Read This: How to Add Music to Your YouTube Video
6. Submitting Your JPG Images to Adobe Stock
Now that you’ve put your JPG files through the testing process, it’s time to submit them to Adobe Stock! This stage might feel a bit intimidating, but I promise it’s a straightforward process. Here’s how to go about it:
- Create An Adobe Account: If you don’t already have an account, go ahead and sign up for one on the Adobe Stock website. It’s down-to-earth and only takes a few minutes!
- Log In: Head over to the Adobe Stock Contributor portal and log in with your newly created or existing account.
- Upload Your Images: Click on the upload option, which is usually quite visible. You can drag and drop your JPG files or select them manually. You can upload multiple images at once, saving you precious time!
- Add Metadata: Once uploaded, you must fill in the metadata for your images. This includes comments, title, and keywords that help others find your work. Be descriptive and think about words people might use to search for your images!
- Review Your Submission: Before hitting that submit button, take a moment to review everything. Make sure your files are labeled correctly and that all metadata is accurate.
- Submit! Finally, click submit and wait for the approval process. This usually takes a few days, and then you’ll be ready to earn from your creativity!
And there you go! It’s as simple as that. With a little patience at this stage, you’ll soon see your beautiful JPG images making their way to potential buyers on Adobe Stock!
Also Read This: Teams Title Tweak: Renaming in Microsoft Teams during a Meeting
How to Save JPG for Adobe Stock
Submitting your images to Adobe Stock requires careful attention to detail, especially when it comes to saving your JPG files. Here's a step-by-step guide to ensure that your images meet Adobe's specifications and maintain high quality.
1. Understanding Adobe Stock Requirements
Before saving your JPG images, it's essential to understand the basic requirements set by Adobe Stock:
- Minimum Dimensions: 4 MP (minimum side of 2000 pixels)
- File Format: JPG, minimum quality set to 10 in Adobe Photoshop or equivalent software
- Color Space: sRGB
- Compression: Minimal compression to avoid loss of quality
2. Preparing Your Image
Make sure to edit your image according to industry standards before saving:
- Use Adobe Photoshop or Lightroom for editing.
- Ensure the image is clear, focused, and free of noise.
- Adjust brightness, contrast, and saturation to achieve the best visual impact.
3. Saving Your Image as a JPG
Follow these steps to save your file correctly:
- Go to File > Save As.
- Select JPEG from the format dropdown menu.
- In the JPEG Options dialog box, set the Quality to 10 (or maximum quality).
- Ensure sRGB is selected in the color profile settings.
- Click OK to save your image.
4. Final Verification
Before uploading, verify the file by checking:
- File size (should not exceed Adobe Stock’s limits).
- Dimensions and resolution.
- Color profile and quality settings.
By following these guidelines, you'll ensure that your JPG images are ready for submission to Adobe Stock and stand the best chance of being accepted. Always check for updates on Adobe's submission guidelines, as they may change over time.
Conclusion
Saving JPGs for Adobe Stock is a straightforward process when you follow the proper guidelines and specifications—ensuring that your images meet the required quality standards will enhance your chances of acceptance and success.
 admin
admin


