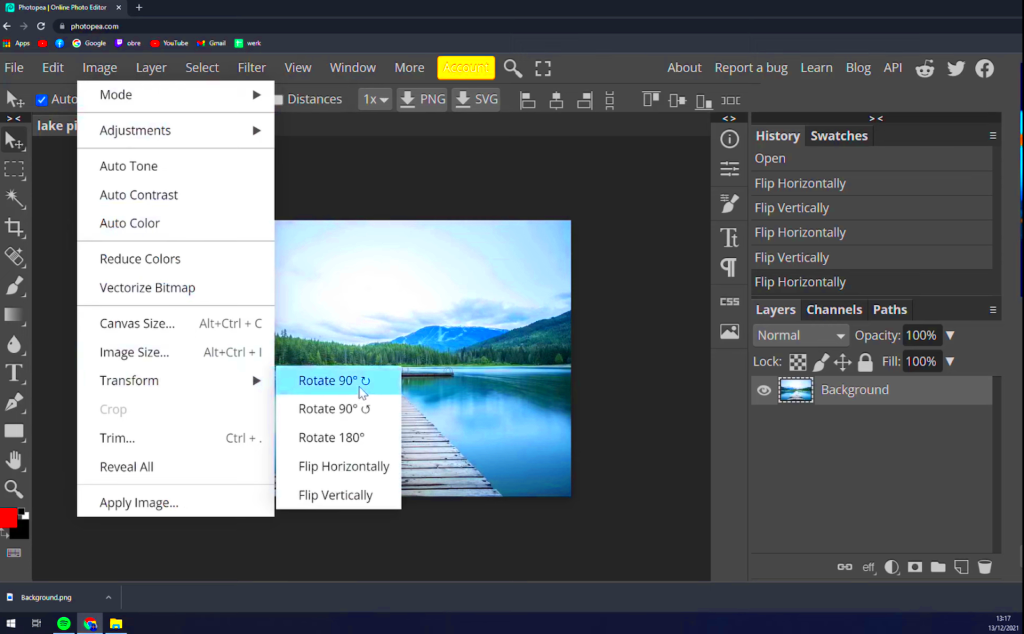
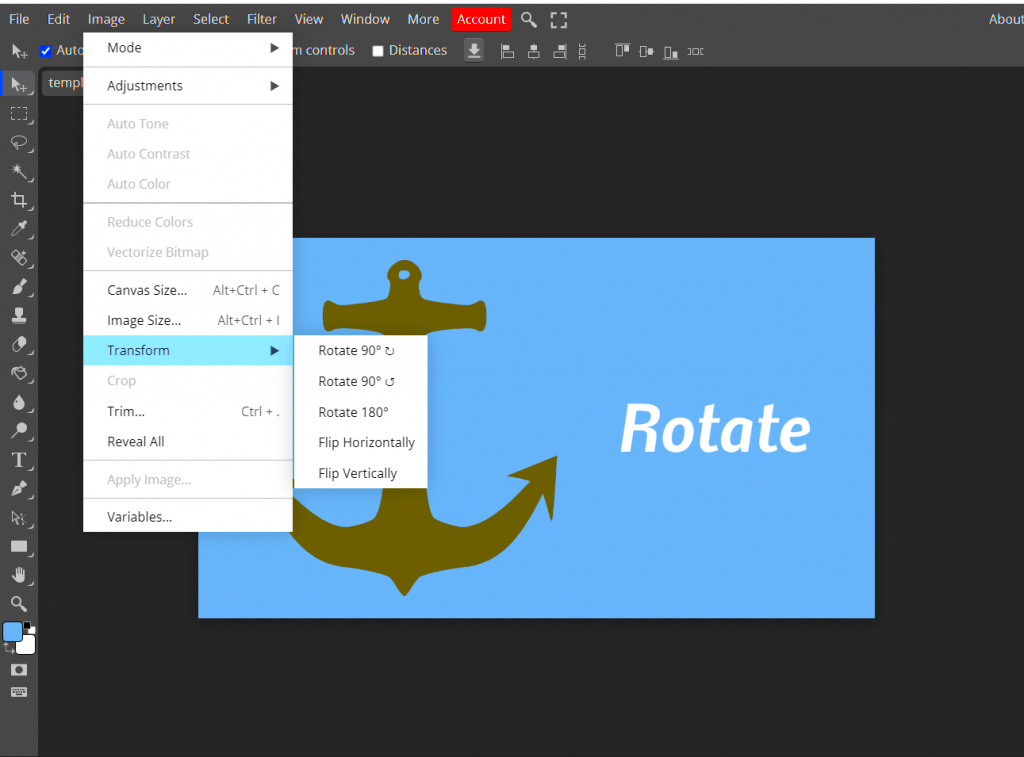
Rotating images is one of the most basic yet essential editing tasks in Photopea. Whether you're adjusting the orientation of a photo or creating a unique design element, knowing how to rotate images correctly can make a big difference. Photopea is a powerful online tool that offers a wide range of features, including an easy way to rotate images. In this section, we'll walk you through the reasons you might need to rotate images and guide you on how to do it effectively.
Why You Might Need to Rotate Images

There are several scenarios in which rotating an image comes in handy. Here are a few reasons you may need to rotate an image while editing:
- Correcting Orientation: Sometimes, images are uploaded or taken at the wrong angle, and rotating them helps adjust them to the correct view.
- Creative Adjustments: Rotating an image can help achieve a more artistic or dynamic look, such as aligning elements in a way that enhances the composition.
- Fixing Perspective: If your image has a slight tilt due to the camera angle, rotating it can help fix the perspective and make the subject appear straight.
- Preparing for Design Projects: In design, rotating images can help with alignment, creating symmetry, or ensuring the design elements fit within the layout.
Rotating an image might seem like a small change, but it can have a huge impact on the final result. Whether you're a photographer, graphic designer, or hobbyist, understanding how to rotate your images effectively is an essential skill.
Also Read This: How to Sell Photos to Getty Images and Showcase Your Work
Steps to Rotate an Image in Photopea

Rotating an image in Photopea is quick and simple. Follow these easy steps to rotate your image to the desired angle:
- Open Your Image: First, launch Photopea and upload your image by going to File > Open and selecting your file.
- Select the Image Layer: Make sure the correct layer is selected in the Layers panel. If your image has multiple layers, ensure you're rotating the right one.
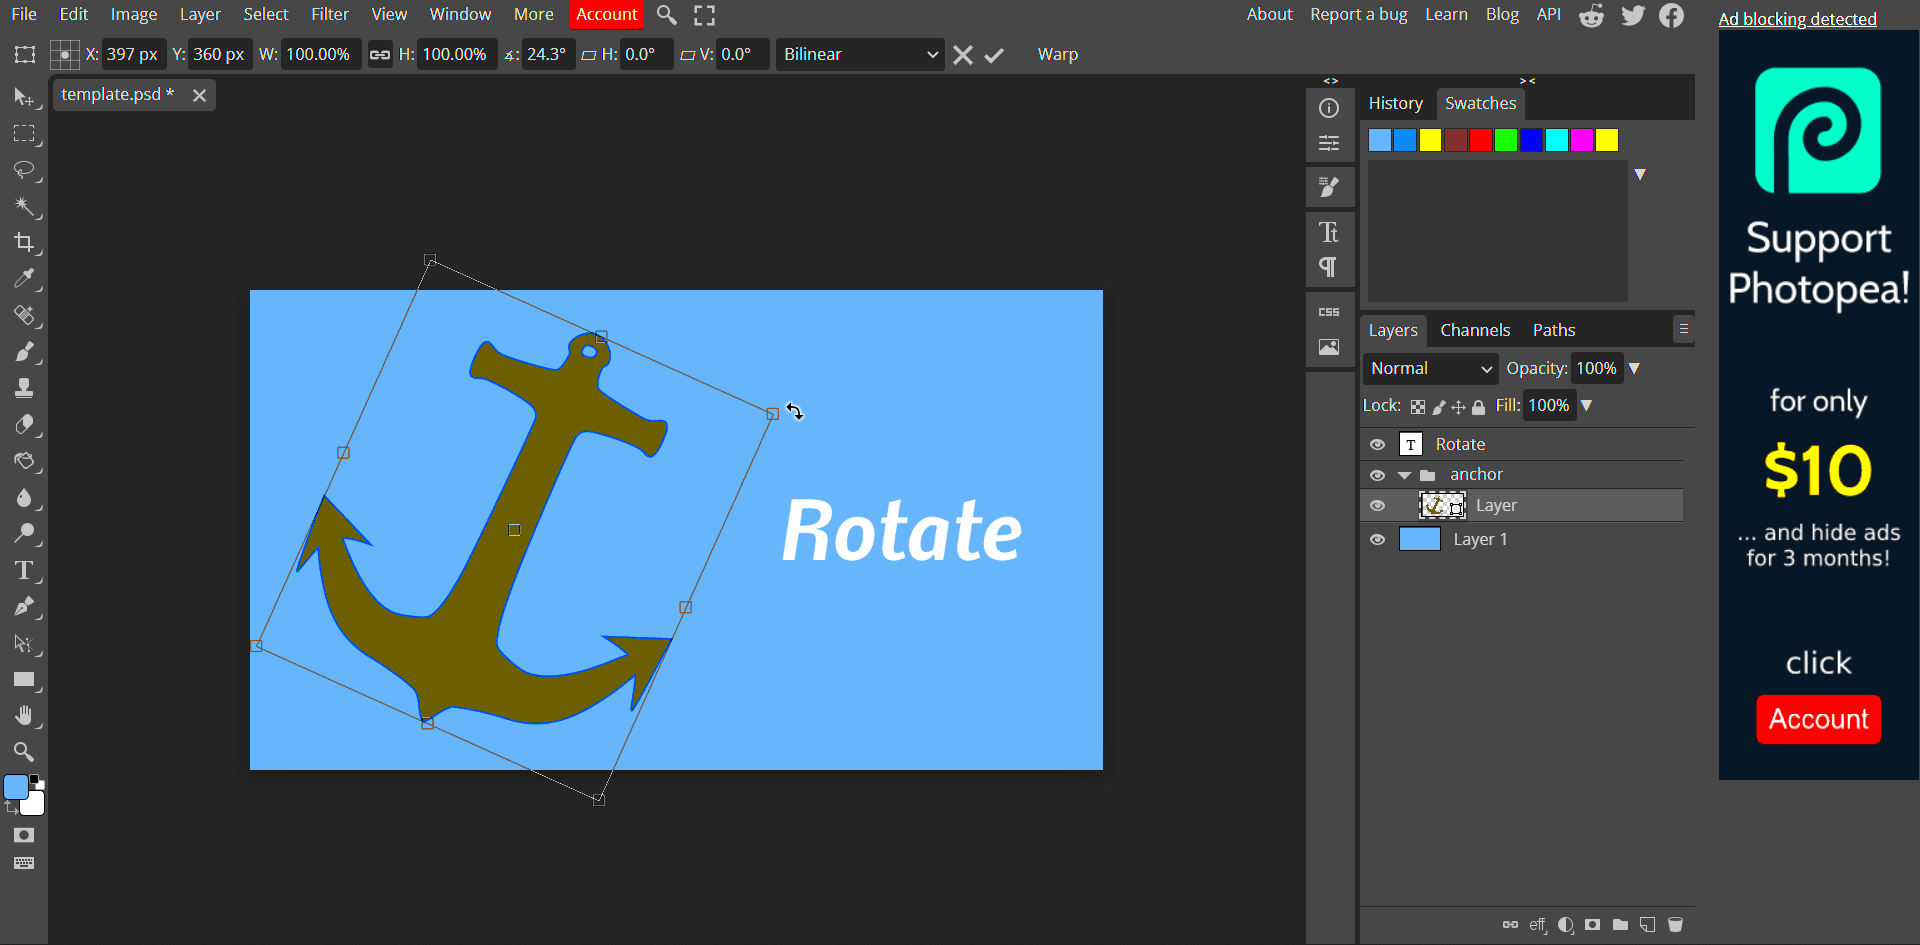
- Choose the Transform Tool: Press Ctrl+T (or Cmd+T on Mac) to activate the transform tool. This tool allows you to rotate and resize your image freely.
- Rotate the Image: Hover your cursor near the corner of the image until you see a curved arrow. Click and drag to rotate the image to your desired angle. You can also hold down the Shift key to rotate in 15-degree increments for more precise control.
- Apply the Rotation: Once you're satisfied with the rotation, press Enter to apply the changes.
- Save Your Image: To keep your rotated image, save it by going to File > Export As and selecting your preferred file format.
That's it! Rotating an image in Photopea is that easy. Whether you're rotating a single photo or working with multiple layers, the process is straightforward, and you'll be able to make quick adjustments to your images.
Also Read This: How to Remove the Alamy Watermark with Photoshop: A Step-by-Step Tutorial
Using the Transform Tool to Rotate Images

The Transform tool in Photopea is an incredibly useful feature for rotating images with precision. It gives you complete control over how your image is adjusted, allowing you to rotate, resize, and skew images all in one place. When you use the Transform tool to rotate an image, you can manually adjust the angle or rotate the
- Activate the Transform Tool: Select your image layer, then press Ctrl+T (or Cmd+T on Mac). This brings up a bounding box around your image with handles at each corner.
- Rotate Using the Mouse: Move your cursor near a corner of the bounding box. Once the cursor changes to a curved arrow, click and drag to rotate the image freely. If you want more control, hold down the Shift key to rotate in 15-degree increments.
- Manual Angle Input: For precise rotation, you can also rotate the image by entering the exact angle. In the top menu, you'll find a field labeled "Angle." Simply type in the number of degrees you want to rotate the image.
- Apply the Transformation: Once you’re satisfied with the rotation, press Enter (or Return on Mac) to apply the changes and exit the Transform mode.
The Transform tool is a versatile way to rotate images, giving you both the flexibility of freeform rotation and the accuracy of precise angle adjustments. Whether you need to rotate an image slightly or rotate it by a large degree, this tool makes it easy and fast.
Also Read This: How to Depixelate an Image
Adjusting Image Rotation Using Keyboard Shortcuts
Using keyboard shortcuts in Photopea can make your editing process much faster, especially when it comes to rotating images. Instead of manually selecting tools from the menu, keyboard shortcuts let you make quick adjustments without interrupting your workflow. Here are some essential shortcuts for rotating images:
- Ctrl+T (Cmd+T on Mac): This shortcut activates the Transform tool, allowing you to rotate the image instantly. Once activated, you can rotate the image using the mouse or the Angle input in the options bar.
- Shift+Arrow Keys: After activating the Transform tool, you can use the arrow keys on your keyboard to rotate the image by small increments. Holding down Shift while pressing the arrow keys rotates the image in larger, more noticeable steps.
- Ctrl+Alt+Z (Cmd+Option+Z on Mac): If you've rotated the image too much or want to undo the last action, this shortcut will step back through your previous actions, including rotation.
- Ctrl+Shift+I (Cmd+Shift+I on Mac): This shortcut inverts your image horizontally, which might also be useful when working with rotated images in some cases.
By memorizing these simple keyboard shortcuts, you can rotate your images much more efficiently. It's a great way to boost productivity and make your editing process smoother, especially if you're working on multiple images or need to make quick changes.
Also Read This: How to Save Images from TikTok
Rotating Multiple Layers in Photopea
When working with more than one image layer in Photopea, you might need to rotate them all at once to maintain consistency in your design. Fortunately, Photopea makes it easy to rotate multiple layers simultaneously, ensuring that your images stay aligned and proportional. Here's how you can rotate multiple layers in one go:
- Select All Layers: To start, open the Layers panel. Hold down the Shift key and click on each layer you want to rotate. This will allow you to select multiple layers at once. If the layers are next to each other, you can also click on the first and last layer while holding Shift to select them all in between.
- Activate the Transform Tool: Once all the layers are selected, press Ctrl+T (or Cmd+T on Mac) to activate the Transform tool. You’ll notice that all selected layers are now surrounded by bounding boxes.
- Rotate the Layers: With multiple layers selected, you can rotate them together. Click and drag near the corners of the bounding boxes to rotate them. You can also input a precise angle in the "Angle" field at the top for more accuracy.
- Apply the Rotation: After rotating the layers, press Enter (or Return on Mac) to apply the changes. All selected layers will rotate simultaneously, keeping their alignment intact.
Rotating multiple layers is incredibly helpful when you're working on complex designs that require uniformity in layout. Whether you're arranging images, text, or shapes, rotating layers together ensures that everything looks cohesive and well-organized.
Also Read This: Can You Remove and Reupload a YouTube Video Without Losing Views
Best Practices for Image Rotation
When rotating images in Photopea, it’s important to follow some best practices to ensure you don’t lose image quality or make unwanted distortions. Rotating an image might seem simple, but there are a few things you should keep in mind to get the best results. By following these guidelines, you can maintain clarity and precision in your work:
- Use the Transform Tool for Precision: Always use the Transform tool (Ctrl+T or Cmd+T) for accurate rotations. This tool lets you control the rotation angle exactly and prevents accidental distortions.
- Rotate in Increments: To avoid skewing your image, rotate in small increments. Holding down the Shift key while rotating locks the rotation to 15-degree steps, which can help maintain a natural look.
- Check the Resolution: Rotating an image too much can cause pixelation or blurriness, especially if it’s a low-resolution image. Ensure that the image resolution is high enough for your editing tasks to avoid quality loss.
- Maintain Aspect Ratio: If you need to rotate an image and also resize it, make sure to hold the Shift key while resizing to maintain the original aspect ratio. This prevents unwanted stretching.
- Avoid Over-Rotating: Rotating images more than necessary can lead to distortion or cropping. Try to rotate images to only the necessary angle to preserve their visual integrity.
By following these best practices, you’ll ensure that your images stay crisp and professional after rotation, without losing important details or compositional balance.
Also Read This: Follow This Fast and Easy Way on How to Upload Video on 9GAG
How to Save Rotated Images in Photopea
After making adjustments and rotating your image in Photopea, saving it in the right format is crucial to ensure you can use it for your intended purpose. Fortunately, Photopea makes it easy to save your rotated images in several file formats. Here's how to save your work:
- Complete Your Edits: Make sure that you're satisfied with your rotated image and any other adjustments you’ve made. You can always go back and adjust further if needed.
- Choose the Right File Format: Once you’re happy with the image, it’s time to save it. To do this, go to File > Export As and choose the appropriate file format for your needs. Here are some common options:
- Adjust Settings: For some formats like PNG and JPEG, you can choose the quality settings before saving. Higher quality means a larger file size, so consider the balance between quality and size.
- Save the File: Once you’ve selected the format and adjusted the settings, click the Save button. Your image will be downloaded to your computer, ready to be used for web, print, or further design work.
| File Format | Best For |
|---|---|
| PNG | High-quality images with transparency |
| JPEG | Photographs or images with smooth color transitions |
| GIF | Simple images with a small file size or animations |
| PSD | Saving your project for future editing with all layers intact |
Saving your rotated images in the right format ensures they’re optimized for their intended use, whether it's for social media, web design, or high-quality print materials.
Also Read This: Complete Guide to Downloading Telegram Videos on iPhone
FAQ
Here are answers to some common questions about rotating images in Photopea. These tips will help you troubleshoot any issues and get the most out of the image rotation process:
- Can I rotate an image without distorting it? Yes, by using the Transform tool (Ctrl+T or Cmd+T), you can rotate an image without distortion. Be sure to rotate in small increments and avoid over-rotating.
- Why does my image look blurry after rotation? Blurriness can occur if you rotate a low-resolution image too much. To prevent this, use high-resolution images and avoid excessive rotation.
- How do I rotate multiple layers at once? To rotate multiple layers, select all the layers you want to rotate by holding down Shift and clicking each layer in the Layers panel. Then, use the Transform tool to rotate all selected layers simultaneously.
- Can I rotate my image in increments of 90 degrees? Yes, you can easily rotate images by 90-degree increments by using the Ctrl+Shift+T (or Cmd+Shift+T) shortcut, which rotates the image in fixed angles.
- How do I undo a rotation? If you’ve made a mistake while rotating an image, simply press Ctrl+Z (or Cmd+Z) to undo the action and return to the previous state of the image.
If you encounter any issues not addressed here, Photopea’s online community or tutorials can provide additional support to help you troubleshoot and improve your image editing skills.
Conclusion
Rotating images in Photopea is a simple yet essential skill for any digital editor. Whether you’re fixing orientation issues, creating artistic effects, or working on complex design projects, knowing how to rotate your images correctly will help you achieve better results. By following the steps and best practices outlined in this guide, you can rotate images with precision and confidence. Remember to use tools like the Transform feature, keyboard shortcuts, and layer selections to rotate images efficiently without compromising quality. By mastering these techniques, you’ll be able to enhance your workflow and produce more professional results in your editing tasks.


