Introduction
Welcome to our step-by-step tutorial on how to remove the Alamy watermark using Adobe Photoshop. If you're a photographer or content creator who has come across the need to edit images downloaded from Alamy, you'll find this guide invaluable. Alamy is a popular stock photo agency known for its high-quality images, but sometimes you may require watermark-free versions for your projects or personal use.
In this tutorial, we'll walk you through the process of removing the Alamy watermark, ensuring that your final image looks professional and polished. We'll cover all the essential steps, including setting up Photoshop, using the Clone Stamp Tool effectively, and fine-tuning the image to achieve the best results.
Before we get started, make sure you have the necessary tools ready, including a copy of Photoshop, the image with the Alamy watermark, and some basic Photoshop skills. Let's dive in and learn how to make those watermark-related edits with ease!
Also Read This: Chatting 101: Initiating Live Conversations on AliExpress
What You'll Need
Before we begin the process of removing the Alamy watermark in Photoshop, it's essential to gather the necessary tools and resources. Here's a checklist of what you'll need:
- Photoshop Software: To follow this tutorial, you must have Adobe Photoshop installed on your computer. If you don't have it, you can subscribe to Adobe Creative Cloud or use a free trial version.
- Image with Alamy Watermark: Select the image from Alamy that you want to edit. Ensure that you have a high-resolution version of the image with the watermark you wish to remove.
- Basic Photoshop Skills: While this tutorial is designed to be beginner-friendly, having some basic knowledge of Photoshop will be advantageous. Familiarize yourself with tools like the Clone Stamp Tool, Layers, and the Toolbar.
Let's go into a bit more detail about these prerequisites:
| Tool/Resource | Description |
|---|---|
| Photoshop Software | Adobe Photoshop is an industry-standard image editing software. It provides a wide range of tools and features for professional image manipulation. |
| Image with Alamy Watermark | Choose the image from Alamy that you want to work on. Ensure that the image is saved on your computer or accessible for editing. |
| Basic Photoshop Skills | Having a fundamental understanding of Photoshop is helpful. You should know how to open and save files, create and manage layers, and use essential tools. |
Before proceeding, make sure you have Adobe Photoshop installed and the image with the Alamy watermark ready for editing. If you're new to Photoshop, consider exploring some basic tutorials to get comfortable with the software's interface and functionality.
Now that you have everything in place, let's move on to the step-by-step process of removing the Alamy watermark from your image.
Also Read This: The Pros and Cons of Shooting in RAW vs. JPEG
Step 1: Launch Photoshop
Before we begin the process of removing the Alamy watermark from your image, you'll need to open Adobe Photoshop on your computer. Here are the steps to launch Photoshop:
- Locate the Photoshop Icon: Look for the Adobe Photoshop icon on your desktop or in your computer's applications folder. It typically has a blue "Ps" icon.
- Double-Click to Open: Once you've found the Photoshop icon, double-click it to launch the software.
- Wait for Initialization: Photoshop may take a moment to initialize, especially if it's the first time you're opening it or if you're working with a large image file.
Once Photoshop is fully loaded, you'll be ready to move on to the next steps in our watermark removal process. If you encounter any issues while launching Photoshop, make sure you have a valid Adobe Creative Cloud subscription or that your trial version is active.
If you don't have Photoshop installed, you can download a free trial from the Adobe website. Keep in mind that Adobe offers regular updates and new versions of Photoshop, so make sure you're using a recent version for the best experience and access to the latest features.
With Photoshop up and running, you're one step closer to removing the Alamy watermark and enhancing your images. In the following steps, we'll guide you through the process of opening your image and preparing it for watermark removal.
Also Read This: Adobe Stock Alternatives: Exploring Other Stock Photography Platforms
Step 2: Open Your Image
Now that you've successfully launched Adobe Photoshop, it's time to open the image containing the Alamy watermark that you want to edit. Follow these steps to open your image:
- Click on "File": In the top-left corner of the Photoshop interface, you'll find the "File" menu. Click on it to reveal a dropdown menu.
- Select "Open": From the "File" menu, choose "Open." This action will open a standard file dialog box.
- Navigate to Your Image: In the file dialog box, navigate to the location where you have saved the image with the Alamy watermark. Select the image file and click "Open" or "OK."
Your selected image will now appear in the Photoshop workspace, ready for editing. It's essential to ensure that you're working with a high-resolution version of the image to maintain image quality after watermark removal.
If your image is in a format that Photoshop supports (common formats include JPEG, PNG, TIFF, and PSD), you should have no trouble opening it. Once your image is loaded into Photoshop, it will be displayed as a new project with its own tab at the top of the workspace.
Before moving on to the next steps, take a moment to examine your image and confirm that it's the correct one. It's always a good practice to save a copy of your original image in case you need to revert to it later.
With your image successfully opened in Photoshop, you're now ready to proceed to the next steps, where we'll explore how to duplicate the image layer and prepare it for watermark removal.
Also Read This: View Velocity: Strategies for Getting More Views on eBay
Step 3: Duplicate the Layer
Now that you have your image loaded into Adobe Photoshop, it's crucial to duplicate the image layer before attempting to remove the Alamy watermark. Duplicating the layer ensures that you have a backup of the original image, which is essential for preserving your work. Here's how to duplicate the layer:
- Locate the Layers Panel: To the right of your workspace, you'll find the Layers panel. It displays a list of layers that make up your image.
- Select the Image Layer: In the Layers panel, locate and select the layer that represents your image. It's usually named "Background" or "Layer 1," depending on your project.
- Right-Click or Use the Menu: Once the image layer is selected, you can either right-click on it or use the top menu to access the layer options.
- Choose "Duplicate Layer": In the menu that appears, select the option labeled "Duplicate Layer." This action will open a dialog box for duplicating the layer.
- Assign a Name: In the duplicate layer dialog box, you can assign a name to the new layer if you wish. This step is optional but can be helpful for organization.
- Click "OK": After naming (or not), click the "OK" button. Photoshop will create a duplicate layer of your image.
By duplicating the layer, you create a safety net for your editing process. If you make a mistake while removing the watermark or wish to compare the edited image to the original, you can always refer back to the duplicated layer without affecting the original image.
The duplicated layer will appear in the Layers panel, usually above or below the original image layer. You can hide or show this duplicated layer by clicking the eye icon next to it in the Layers panel.
With the image layer duplicated and ready for editing, you're well-prepared for the next steps in our watermark removal tutorial. In the upcoming steps, we'll explore how to use the Clone Stamp Tool to effectively remove the Alamy watermark from your image.
Also Read This: How to Download Adobe Stock Videos Without Watermark in 2023
Step 4: Select the Clone Stamp Tool
The Clone Stamp Tool is a powerful feature in Adobe Photoshop that allows you to copy pixels from one part of an image and apply them to another area. It's the key tool you'll use to remove the Alamy watermark. Here's how to select the Clone Stamp Tool:
- Access the Toolbar: The Toolbar is usually on the left side of your Photoshop workspace, displaying various tools for image editing.
- Locate the Clone Stamp Tool Icon: Look for the icon that resembles a rubber stamp. This is the Clone Stamp Tool.
- Select the Clone Stamp Tool: Click on the Clone Stamp Tool icon to select it. You'll notice that your cursor changes to a crosshair, indicating that the Clone Stamp Tool is active.
The Clone Stamp Tool is versatile and widely used for retouching and editing images. It allows you to sample pixels from one area of your image and paint them over another area, effectively "cloning" one part of the image onto another. In the context of removing a watermark, you'll use it to replace the watermarked area with pixels from a nearby, watermark-free region.
Before you move on to using the Clone Stamp Tool, it's essential to configure its settings to achieve the best results. You can adjust parameters like the brush size, opacity, and hardness to match the specific characteristics of the Alamy watermark and your image.
The Clone Stamp Tool can be a bit tricky to master, but with practice and attention to detail, you'll be able to seamlessly remove the watermark while maintaining the overall quality of your image. In the upcoming steps, we'll guide you through the process of using the Clone Stamp Tool effectively to eliminate the Alamy watermark from your image.
Also Read This: Resale Revolution: Selling Alibaba Products on Amazon with Ease
Step 5: Adjust Clone Stamp Settings
Before you start using the Clone Stamp Tool to remove the Alamy watermark, it's essential to configure its settings to ensure precise and effective editing. The Clone Stamp Tool offers various parameters that you can adjust to match the characteristics of the watermark and the surrounding areas. Here's how to adjust the Clone Stamp Tool settings:
- Activate the Clone Stamp Tool: As mentioned in the previous step, ensure that the Clone Stamp Tool is selected in the Toolbar on the left side of your Photoshop workspace.
- Access the Tool Options Bar: At the top of the Photoshop window, you'll find the Tool Options Bar. This bar displays settings and options for the selected tool, including the Clone Stamp Tool.
- Adjust the Brush Size: One of the most critical settings is the brush size. Click on the brush size dropdown menu in the Tool Options Bar to select an appropriate brush size. For removing watermarks, it's generally best to use a small to medium-sized brush for precision.
- Set Opacity and Flow: Opacity and Flow control the transparency and intensity of the cloned pixels. Lower opacity and flow values result in more subtle edits. Experiment with these settings to achieve the desired effect, but start with moderate values (e.g., 50% opacity and flow).
- Adjust Hardness: Hardness determines the softness or hardness of the brush edges. For most watermark removal tasks, use a soft-edged brush (low hardness) to blend the cloned pixels seamlessly into the surrounding area.
- Sample Source: The "Sample" dropdown menu allows you to specify how the Clone Stamp Tool samples pixels. In most cases, "Current & Below" is the suitable option, as it samples from the active layer and layers below it.
Configuring these settings is crucial for achieving natural-looking results when removing the Alamy watermark. Take the time to experiment with different settings to find the combination that works best for your specific image and watermark. It's often a good practice to start with conservative settings and make adjustments as needed.
Remember that practice makes perfect when it comes to using the Clone Stamp Tool effectively. Be patient and pay attention to detail, especially when working on intricate areas of your image.
With the Clone Stamp Tool settings adjusted to your liking, you're now prepared to move on to the actual watermark removal process in the upcoming steps. In these steps, we'll guide you through the hands-on process of removing the Alamy watermark from your image.
Also Read This: Foap: How to Make Money Selling Your Photos Online
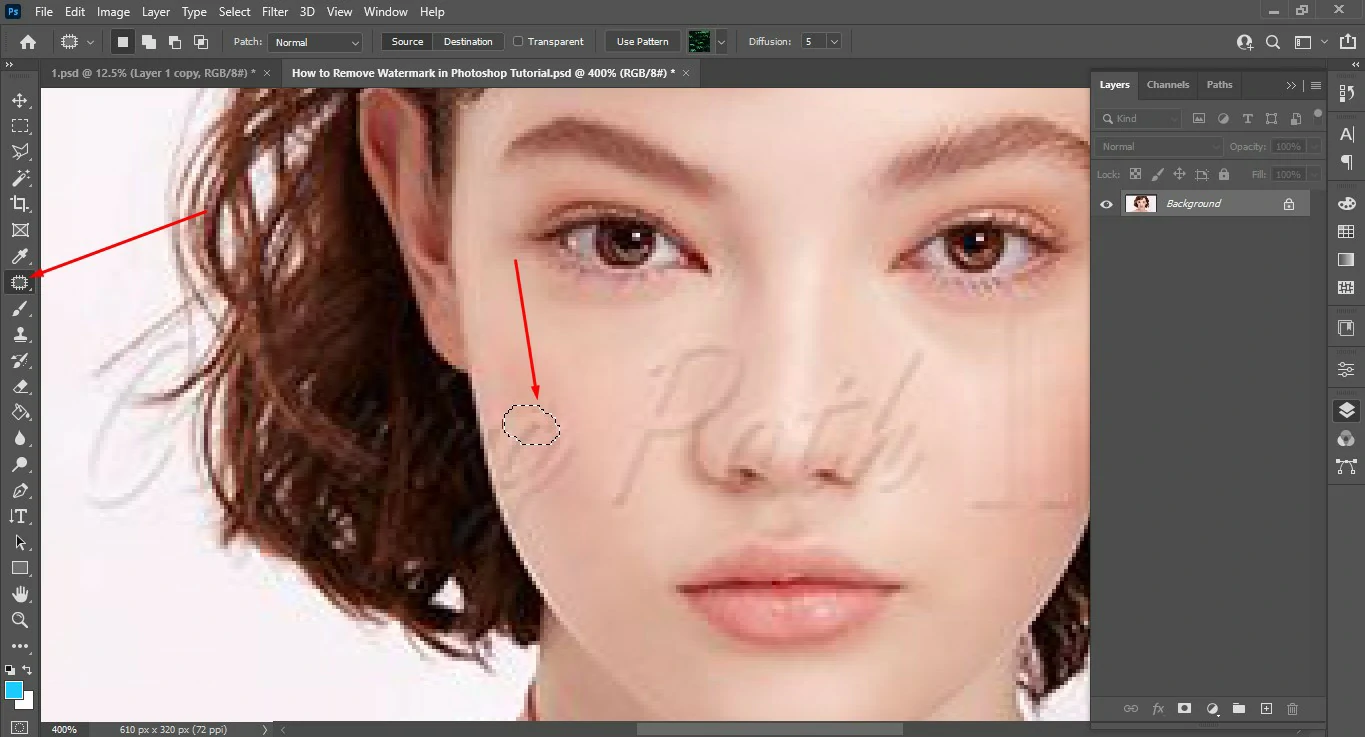
Step 6: Start Removing the Watermark
Now that you've configured the Clone Stamp Tool settings and prepared your image, it's time to begin the process of removing the Alamy watermark. This step requires attention to detail and precision. Here's how to get started:
- Select a Source Point: Move your cursor to a point in your image that is close to the watermark but does not contain it. This will serve as your source point—the area you will clone pixels from.
- Alt-Click (Windows) or Option-Click (Mac): Hold down the "Alt" key (Windows) or the "Option" key (Mac) and click on the selected source point. This action tells Photoshop where to sample pixels from.
- Position the Clone Stamp: Move your cursor over the watermark, and you'll see a preview of the source pixels that you are about to clone. Align the cursor with the watermark's edge or the area you want to remove.
- Click to Clone: Once you've positioned the cursor, click on the image. Photoshop will clone the selected source pixels onto the watermark area, effectively covering it up.
- Repeat as Needed: Continue this process, selecting new source points as necessary, and clicking to clone over the watermark. Be sure to blend the cloned pixels seamlessly with the surrounding area to create a natural look.
When using the Clone Stamp Tool for watermark removal, it's crucial to be patient and take your time. Pay close attention to the details, and make sure that the cloned pixels match the surrounding pixels in terms of color, texture, and lighting. This will result in a more convincing removal of the watermark.
If you make a mistake or need to adjust your edits, you can always undo your last action by pressing "Ctrl+Z" (Windows) or "Command+Z" (Mac) or by using the "History" panel to go back to a previous state of your image.
Depending on the size and complexity of the watermark and the image, removing the watermark may require multiple iterations and adjustments. Be persistent and take breaks if needed to maintain concentration and accuracy.
Continue this process until you have successfully removed the Alamy watermark from your image. Once you're satisfied with the results, you can move on to the next steps to fine-tune your edited image and ensure it looks polished and professional.
Also Read This: Traffic Triumph: Increasing Traffic to Your eBay Listings
Step 7: Fine-Tune Your Image
After successfully removing the Alamy watermark using the Clone Stamp Tool, it's essential to fine-tune your edited image to ensure it looks polished and professional. These final touches can make a significant difference in the overall quality of your image. Here's how to fine-tune your image:
- Zoom In for Precision: Zoom in on your image to get a closer look at the areas where you removed the watermark. This will help you identify any imperfections or inconsistencies that need attention.
- Use Additional Tools: Depending on the complexity of your image, you may need to use other Photoshop tools to refine specific areas. For example, the Healing Brush Tool or the Spot Healing Brush Tool can be helpful for smoothing out irregularities.
- Adjust Brightness and Contrast: Fine-tune the overall brightness and contrast of your image to ensure that the edited area seamlessly blends with the rest of the picture. Use the "Brightness/Contrast" adjustment layer or other adjustment tools as needed.
- Check for Cloning Artifacts: Carefully inspect your image for any cloning artifacts or repeating patterns that may have been unintentionally created during the watermark removal process. If you spot any, use the Clone Stamp Tool to correct them.
- Save a High-Quality Copy: Once you're satisfied with the edits, save your image as a high-quality file format (e.g., JPEG or PNG) to preserve the image's detail and resolution. You can do this by going to "File" > "Save As" and choosing the appropriate format and settings.
Remember that the goal of fine-tuning is to make your image look as if it had never contained a watermark. A well-executed removal should leave no traces of the watermark, and the image should maintain its original quality and integrity.
As a final step, compare your edited image with the original to ensure that it meets your expectations. Sometimes, minor adjustments or further retouching may be necessary to achieve a flawless result.
Once you're confident that your edited image looks professional and watermark-free, you can use it for your intended purpose, whether it's for a project, publication, or personal use.
Congratulations! You've successfully learned how to remove the Alamy watermark with Adobe Photoshop and fine-tune your image to perfection. With practice, you'll become more adept at watermark removal and image retouching, making your images even more compelling and visually appealing.
📸 | Théo at Alfa Romeo’s pitbox during FP1 ❤️
(Via alamy and @/alfaromeostake on twt) pic.twitter.com/7vjzHdJ0Bu
— Team Théo (@teamtheo21) October 20, 2023
Also Read This: Learn How to Download Music from SoundCloud to Apple Music in Minutes
FAQ
Here are some frequently asked questions (FAQs) related to removing the Alamy watermark with Photoshop:
- Is it legal to remove watermarks from images downloaded from Alamy?
While removing watermarks for personal use or practice may not be illegal, it's essential to respect copyright and licensing agreements. Removing watermarks from images for commercial use or distribution without proper authorization is typically a violation of copyright and can lead to legal consequences. - Can I use any version of Photoshop for watermark removal?
Yes, you can use various versions of Adobe Photoshop for watermark removal. However, the specific steps and features may vary slightly between versions. It's recommended to use a recent version of Photoshop for the best experience and access to the latest tools and functionalities. - What if the watermark is complex or covers a large area?
Complex watermarks or those that cover a significant portion of an image can be challenging to remove. In such cases, consider seeking professional assistance or using more advanced image editing techniques. Additionally, prevention is the best approach, so always purchase images without watermarks when available. - Are there alternative tools or software for watermark removal?
Yes, several alternative software and online tools are designed specifically for watermark removal. Some of these tools may use artificial intelligence or machine learning algorithms to automate the process. However, the results may vary, and manual editing in Photoshop often yields the best quality. - Is it possible to recover the original image if I make a mistake during watermark removal?
If you've duplicated the image layer as recommended in this tutorial, you can always go back to the original, unedited layer to start over if you make a mistake. Additionally, Photoshop's "History" panel allows you to step back through your editing actions to a previous state of the image.
Remember that watermark removal should always be done with care and respect for intellectual property rights and licensing agreements. If you have any doubts or concerns, it's advisable to contact Alamy or the copyright owner for guidance on using their images appropriately.
Conclusion
Congratulations on completing this step-by-step tutorial on how to remove the Alamy watermark with Photoshop. We hope this guide has been valuable in helping you achieve professional-looking results while respecting copyright and licensing agreements. Here are the key takeaways from this tutorial:
- Respect Copyright: It's essential to respect the intellectual property rights of content creators and adhere to licensing agreements. Removing watermarks without proper authorization for commercial use is typically a violation of copyright.
- Use Photoshop: Adobe Photoshop is a powerful tool for watermark removal. Ensure you have access to a recent version of Photoshop for the best experience and access to essential features.
- Follow the Steps: The step-by-step process outlined in this tutorial, from duplicating the image layer to fine-tuning your edits, is designed to help you achieve watermark removal with precision.
- Practice Makes Perfect: Watermark removal can be challenging, especially for complex watermarks. With practice and attention to detail, you can become proficient at achieving high-quality results.
- Respect Licensing: When using images for projects or publications, always ensure that you have the appropriate licensing and permissions. Avoid using watermarked images in professional or commercial contexts.
Remember that watermark removal should be approached with care, and it's always best to obtain watermark-free images from legitimate sources whenever possible. By following ethical practices and using the skills you've gained in this tutorial, you can enhance your image editing capabilities and create visually appealing content.
Thank you for choosing this tutorial as your guide for removing the Alamy watermark with Photoshop. We hope it has empowered you to edit your images effectively and ethically.