Welcome to the world of Adobe Lightroom, a powerful tool for photographers and image editors alike. One of the most basic yet essential functions in Lightroom is the ability to rotate images. Whether you've captured a stunning landscape that needs a quick landscape-to-portrait flip or a candid snapshot that just didn’t come out straight, rotating your image can dramatically enhance its presentation. In this section, we’ll introduce you to the concept of
Rotation isn't just about turning an image sideways; it can transform the way your audience perceives your photo. A well-rotated image can bring the viewer’s focus to the most critical elements, ensuring that your artistic intent shines through. This process can be easily done in both the Library and Develop modules, making it a versatile part of your editing workflow.
Accessing the Editing Panel

Before you can start rotating your images in Lightroom, you’ll need to know how to access the editing panel. The editing panel is where all the magic happens! Here’s a simple step-by-step guide:
- Open Lightroom: Begin by launching Adobe Lightroom on your computer.
- Select Your Image: Navigate to the Library module and click on the image you wish to rotate. This will be displayed in the main viewer.
- Switch to the Develop Module: To access the editing tools, click on the ‘Develop’ module located in the top right corner of the interface.
Once you’re in the Develop module, you can see various editing options on the right side of your screen. This panel includes everything from basic adjustments to advanced tools, but for our purpose, we’re focusing on rotation.
There are two primary ways to rotate your image:
- Using Keyboard Shortcuts: Press ‘R’ to rotate the image to the right and ‘Shift + R’ to rotate it to the left.
- Using the Toolbar: Look for the rotation icons located beneath the image preview. Here, you can click on the clockwise or counterclockwise arrows to achieve your desired orientation.
By following these simple steps, you’ll be well on your way to rotating images in Lightroom like a pro!
Also Read This: How to Remove the Alamy Watermark with Photoshop: A Step-by-Step Tutorial
Using the Crop Overlay Tool

The Crop Overlay Tool in Lightroom isn’t just for cropping images; it also allows you to rotate them quickly and efficiently. This tool is particularly handy if you want to adjust the composition while straightening an image at the same time.
To access the Crop Overlay Tool, simply hit the *"R" key on your keyboard or select the crop icon in the right-hand panel. Once activated, you'll notice a grid overlay on your image, and this is where the magic begins!
Here’s how to use the Crop Overlay Tool to rotate your image:
- Select the Crop Tool: Open your desired image and press "R" to engage the Crop Overlay Tool.
- Locate the Corner Handle: At the top of the crop rectangle, you’ll see a small handle. This is your pivot point for rotation.
- Click and Drag: Click on the handle and drag it left or right. As you do this, you’ll see the image rotate around its center point.
- Use the Angle Slider: Not a fan of dragging? No worries! Head to the right panel where you’ll see an "Angle" slider. Here, you can input a specific degree of rotation for precise adjustments.
- Apply Changes: Once you’re satisfied with the rotation, press "Enter" or click the "Done" button to save your adjustments.
It’s a quick and pain-free way to ensure your images are perfectly aligned, making them more visually appealing!
Also Read This: How to Change Projects to Public on Behance Making Your Work Visible to All
Rotating the Image Manually
If you prefer a little more control over the rotation process in Lightroom, you can manually rotate the image without the crop overlay. This method is great for creating dynamic compositions or fixing alignment issues.
To rotate an image manually, follow these easy steps:
- Open the Image: Start by selecting the image you want to rotate in the Library or Develop module.
- Navigate to Transform Panel: Open the "Transform" panel located on the right side of the Develop module. This area offers more advanced options for transforming your images.
- Use the Rotate Tools: Here, you’ll find the "Rotate" function. You can either use the "Counter Clockwise" (⌖) or "Clockwise" (⌗) buttons to rotate your image by 90 degrees at a time.
- Slider Option: For more nuanced adjustments, look for the Angle slider within the Transform panel. As you slide it left or right, you’ll see the image rotate in real-time!
- Check Alignments: Take a moment to check the image borders and ensure the composition looks fantastic after any rotation adjustments.
- Your Choices Matter: Once you're satisfied, remember to save your changes by pressing "Enter"*.
This manual method allows for great flexibility and creativity in your editing process, making it a favorite for many photographers!
Also Read This: Get to Know What’s the Difference Between Trying and Buying Shutterstock
Using the Rotate Options
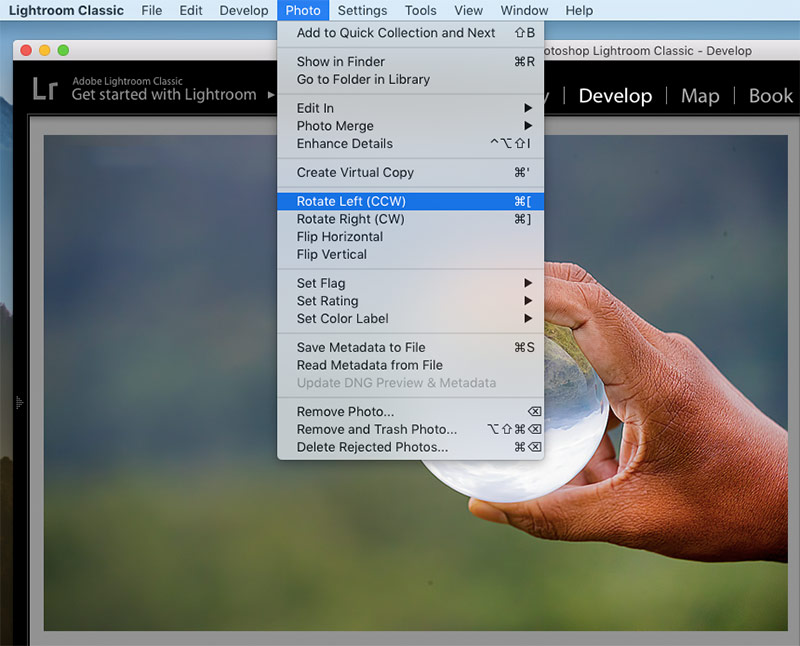
When you're working with images in Lightroom, efficiently rotating them can greatly enhance your workflow. Luckily, Lightroom offers several easy ways to rotate an image, allowing you to find the perfect angle quickly. Let’s explore the various rotate options available!
Here are three primary methods for rotating an image:
- Keyboard Shortcuts: A quick way to rotate is by using keyboard shortcuts. Pressing Ctrl + Right Arrow (Windows) or Cmd + Right Arrow (Mac) rotates the image clockwise. Conversely, Ctrl + Left Arrow or Cmd + Left Arrow rotates it counterclockwise. This method is handy when you're editing and want to save time.
- Using the Toolbar: The toolbar at the bottom of the Develop module has quick rotate buttons. Look for the clockwise and counterclockwise buttons with circular arrows. Clicking these will rotate your image without needing to remember any shortcuts!
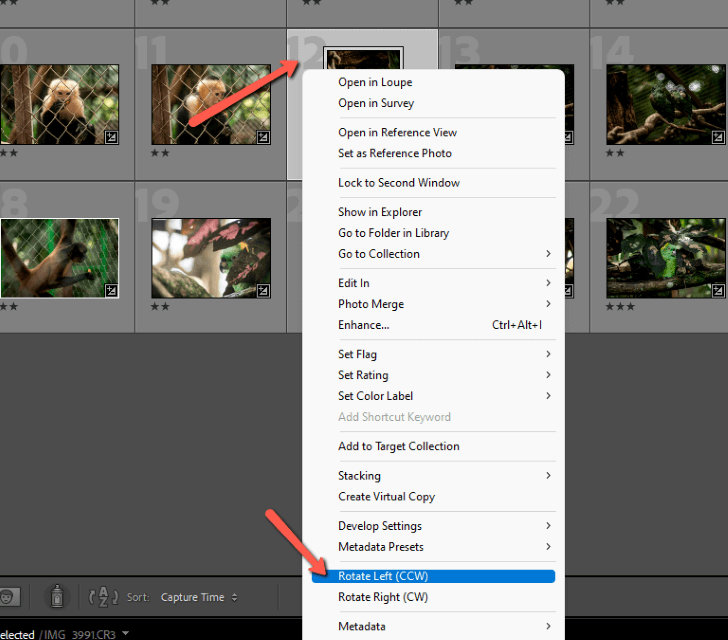
- Right Click Option: If you prefer using the context menu, you can right-click on the image. A dropdown menu appears, offering the option to rotate it either clockwise or counterclockwise. This can be more intuitive for users who like to explore options visually.
Experimenting with these different methods can help you find which feels most natural. No matter how you choose to do it, the result is the same: a beautifully aligned image that speaks volumes about your creative vision!
Also Read This: How to Add Contacts on Telegram Easily
Adjusting Image Orientation
Sometimes, rotating an image isn’t the only adjustment you’ll need. You may find that after rotating, the image still doesn't quite feel right. Thankfully, Lightroom offers features to adjust image orientation, ensuring your photos look their absolute best.
Here are some things to consider when adjusting image orientation:
| Adjustment | Description |
|---|---|
| Crop Tool | After rotating an image, you might want to crop out distractions. The Crop Overlay tool allows you to zoom in and focus the viewer’s attention where you want it. |
| Transform Panel | If your image still feels off after rotation and cropping, you can use the Transform Panel to adjust the vertical or horizontal perspective. This can help in correcting tilted horizons and making sure everything is aligned. |
| Flip Options | Sometimes, flipping an image is necessary to achieve the desired orientation. You can find flipping options in the right-click menu or under the Transform tool. |
Always remember to experiment with these adjustments. The great thing about Lightroom is the non-destructive editing feature, meaning you can make changes without permanently altering your original photo. So, rotate, crop, and adjust to your heart's content!
Also Read This: Should You Premiere or Publish Your YouTube Video? Exploring the Advantages and Disadvantages
7. Saving Your Changes
Once you’ve perfected your image and rotated it to your liking, it’s time to save those changes. Thankfully, Adobe Lightroom makes this part easy and intuitive. Unlike traditional photo editing software, Lightroom operates on a non-destructive editing principle, which means your original file remains unchanged while you create and save various adjustments.
Here’s how you can save your changes:
- Sync Settings: If you’ve edited multiple images in a similar way, you can sync the settings to save time. Simply select the images, then click on the “Sync” button in the bottom right corner and choose what you want to apply.
- Exporting Your Image: To get the final, edited version ready for sharing or printing, you’ll need to export it. Click on the “File” menu at the top, then select “Export.” A dialog box will pop up where you can choose your export settings.
- Select Format: You can choose the format (JPEG, TIFF, etc.), quality, and size. For web use, JPEG is usually preferred, but for print, consider TIFF for better quality.
- Destination Folder: Decide where you want to save your edited image. Select a folder in your computer or external drive for easy access.
- File Naming: Give it a unique name, or let Lightroom name it for you based on a chosen template.
- Finally, Click Export: Once you’ve set everything, hit the “Export” button, and voilà! Your image is saved with all its glorious tweaks!
And remember, your original unedited photo is still safe in its original format. Feel free to return and tweak it again in the future!
8. Conclusion
Rotating an image in Lightroom is a straightforward process that can dramatically enhance the composition and aesthetics of your photos. Whether you’re correcting a tilted horizon or simply experimenting with different orientations, the steps you’ve learned here will equip you to make those adjustments swiftly and effectively.
In summary, here’s what we covered:
- Understanding the rotation tools available in Lightroom.
- The significance of using the grid lines for precise adjustments.
- The ability to make other enhancements and corrections before saving your final work.
- How to efficiently save your changes and export your images in the format of your choice.
Lightroom's flexibility allows you to revisit your images anytime, making it an indispensable tool for both amateur and professional photographers. So don’t hesitate to explore, learn, and get creative with your edits. Happy editing!
 admin
admin


