If you're a fan of binge-watching or catching up on your favorite shows, you know how important it is to have a reliable way to save content. YouTube TV offers a fantastic solution with its recording feature. With this handy tool, you can record live shows, movies, and even entire seasons of your favorites! Not only does this feature allow you to pause or rewind live TV, but it also makes it easy to enjoy content at your convenience. Let’s dive into how you can set up your YouTube TV account and start recording!
Setting Up Your YouTube TV Account
Getting started with YouTube TV is a breeze! Here’s a step-by-step guide to help you set up your account:
- Visit the YouTube TV website: Go to tv.youtube.com on your preferred browser.
- Sign in or create a Google account: If you already have a Google account, simply sign in. If not, you’ll need to create one. This account will be linked to your YouTube TV subscriptions and recordings.
- Select your plan: YouTube TV offers a variety of plans. Choose the one that suits your viewing habits best. They often provide a trial period, so take advantage of that!
- Set your location: Enter your zip code to ensure you get access to the channels available in your region.
- Customize your channel lineup: Once your location is set, you can customize your channel selection. YouTube TV includes major networks like ABC, NBC, CBS, and more!
- Download the app: For added convenience, download the YouTube TV app on your smartphone or tablet. This allows you to watch on-the-go and access your recordings wherever you are.
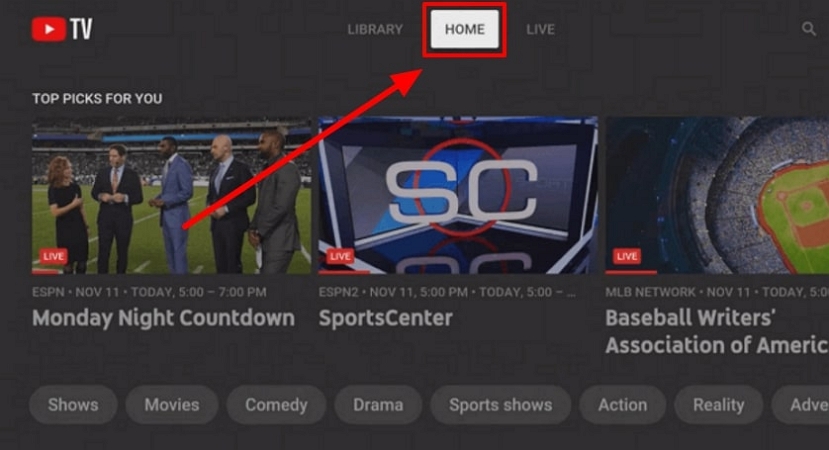
- Explore the interface: Familiarize yourself with the interface. The homepage features live programming, recordings, and suggestions based on your viewing habits.
Now that your account is set up, you’re ready to start recording shows! Remember, YouTube TV allows you to record an unlimited amount of content, which is a game-changer for anyone who loves to curate their own watchlist.
Pro Tip: Don’t forget to check your recordings regularly to manage your storage. YouTube TV keeps your recordings for up to nine months, so make sure to watch them before they disappear!
Also Read This: How to Check Your Viewers' Age on YouTube: Insights into Understanding Your Audience
3. Finding the Shows You Want to Record

So, you’ve decided to dive into the world of YouTube TV and record your favorite shows. But first, how do you find those shows you want to keep? It’s actually pretty straightforward!
Start by launching YouTube TV and navigating to the Library section. This is where all your recorded content will be stored, but it also offers some handy tools for discovering new shows.
Here are some ways to find the shows you want to record:
- Search Bar: At the top of the screen, you’ll see a search bar. Type in the name of the show you’re interested in, and it will show you relevant results.
- Categories: Browse through categories like Movies, Sports, News, and Live TV. This can help you stumble upon new shows that align with your interests.
- Recommendations: YouTube TV often recommends shows based on your watching habits. Check out the “Recommended for You” section to discover hidden gems!
- Network Channels: If you’re a fan of a specific channel, you can navigate to that channel's section to see all the shows available for recording. For example, if you love HBO, go straight to their section and browse through the shows.
Once you find the show you want, make sure to check if it’s available for recording. Most shows are, but occasionally, live events or certain programming may be restricted. You’ll usually see a small indicator or button that tells you whether you can record it.
By utilizing these features, you’ll be well-equipped to hunt down your favorite content and set up recordings like a pro!
Also Read This: How to Upload an Unlisted YouTube Video from iPhone: Step-by-Step Process
4. Step-by-Step Guide to Recording Shows
Now that you’ve found the shows you want to record, let’s get into the nitty-gritty of actually making those recordings happen. Follow this simple step-by-step guide, and you’ll have your favorite episodes saved in no time!
- Select the Show: Navigate to the show you want to record. Click on its title to open the show’s page.
- Hit the Record Button: Once you’re on the show’s page, look for the Record button, usually represented by a small circle or a red dot. Click it!
- Choose Your Recording Options: YouTube TV allows you to customize your recording settings. You can choose to record a single episode or the entire series. If you’re a binge-watcher, you might want to go for the series option!
- Check Your Library: After setting the recording, head over to your Library to ensure the show is queued for recording. You’ll see it listed under “Scheduled” along with the date and time.
- Monitor Your Recordings: YouTube TV automatically saves all recordings for nine months. However, check back regularly to manage your storage and ensure you don’t run out of space!
And there you have it! Recording your favorite shows on YouTube TV is as easy as pie. Enjoy the flexibility of watching whenever you want, without the hassle of live TV schedules! With this guide, you can save and savor your favorite moments at your leisure.
Also Read This: Why Is YouTube So Slow on Opera GX
5. Managing Your Recorded Content
Once you start recording shows on YouTube TV, managing that content efficiently becomes essential. You don’t want to end up with a cluttered library where finding your favorite episodes feels like a treasure hunt!
Here are some handy tips to keep your recorded content organized:
- Access Your Library: To view your recordings, simply go to the “Library” tab on the YouTube TV interface. This is your central hub for all your saved shows and movies.
- Sort by Date or Title: You can sort your recordings by date or title, making it easier to find what you’re looking for. This feature is especially helpful when you have multiple seasons of a show.
- Delete Unwanted Recordings: If you find an episode you no longer want, just select it and hit the delete button. This will free up space for new recordings!
- Use the Search Function: YouTube TV has a built-in search function that allows you to quickly locate specific recordings. Just type the show's name, and voila, you’re there!
Additionally, YouTube TV keeps your recordings for up to nine months, so you can always go back and revisit your favorites or catch up on what you missed. However, if you're running low on storage, consider reviewing and deleting old or less important recordings to make room for new content.
Another useful feature is the ability to create and manage different profiles for family members. Each profile can have its own set of recordings, ensuring that everyone has easy access to their favorite shows without cluttering the main library.
Also Read This: Finding and Viewing Your YouTube Music Recap Easily
6. Tips for Optimizing Your Recording Experience
To ensure you’re getting the most out of your YouTube TV recording experience, here are some tailored tips:
- Set Up Series Recordings: If you love a particular show, make sure to set up series recordings. This way, the latest episodes will automatically be recorded without you needing to remember each time!
- Check Your Internet Connection: A stable internet connection is crucial for smooth recording. If possible, connect your device to a high-speed network to prevent buffering or failed recordings.
- Regularly Review Your Settings: Make sure that your recording preferences are set to your liking. Check if you want to record in HD or adjust any other settings that may enhance your viewing experience.
- Explore the “DVR” Features: YouTube TV allows you to pause, rewind, and fast forward through recorded content. This is especially useful for catching those moments you might have missed!
Lastly, don’t forget to explore the vast library of content available for recording. YouTube TV offers a variety of channels and shows, from live sports to the latest TV dramas. Take advantage of the platform’s offerings to enrich your recording library.
By managing your recordings well and optimizing your experience with these tips, you’ll ensure that every moment spent watching the content you love is enjoyable and hassle-free!
Also Read This: How to Download Instrumentals from YouTube for Your Music Collection
7. FAQ About Recording on YouTube TV
Got questions about recording shows on YouTube TV? You’re not alone! Many users have similar queries. Let’s tackle some of the most frequently asked questions to help you get the best out of your recording experience.
1. How much storage do I have for recordings?
YouTube TV offers unlimited cloud DVR storage for your recordings. Yes, you read that right—unlimited! This means you can record as many shows as you want without worrying about running out of space. However, keep in mind that individual recordings are stored for 9 months before they automatically expire.
2. Can I pause or rewind live TV while recording?
Absolutely! When you’re recording a live show, you can pause, rewind, and even fast-forward through the recording. It’s a fantastic feature that allows you to enjoy live broadcasts without missing a moment.
3. What happens if a show overlaps?
Fear not! YouTube TV intelligently manages overlapping recordings. If you have two shows scheduled to record at the same time, it will automatically record both if you have enough storage space. If not, you’ll get a notification, and you can decide which show to prioritize.
4. Can I record shows from any channel?
Yes! You can record shows from all channels included in your YouTube TV subscription. Just remember that some channels may have restrictions on how many times you can record specific episodes, especially for new releases.
5. Is there a limit to how many recordings I can have?
While you have unlimited storage, YouTube TV does not impose a strict limit on how many recordings you can have. Just keep in mind that older recordings will eventually expire after 9 months, so you might want to manage your library periodically.
6. Can I watch my recordings on devices other than my TV?
Yes! YouTube TV allows you to watch your recorded shows on a variety of devices, including smartphones, tablets, and even web browsers. This flexibility makes it easy to catch up on shows while on the go!
7. How can I delete recordings?
Deleting recordings is simple. Just navigate to your library, find the show you want to remove, and select the delete option. This frees up space for new recordings and keeps your library organized.
8. Conclusion: Enjoying Your Recorded Shows Anytime
Now that you know how to record shows on YouTube TV and tackle some common questions, let’s wrap things up! Recording shows is not just convenient; it’s a game-changer for content consumption. Imagine having your favorite series or movies at your fingertips, ready to watch whenever you have the time.
Whether you’re binge-watching on a lazy Sunday or catching up after a busy week, your recorded library allows you to control your viewing experience. Plus, the unlimited storage ensures that you can hold onto all those amazing moments without worrying about space!
So go ahead, record that new series you’ve been eyeing, or save those must-watch sports events. With YouTube TV, your entertainment is always just a click away. Enjoy your shows, and happy watching!
 admin
admin


