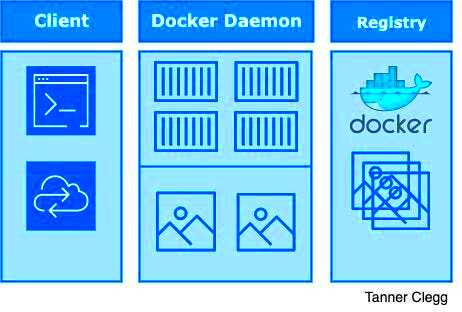
Docker is a platform used by developers and system administrators to create, deploy, and run applications inside containers. These containers allow you to package up an application with all of its dependencies, making it easy to move and run across different environments. A Docker image is the template used to create these containers.
Customizing a Docker image can provide greater flexibility, allowing you to optimize it for your specific needs. By modifying an image, you can install new software, adjust configurations, or fine-tune performance. This can be particularly useful for streamlining deployment or ensuring consistency in development and production environments.
Why You Should Modify a Docker Image
There are several reasons why modifying a Docker image can be beneficial, especially when working on specific projects or in certain environments. Here are a few key reasons:
- Customization for Your Application: By modifying the base image, you can install only the dependencies your application needs, resulting in a smaller and more efficient image.
- Faster Deployment: Custom images can streamline your deployment process, as they are pre-configured with everything you need.
- Consistency Across Environments: Modifying an image ensures that both your development and production environments are consistent, avoiding issues caused by differing configurations.
- Security Enhancements: Custom images allow you to apply the latest security patches, configure access controls, and manage user permissions more effectively.
Also Read This: Accessing YouTube TV on Amazon Fire TV Stick Guide
Step by Step Guide to Modifying a Docker Image
Modifying a Docker image involves a few straightforward steps. Here’s a detailed guide to help you customize a Docker image for your needs:
- Choose a Base Image: The first step is to select a base image that aligns with your project. Docker Hub offers a variety of official images, such as Ubuntu or Alpine, which you can build upon.
- Create a Dockerfile: A Dockerfile is a script that contains instructions on how to build your custom image. You can specify commands to install packages, set environment variables, and more.
FROM ubuntu:latest
RUN apt-get update && apt-get install -y
- Install Dependencies: Use the RUN command in the Dockerfile to install any necessary software or dependencies. For example, if you need Node.js, you would add the following:
RUN apt-get install -y nodejs
- Configure the Image: You can also modify configuration files or set up environment variables to suit your application’s needs. This can include setting environment variables with the ENV command or copying files with the COPY command.
COPY ./app /app
ENV APP_ENV=production
- Build the Image: Once you have your Dockerfile ready, you can build your custom image with the docker build command:
docker build -t my-custom-image .
- Test the Image: After building the image, it’s important to test it locally to ensure it functions as expected. You can run the image with the docker run command.
docker run -it my-custom-image
By following these steps, you can modify a Docker image to better suit your project requirements and ensure a more efficient workflow.
Also Read This: How to Watch YouTube on Echo Show 8 and Set Up Your Device
Using Dockerfile for Customization
A Dockerfile is the blueprint for building Docker images. It’s a text file that contains a series of instructions on how to build an image from a base image to a fully customized container. By using a Dockerfile, you can automate the process of installing software, setting up environments, and even running commands every time you build the image.
Here’s how Dockerfiles help in customizing your Docker image:
- Base Image Selection: The Dockerfile starts with a
FROMcommand to choose the base image. This could be a lightweight image like Alpine or a full OS like Ubuntu, depending on your needs. - Installing Packages: The
RUNcommand allows you to install dependencies and update packages, ensuring your image includes everything required for your application to run smoothly. - Adding Files: You can copy files into the image using the
COPYorADDcommands. This is useful for adding application code, configuration files, or any necessary assets. - Environment Variables: The
ENVcommand allows you to set environment variables, which can be helpful for configuration settings like database URLs or API keys. - Exposing Ports: If your application runs on specific ports, you can use the
EXPOSEcommand to tell Docker which ports should be available to the outside world. - Setting the Command: The
CMDorENTRYPOINTcommands specify what the container will do when it starts, such as running a specific application or script.
With a well-crafted Dockerfile, you can easily customize your images for different environments, applications, or use cases.
Also Read This: Ultimate Guide to Using Dailymotion on Roku and Other Streaming Devices
Testing Custom Docker Images Locally
Once you've customized your Docker image, testing it locally is a crucial step to ensure everything works as expected. Testing allows you to catch errors early and make adjustments before deploying the image to a production environment.
Here’s how you can test your custom Docker image locally:
- Build the Image: Start by building your custom image using the
docker buildcommand. Be sure to use the-tflag to tag the image with a name.docker build -t my-custom-image .
- Run the Image: To run your image locally, use the
docker runcommand. This will create a container from your image and execute it.docker run -it my-custom-image
- Interactive Testing: If your image includes a shell or terminal, you can use the
-itoption to interact with the container in real time. This is useful for running commands or debugging. - Check Logs: Use
docker logsto check the output or logs from a running container. This can help you identify errors and issues with the container’s behavior. - Verify Functionality: Test the core functionality of your application by making sure all services or scripts inside the container work as expected. This might involve making API calls, running a web server, or checking network connections.
- Stop and Clean Up: After testing, stop the container with
docker stopand remove it withdocker rm. This will ensure your local environment stays clean.docker stop
docker rm
By running your image locally and troubleshooting early, you can avoid deployment headaches and ensure your Docker containers run smoothly in production.
Also Read This: Market Valuation: How Much Is Flipkart Worth?
Best Practices for Docker Image Customization
Customizing Docker images is a powerful way to make your containers fit your exact needs. However, it’s important to follow best practices to maintain efficiency, security, and ease of use. Here are some best practices for customizing Docker images:
- Use Minimal Base Images: Choose lightweight base images like
AlpineorDebianwhenever possible. Smaller images mean faster downloads, lower resource usage, and fewer security vulnerabilities. - Leverage Multi-Stage Builds: Multi-stage builds allow you to separate the build process from the final image, reducing the size and complexity of your final image. This is especially useful when compiling code or handling assets.
- Keep Dockerfiles Simple: Avoid overly complex Dockerfiles. Keep them clean and easy to understand, as this makes future updates, debugging, and collaboration easier.
- Minimize Layers: Each command in a Dockerfile creates a new layer. Minimize the number of layers by combining related commands. For example, combine multiple
RUNcommands into one, if possible, to reduce image size. - Clean Up After Yourself: Remove temporary files, unnecessary dependencies, and caches after installation steps. This keeps your image size small and reduces the attack surface.
RUN apt-get clean && rm -rf /var/lib/apt/lists/*
- Use Tags for Versioning: Always tag your images with meaningful version numbers or tags. This makes it easier to roll back to previous versions or track changes over time.
docker build -t my-custom-image:v1.0 .
- Optimize Security: Regularly update your base images and installed packages to ensure they are free from security vulnerabilities. Also, consider using Docker’s built-in security features like user namespaces and limiting container privileges.
By following these best practices, you can ensure that your custom Docker images are efficient, secure, and easy to maintain in the long run.
Also Read This: Exploring Job Opportunities in Cloud Technologies Across the USA
Common Mistakes to Avoid When Modifying Docker Images
Modifying Docker images can greatly improve your development workflow, but there are some common mistakes that can cause issues in the long run. By being aware of these, you can avoid unnecessary headaches and keep your images efficient and secure.
Here are some common mistakes to avoid when customizing Docker images:
- Not Using a .dockerignore File: Just like .gitignore for Git, a .dockerignore file helps exclude unnecessary files from being added to the image. Without it, you risk adding large files, like logs or temporary build files, which will unnecessarily increase the size of your image.
- Overloading the Dockerfile with Commands: While it might seem efficient to cram everything into one command, this creates unnecessary layers and increases the size of the image. Always combine related commands in a single RUN statement to minimize layers and keep the image size small.
- Using Latest Tags: Using the
latesttag for your base image might seem convenient, but it can lead to inconsistent results. The "latest" tag can change over time, causing unexpected behavior. Instead, use a specific version tag (e.g.,ubuntu:20.04) to ensure consistent builds. - Neglecting to Clean Up: After installing software or running commands in the Dockerfile, always remove unnecessary files and caches. Leaving these behind increases the size of the image and can cause performance issues in production.
- Running Containers as Root: Running your Docker containers as the root user is a security risk. It’s best practice to create a non-root user in your Dockerfile and switch to that user for better security.
- Not Testing Changes Locally: Testing your image locally before pushing it to a repository or deploying it ensures that you catch any errors early. Running a quick test in your local environment can save you time and effort in the long run.
Avoiding these common mistakes ensures that your Docker images are clean, efficient, and secure, making them much easier to work with and deploy.
Also Read This: Understanding DistroKid’s Upload to YouTube and Music Distribution
How to Push Custom Docker Images to a Repository
Once you’ve customized your Docker image, the next step is pushing it to a Docker repository. This makes it easier to share your image with team members or deploy it to production environments. Here’s how to do it:
Follow these steps to push your custom Docker image to a repository:
- Create a Docker Hub Account: First, you need to create an account on Docker Hub or any other Docker registry, like Google Container Registry or Amazon ECR, to store your images.
- Login to Docker Hub: Use the
docker logincommand to authenticate with the Docker Hub registry. Enter your username and password when prompted.docker login
- Tag Your Image: Before pushing your image, you need to tag it with your repository name. The format is
username/repository:tag. The tag is often used for versioning your images.docker tag my-custom-image username/my-repo:v1.0
- Push the Image: After tagging the image, use the
docker pushcommand to upload your image to the repository.docker push username/my-repo:v1.0
- Verify the Image: Once the image is pushed, you can check your Docker Hub (or other registry) account to verify that the image has been uploaded successfully.
- Pulling the Image: To use the image in a different environment, simply pull it from the repository with the
docker pullcommand.docker pull username/my-repo:v1.0
By following these steps, you can share your custom Docker image with others or deploy it to various environments without hassle.
Also Read This: Is Downloading YouTube Music for Offline Use Against the Law
FAQ
1. What is a Docker image?
A Docker image is a lightweight, standalone, and executable package that includes everything needed to run a piece of software, including the code, runtime, libraries, and system tools.
2. Can I modify an existing Docker image?
Yes, you can modify an existing Docker image by creating a custom Dockerfile or by using Docker’s commit feature to create a new image based on an existing container.
3. How do I reduce the size of my Docker image?
To reduce the size of your Docker image, use a minimal base image, combine RUN commands to reduce layers, and remove unnecessary files after installation using the RUN apt-get clean command or similar commands for other package managers.
4. How can I automate the process of updating my Docker images?
You can automate the process of building and updating Docker images by integrating Docker into your CI/CD pipeline. This ensures that images are built and tested every time changes are made to the codebase.
5. Should I use Docker for production?
Yes, Docker is a popular and reliable choice for production environments. However, it’s important to ensure that your Docker images are secure, optimized, and properly tested before deploying to production.
Also Read This: How to Watch Rumble – Viewing Options and Platforms
Conclusion
Modifying Docker images can give you the flexibility and control you need for your applications. By following best practices, avoiding common mistakes, and testing your images thoroughly, you can create efficient, secure, and easily deployable Docker containers. Don’t forget to push your images to a repository for easy sharing and collaboration, and automate the process where possible to save time and improve workflow.
Conclusion
Modifying Docker images is an essential skill for developers and system administrators, providing the flexibility to tailor containers to specific needs. By following the right steps—such as creating a Dockerfile, testing images locally, and pushing them to a repository—you can ensure that your Docker images are efficient, secure, and ready for deployment. Avoid common mistakes like not using a .dockerignore file or overloading Dockerfiles with too many commands to maintain clean and optimized images.
Adopting best practices like minimizing layers, using specific image tags, and testing locally will lead to faster builds, easier maintenance, and fewer headaches in production. Docker’s ability to automate and streamline development workflows makes it a powerful tool for any project, whether small or large. Keep experimenting and learning as you go, and you’ll quickly see how Docker enhances the overall development and deployment process.
