Welcome to the enchanting world of paper butterfly crafts! Whether you're looking for a fun weekend project or a thoughtful gift, crafting paper butterflies is a delightful way to express your creativity. These colorful creations are not only beautiful but also a fantastic way to improve your fine motor skills if you're working with kids. Plus, they can brighten up any space, adding a touch of nature indoors. So, get ready to spread your creative wings as we dive into the art of making paper butterflies!
Materials Needed for Making Paper Butterflies
Before we get started on our lovely paper butterflies, let's gather all the materials you'll need. Having everything ready will make your crafting experience smooth and enjoyable!
- Paper: Choose lightweight craft paper or origami paper; you can pick colors and patterns that inspire you.
- Scissors: A good pair of sharp scissors will help you cut your paper effortlessly.
- Glue: Liquid glue or glue sticks work great for sticking parts together.
- Pencil: You’ll need this for sketching outlines before cutting.
- Markers or Colored Pencils: Use these to add details and enhance your butterflies’ appearance.
- Pipe Cleaners (optional): These can be used for creating antennae for your butterflies.
- Stickers or Glitter (optional): For added decoration, use stickers or a sprinkle of glitter to give your butterflies a little sparkle!
- Ruler and Compass (optional): If you're looking to create precise shapes, these tools will be handy for measuring and drawing circles.
Once you’ve gathered your materials, it’s time to let your imagination take flight! Don’t worry about being perfect—remember, the beauty of crafting lies in its imperfections. Each paper butterfly you create will be unique, just like you!
Also Read This: How to Watch Blocked Copyright Dailymotion Videos Access Videos Despite Restrictions
3. Step 1: Choosing the Right Paper
When it comes to crafting paper butterflies, the choice of paper can make a big difference in your final product. There are a variety of options out there, each with its unique qualities. So let’s dive into some popular choices:
- Copy Paper: This is the most accessible and economical option. While it's not ideal for creating vibrant designs, it’s great for practicing your folding techniques.
- Origami Paper: Typically square and available in numerous colors and patterns, origami paper is specifically designed for folding, allowing for crisp and defined edges. This is a favorite among butterfly crafters!
- Scrapbooking Paper: If you want to add some flair to your butterflies, consider scrapbooking paper. It comes in various patterns and weights, giving you the chance to infuse some personality into your designs.
- Cardstock: For a sturdier butterfly, cardstock is perfect. It holds its shape well and can be used for making larger butterflies. Just keep in mind that it requires a bit more effort to fold.
As you select your paper, consider the following:
- Thickness: Thinner papers are easier to fold but may not hold their shape well. Thicker papers are sturdier but can be challenging to work with.
- Color and Pattern: Think about the overall aesthetic you want. Bright colors can make your butterflies pop, while textured papers can add depth to your creations.
- Size: Depending on your design, choose a paper size that works best for how big or small you want your butterflies to be.
In summary, choosing the right paper is all about balancing aesthetics and your crafting needs. Don’t hesitate to try a few different types to discover what you enjoy working with the most!
Also Read This: Exploring Cultural Narratives Through Urdu Stories on Dailymotion
4. Step 2: Preparing Your Workspace
Before diving into the delightful world of butterfly crafting, it's essential to set up a workspace that inspires creativity. Here’s a simple guide to preparing your space:
1. Find a Flat Surface: Choose a clean, flat area where you can spread out your materials. A table or desk works best to provide ample space.
2. Gather Your Supplies: Make sure you have all the materials you need within arm's reach. Here’s a handy checklist:
- Paper (your choice from the previous section)
- Scissors
- Glue or tape for assembly
- Pencil and ruler for measuring (if necessary)
- Decorative items like markers, stamps, or stickers for embellishments
3. Good Lighting: Ensure your workspace is well-lit. Natural light is best, but a good lamp can work wonders. You want to clearly see your materials and the details of your folding.
4. Clean Up as You Go: Keep your area tidy. A clean workspace helps keep your mind uncluttered and allows you to focus on your beautiful creations.
5. Inspiration Board: Consider creating a small inspiration board nearby. Pin up any butterfly designs or colors that inspire you. This can help spark your imagination as you work!
Setting up an inviting and organized workspace will make your crafting experience more enjoyable and productive. Remember that the more comfortable you are, the more fun you’ll have creating those beautiful paper butterflies!
Also Read This: How to Use Dailymotion for Inspirational Stories and Holiday Specials
5. Step 3: Cutting the Paper for Butterfly Wings
Now that you have your butterfly template ready, it’s time for the fun part—cutting the paper to create the wings! This step is where your butterflies will start to come to life. If you’ve chosen to use patterned paper, think about how the design will show on your wings. Will the vibrant colors be on the top side? Or do you have a beautiful marble pattern perfect for each wing’s base? Let’s dive into the cutting process!
Here’s a simple breakdown of what you need to do:
- Gather Your Materials: You’ll need scissors, your template, and a fresh stack of craft paper. If you’re feeling adventurous, grab different colors and patterns—this will make your butterflies unique!
- Pin or Hold the Template: Place the template on top of the paper. If you’re using thin paper, you can hold it firmly with your hand, but if it’s a bit thicker, consider using some small pins to secure it in place.
- Trace the Outline: Using a pencil or a light-colored pen, carefully trace around the template. Ensure the edges are smooth and don’t rush this step! A clean outline here will make cutting much easier.
- Make Precise Cuts: Starting from one edge, begin cutting along the outline. It’s best to use small, controlled motions rather than one big snip. This will give you more accuracy and help prevent any accidental snags.
- Highlight Details: After cutting, you can add some additional details like swirls or dots along the wings with a marker. This will enhance their beauty and personalize your butterflies!
Now, you should have a beautiful pair of butterfly wings cut out and ready for your next steps! Remember, if you make any mistakes, don’t fret! Crafting is about fun and creativity, and you can always use your extra wings for another project.
Also Read This: How Dishwashers Work: A Detailed Guide on Dailymotion
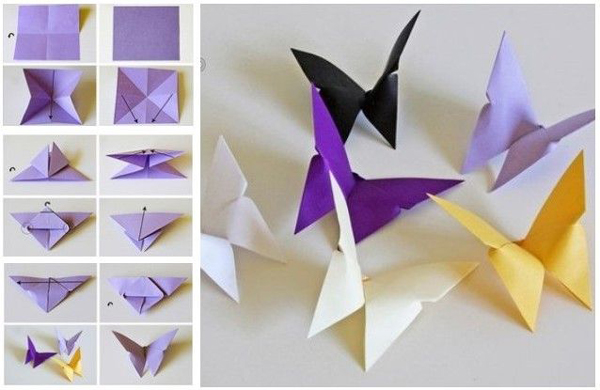
6. Step 4: Folding Techniques for Paper Butterflies
With the wings cut out, we’re moving onto one of the most creative parts of our butterfly crafting journey—folding! This is where your flat paper transforms into a charming 3D butterfly. Get ready to channel your inner origami artist as we explore some simple yet effective folding techniques.
Here are some key folding techniques you might find helpful:
- The Center Fold: Start by folding the wings in half, aligning the edges perfectly. Press down firmly along the crease to ensure it holds. This fold creates the center of the butterfly and gives it a beautiful rounded shape.
- The Wing Dip: With your wings still folded in half, pinch the top part of the wings and fold them down slightly. This will create a gentle curve at the top, mimicking a butterfly’s natural look. Make sure to repeat this on both sides so that they match.
- Accordion Fold: For added texture, you can create an accordion fold along the lower part of the wings. To do this, start folding a small section, then flip it to create a zigzag effect. This gives your butterfly a more dynamic shape!
- Petal Fold: If you want a slightly different look, try the petal fold. Starting from the outer edges of the wings, fold the paper toward the center, creating a more pronounced tip on each wing. It’s an elegant twist that can really enhance your butterfly’s appearance.
Lastly, remember that there’s no right or wrong way to fold your butterfly. The beauty of crafting lies in making it your own! After folding, you can use a small piece of tape or glue to secure the base of the wings if needed. You’re almost ready to add the finishing touches to your creation!
Also Read This: The Ultimate Guide to Streaming on Dailymotion for Beginners
Step 5: Assembling the Butterfly Body
Congrats on making it this far! By now, your wings are beautifully crafted and full of personality. Now it’s time to assemble the butterfly body. This is where your creation will start to come to life. Let’s dive into the process!
To assemble your butterfly’s body, you’ll need:
- Craft glue or a hot glue gun
- A thin strip of paper (about 1 inch wide) for the body
- Two small beads (optional, for antennae)
- Scissors
- Markers or colored pencils for detailing
Here’s a simple step-by-step:
- Create the Body: Take your thin strip of paper and roll it up tightly, forming a cylindrical shape. This will be the main body of your butterfly. If you prefer, you can fold it in an accordion style for a bit of texture.
- Attach the Wings: Position your wings on either side of the body. Apply glue to the base of each wing and press them onto the body strip. Hold them in place for a few seconds to ensure they stick.
- Secure the Wings: For extra stability, add a small amount of glue where the wings meet the body. This will help prevent them from flopping down.
- Add Antennae (optional): If you'd like to give your butterfly some antennae, cut two small pieces of wire or use toothpicks. Attach them to the top of the body using glue. If you want to get fancy, glue a bead on top of each antenna to mimic little butterfly feelers.
With your butterfly wings securely attached, take a moment to admire your work so far! You’re really shaping something special. But hold on a second; we’re not done yet—let's add those final decorative touches next!
Also Read This: How to Do Ribbon Work Embroidery on Dailymotion
Step 6: Adding Decorative Elements
Now that your butterfly is assembled, it’s time to add the fun and whimsical touches that will truly make it your own! This step is all about unleashing your creativity and making your butterfly stand out.
Gather your supplies for this step:
- Markers or acrylic paints
- Glitter or sequins (optional for sparkle!)
- Colored tissue paper or stickers
- Fabric scraps (optional for added texture)
Here’s how to embellish your butterfly:
- Design the Wings: Start with markers or paints and add patterns to your wings. Swirls, dots, or lines can add visual interest. Don’t be afraid to layer colors! The beauty of butterflies lies in their unique designs.
- Add Some Sparkle: If you want a bit of glamour, sprinkle some glitter on the wet paint or glue down sequins for extra bling! Just make sure you apply it while the adhesive is still wet.
- Use Fabric or Tissue Paper: Cut small shapes from fabric or tissue paper and glue them onto the wings. This will give texture and dimension to your butterfly and make it feel more lifelike!
- Personal Touches: Think about what your butterfly represents. Perhaps it’s a symbol of transformation or a reminder of nature’s beauty. Write a small sentiment on the back of the body with a marker or add stickers that resonate with you.
Once you’ve finished decorating, let everything dry completely. Then, your butterfly is ready to take flight—on a wall, a gift package, or wherever your imagination takes you! ✨
Congratulations on your completed paper butterfly! You’ve not only learned a new craft but also created something truly unique. Now, go ahead and show off your beautiful creation!
Also Read This: How to Watch Blocked Copyright Dailymotion Videos: Access Videos Despite Restrictions
Step 7: Displaying Your Paper Butterflies
Now that you've meticulously crafted your paper butterflies, it's time to show off your beautiful work! Displaying your creations can really enhance your home decor or serve as delightful gifts for friends and family. Here are some creative ideas on how to display your paper butterflies:
- Wall Hanging: Create a stunning wall display by attaching your butterflies to a canvas or poster board. You can use a combination of sizes and colors for a vibrant effect. Use double-sided tape or clear glue to secure them, and consider arranging them in a swirling pattern to mimic the flight of butterflies.
- Shadow Box: For a three-dimensional effect, place your butterflies in a shadow box. Layer them with different depths to create a sense of movement. You can even add some floral decorations or a painted background to enhance the scene.
- Mobile: Hang your butterflies from a mobile for a whimsical touch! Use a wire frame or a wooden hoop, and suspend your butterflies from different lengths of string. When hung in a window or from the ceiling, they’ll sway beautifully with the slightest breeze.
- Gift Tags: Want to make your gifts extra special? Attach smaller butterflies to gift tags. They add a personal touch, and the recipient can keep the butterflies as a lovely memento.
- Table Centerpiece: For gatherings or celebrations, create a centerpiece using a vase filled with beautiful flowers and your paper butterflies perched among them. This adds an unexpected and interactive element to your table decor.
- Party Decor: If you’re throwing a party, consider making a banner with your butterflies. String them together or hang them from the ceiling for a festive and colorful atmosphere.
When displaying your butterflies, think about lighting, colors, and your existing decor. A well-placed butterfly can brighten up a dull corner or serve as an eye-catching focal point in your home.
Conclusion and Tips for Successful Paper Crafts
Congratulations! You've completed your journey of crafting paper butterflies, and we hope you enjoyed every step. As we wrap up this guide, here are some final tips to help you elevate your paper crafting experience:
- Quality Materials Matter: Always choose high-quality paper and tools. This will ensure that your butterflies not only look fantastic but also last longer.
- Experiment and Have Fun: Don’t be afraid to try new techniques, colors, and folding styles. The beauty of crafting is in the experimentation. Some of the best ideas come from trying something unexpected!
- Practice Patience: Crafting can sometimes be tricky, especially when it comes to detailed designs. Take your time, enjoy the process, and don’t rush through it.
- Seek Inspiration: Look for inspiration from other crafters! Social media platforms like Pinterest and Instagram are great resources for new designs and tutorials.
- Share Your Creations: Connect with a crafting community, whether online or locally. Sharing your work not only showcases your talents but also inspires others.
Remember, crafting is about creativity, self-expression, and having fun. Your paper butterflies are a reflection of your artistic journey. So, hang them proudly or give them as heartfelt gifts, and continue to explore the world of paper crafts. Happy crafting!
 admin
admin