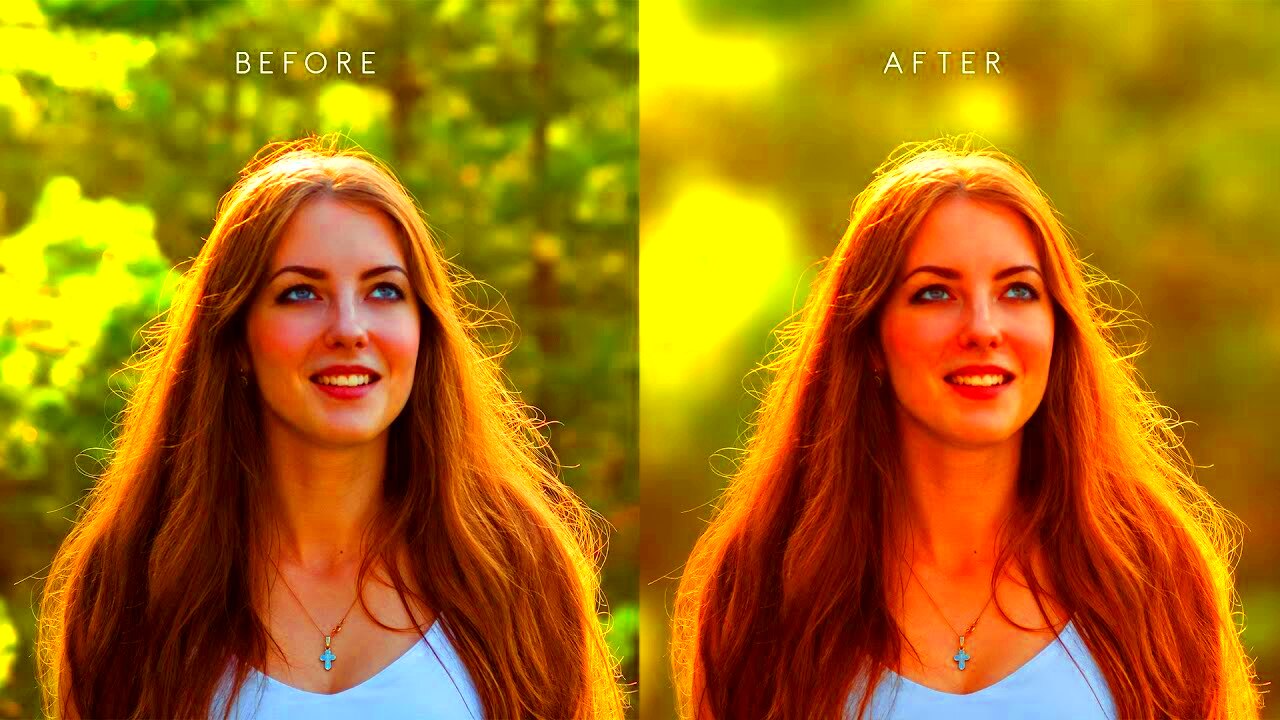
In photography, soft focus effect is one of the most common techniques which produce a dreamlike and heavenly image. This effect can be achieved by slightly blurring an image, which leads to loss of details but the outline is still clear. It often produces a romantic or nostalgic feeling hence suitable for portraits, landscapes and artistic shots. When using soft focus, photographers manage to put emphasis on their subjects and remove unwanted elements from the background.
Soft-focus goes beyond mere blurring; it is about being in an appropriate degree of balance. The aim here is to amplify the attractiveness of any person or thing without taking away that person’s or thing’s very nature. There are two ways you can use this approach: using a camera or doing it while editing pictures at home, depending on what you have and prefer at that time.
Reasons to Blur an Image
You might have many reasons to fog an image. Here are a few common ones:
- Enhance Aesthetic Appeal: A soft focus can transform an ordinary image into something visually stunning.
- Draw Attention to the Subject: Blurring the background can help your main subject stand out.
- Create Mood: A blurred effect can evoke feelings of calmness, romance, or nostalgia.
- Minimize Distractions: Blurring unwanted details can help keep the viewer's focus where it belongs.
- Improve Portraits: Soft focus can smooth out skin imperfections, giving portraits a flattering appearance.
The effectiveness of blurs can be ranged below to: At quite great the time, try to explore the possibilities of every picture. The idea is to take an unusual perspective and compose it from various angles and distances before printing.
Also Read This: How to Upload Video to Behance with a Step-by-Step Guide
Choosing the Right Tool for Blurring Images
The impact of blurring on an image can be quite different depending on the technique overall: choose wisely. A few are worth considering:
- Photo Editing Software: Programs like Adobe Photoshop, GIMP, and Lightroom offer various blurring options.
- Mobile Apps: Apps like Snapseed and PicsArt provide easy-to-use blur tools for on-the-go editing.
- Camera Settings: Some cameras have soft focus settings or filters that can create this effect in-camera.
- Online Tools: Websites like Fotor and Canva allow for quick edits without needing to install software.
When picking a tool you should be mindful of the following aspects:
Also Read This: how to return an image adobe stock
Steps to Blur an Image Using Software
Blurring an image using software is a straightforward process that can dramatically enhance your photos. Whether you’re using Photoshop, GIMP, or another editing tool, the basic steps are often quite similar. Let’s break down how to do it step by step:
- Open Your Image: Launch your photo editing software and import the image you want to blur.
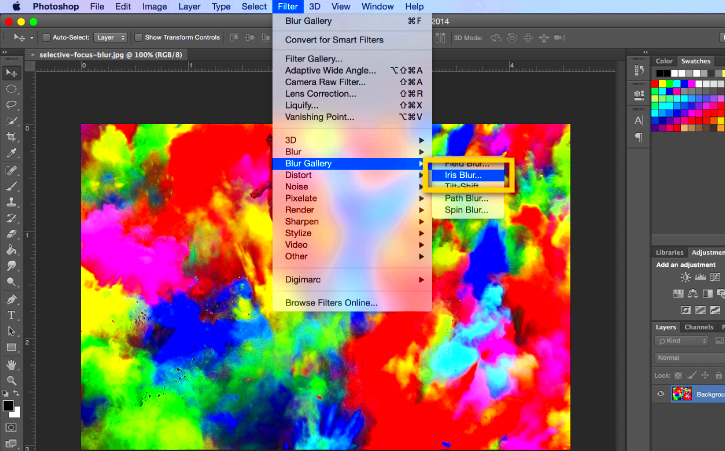
- Select the Blur Tool: Most software has a dedicated blur tool. In Photoshop, for instance, you can find this in the toolbar.
- Adjust the Brush Settings: Set the size and strength of the brush according to the area you want to blur. A larger brush covers more area, while a smaller one gives you more control.
- Apply the Blur: Click and drag over the areas you want to blur. Be gentle; it’s easier to add more blur than to take it away!
- Use Gaussian Blur for a Soft Focus: If you want a smoother blur effect, look for a filter option like Gaussian Blur, which allows you to control the intensity.
- Adjust Opacity and Layers: If your software supports layers, consider duplicating your image layer and applying blur to just one of them. This way, you can easily adjust opacity for a more controlled look.
- Save Your Work: Once you’re happy with the results, save your edited image in the desired format.
These simple steps will help you achieve a beautiful blur effect in your images!
Also Read This: How to Hide End Cards on YouTube for a Cleaner Video Layout
Tips for Achieving a Balanced Blur
Creating a balanced blur effect is all about finding the right mix. Too much blur can make an image look out of focus, while too little might not have the desired impact. Here are some tips to help you strike that perfect balance:
- Start Small: It’s better to start with a subtle blur and gradually increase it until you achieve the desired effect.
- Focus on the Subject: Make sure the main subject remains sharp while blurring the background. This draws the viewer's attention where it belongs.
- Consider the Composition: Evaluate how the blur affects the overall composition. Aim for a harmonious balance between sharp and soft areas.
- Experiment with Different Blurring Techniques: Try different methods like radial blur or motion blur for varied effects.
- Use Layer Masks: If your software allows, use layer masks to apply blur selectively. This technique gives you fine control over where the blur appears.
Finding the right balance takes practice, so don’t hesitate to experiment and see what works best for your unique style!
Also Read This: How to Create YouTube Shorts Ads – A Step-by-Step Guide to Marketing with YouTube Shorts
How to Use Blur in Different Photography Styles
Blur can be a powerful tool across various photography styles, adding depth and emotion to your images. Here’s how you can effectively use blur in different contexts:
- Portrait Photography: Softening the background with a gentle blur can highlight your subject, making them stand out beautifully.
- Landscape Photography: Use blur to create a dreamy effect in the foreground while keeping the background sharp for depth.
- Macro Photography: When shooting close-up, blurring parts of the image can enhance the texture and detail of the subject.
- Abstract Photography: Experimenting with heavy blur can create unique and artistic compositions that evoke emotion.
- Street Photography: Use motion blur to capture movement, giving a sense of action and life to your images.
Each style has its own way of incorporating blur, so consider the mood and message you want to convey. Don’t be afraid to try new techniques and have fun with it.
Also Read This: Adding Text to an Image on Mac
FAQ
What is the soft focus effect in photography?
The soft focus effect is a technique that creates a dreamlike image by slightly blurring the photograph while keeping the outlines clear. It enhances aesthetic appeal and is often used for portraits and artistic shots.
Why should I use soft focus in my photos?
Soft focus can enhance the attractiveness of a subject, draw attention to the main focus, create mood, minimize distractions, and improve portrait quality by smoothing skin imperfections.
What tools can I use to achieve a soft focus effect?
You can use photo editing software like Adobe Photoshop or GIMP, mobile apps like Snapseed, camera settings with soft focus options, or online tools like Fotor and Canva.
How do I blur an image using editing software?
- Open your image in the software.
- Select the blur tool.
- Adjust brush settings for size and strength.
- Apply the blur gently.
- Use filters like Gaussian Blur for smoother effects.
- Adjust layers and opacity if needed.
- Save your work.
What tips can help me achieve a balanced blur?
Start with a subtle blur, keep the subject sharp, consider composition, experiment with different blurring techniques, and use layer masks for selective application.
How can blur be applied in different photography styles?
In portrait photography, it emphasizes the subject. In landscapes, it creates dreamy effects. For macro photography, it enhances textures, while in abstract photography, it can evoke emotion. Motion blur in street photography captures action.
Conclusion
The soft focus effect is a versatile and impactful technique in photography, allowing artists to create visually stunning images that evoke emotions and highlight subjects effectively. By understanding the reasons for blurring, selecting the right tools, and following a straightforward editing process, photographers can master this technique.
Whether shooting portraits, landscapes, or abstract compositions, experimenting with blur can enhance your unique style and storytelling abilities. Remember to find the right balance to make your images shine, and enjoy the creative journey!
 admin
admin


