Blackheads can be quite a nuisance, popping up at the most inconvenient times and making our skin feel less than perfect. With so many products and methods available, it can be hard to know what really works. That's where the blackhead remover tool comes in! This handy little tool is designed to help you combat those pesky blackheads and achieve a clear, smooth complexion. In this blog post, we'll explore effective techniques for using blackhead remover tools effectively and safely.
Understanding Blackhead Remover Tools

Before diving into the techniques of using blackhead remover tools, it's essential to understand what these tools are and how they work. Blackhead remover tools come in various shapes and sizes, but they generally serve the same purpose: to extract clogged pores and clear up your skin.
*Types of Blackhead Remover Tools
- Metal Extractors: These have a circular loop at one end, designed to apply pressure around the blackhead and push it out.
- Comedone Extractors: Similar to metal extractors but often come with a flat side for different extraction methods.
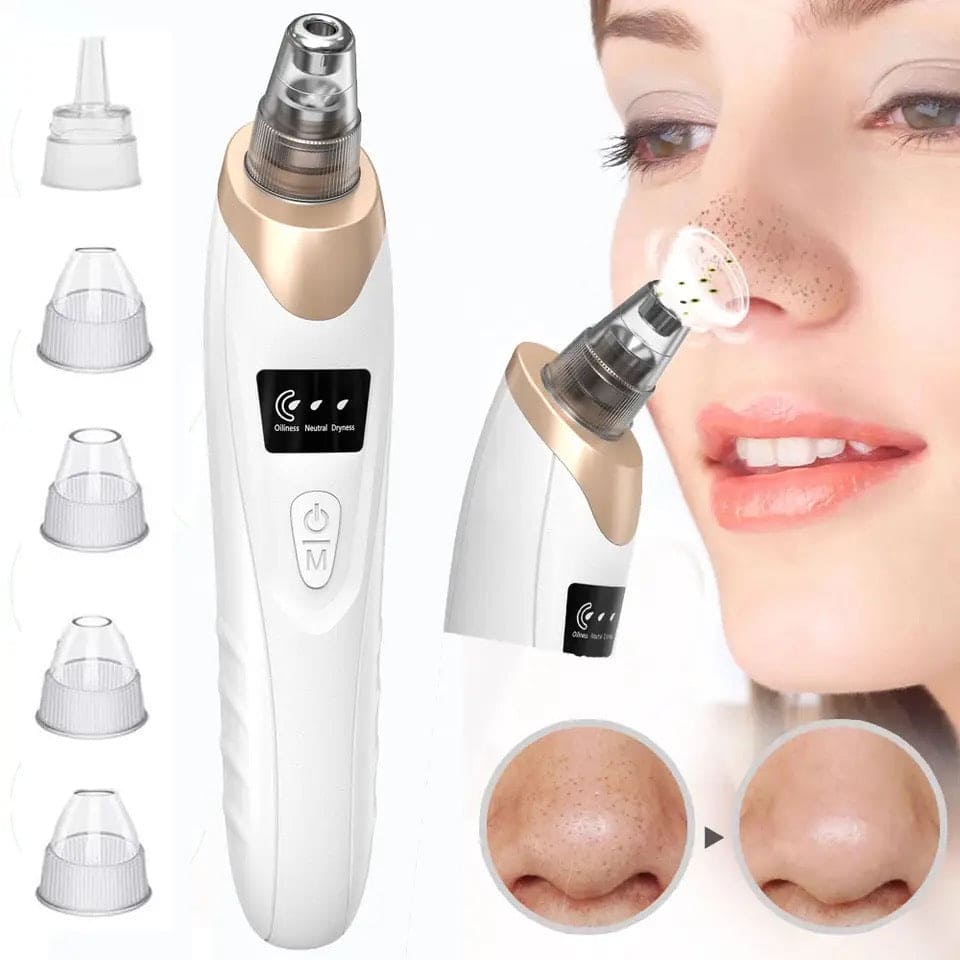
- Vacuum Devices: These tools use suction to help loosen and remove blackheads from the skin.
- Silicone Cleanser Brushes: While not strictly used for extraction, these tools can help in keeping the skin clean and preventing blackheads from forming.
How They Work
Blackhead remover tools work by applying pressure to the skin around the blackhead, allowing the contents to be pushed out of the pore. The process can be effective in reducing the appearance of blackheads when done correctly. However, it's important to ensure that the tool is sanitized before and after use to prevent any infection or irritation.
Safety Precautions*
- Always cleanse your skin before using a blackhead remover tool.
- Use gentle pressure to avoid damaging your skin.
- Don’t attempt to remove blackheads that are inflamed or painful.
- Follow up with a soothing toner or serum post-extraction.
Overall, understanding your blackhead remover tool is the first step towards achieving that clear, smooth skin you desire! By choosing the right type and applying proper techniques, you’re well on your way to saying goodbye to blackheads.
Also Read This: Tracing Images in Canva: A Step-by-Step Tutorial
Preparing Your Skin for the Procedure

Before diving into the world of blackhead removal, you need to ensure your skin is in the best condition possible. A well-prepared canvas not only makes the process easier but also reduces the risk of irritation. Here’s how to get your skin ready:
- Cleansing: Start with a gentle cleanser to remove dirt, oil, and makeup. A clean surface is crucial for effective blackhead removal. Choose a product that suits your skin type—gel for oily, cream for dry, and gel-based foams for combo skin.
- Exfoliation: Gently exfoliate your skin to slough off dead skin cells. This can be achieved using a scrub or a chemical exfoliant. Aim for products containing salicylic acid or glycolic acid for deeper cleaning.
- Steam Treatment: Steaming your face helps to open up the pores, making it easier to extract blackheads. You can do this by leaning over a bowl of hot water or using a facial steamer for about 5-10 minutes.
- Applying a Toner: After steaming, apply a toner to help balance the skin's pH levels and tighten the pores. Opt for an alcohol-free toner to avoid dryness.
- Using a Clay Mask: If you have a clay mask handy, it’s the perfect time to use it. Clay masks draw out impurities and excess oil, setting the stage for effective blackhead removal.
Once your skin is fully prepped, you’ll be ready to tackle those annoying blackheads with confidence!
Also Read This: How to Obtain 10 Free Adobe Stock Images
Step-by-Step Guide to Using the Tool
Now that your skin is prepped, it’s time to get into the nitty-gritty of using that blackhead remover tool. Follow these steps for a smooth experience:
- Choose the Right Tool: There are various types of blackhead removers, such as loop extractors and needle end tools. Select the one that you feel comfortable with.
- Position the Tool: Hold the tool at a 45-degree angle against the skin around the blackhead. Make sure you're not pressing down too hard.
- Apply Gentle Pressure: Using even pressure, press down and slide slightly forward. You want to coax the blackhead out—don’t force it! If it doesn’t come out easily, skip it to avoid scarring.
- Clean the Tool: After each blackhead removal, wipe the tool with alcohol or a disinfectant to keep it clean and prevent any further irritation.
- Soothing Your Skin: Once you’re done, wash your face again and apply a soothing toner or a calming serum. This will help reduce redness and patchiness!
And there you have it! Following these steps will help you use the blackhead remover tool effectively for clearer, smoother skin. Remember, patience is key, and never rush through the process!
Also Read This: How to Create Your Own Foundation at Home
5. Aftercare Tips for Optimal Results
Once you've successfully used your blackhead remover tool, it's crucial to follow up with some aftercare to ensure your skin remains clear and healthy. Neglecting aftercare can lead to irritation or even more breakouts. Here’s your post-removal routine:
- Cleanse: Gently cleanse your face with a mild cleanser to remove any residue left from the procedure.
- Apply a Toner: Using an alcohol-free toner can help tighten pores and restore your skin's pH balance.
- Use a Gentle Exfoliant: A light exfoliant (like a chemical exfoliant containing AHAs or BHAs) can aid in keeping pores clear, but don’t overdo it; once or twice a week is sufficient.
- Moisturize: Hydrate your skin with a non-comedogenic moisturizer. This will help soothe any irritation and keep your skin soft.
- Sun Protection: Your skin may be a bit sensitive after using the tool, so make sure to apply sunscreen if you’re heading outdoors.
- Avoid Harsh Products: For at least 24 hours, avoid using harsh treatments such as retinoids or products with abundant fragrances.
Remember, the key to maintaining that smooth, clear complexion is not just about removing blackheads but taking good care of your skin afterward. Giving your skin a little TLC can make all the difference!
Also Read This: How to Make Cushion Covers at Home with a Simple Sewing Tutorial
6. Common Mistakes to Avoid
When it comes to using a blackhead remover tool, knowledge is power! Avoiding common pitfalls can help you achieve the clear and smooth skin you desire. Here are a few mistakes to steer clear of:
- Skipping Cleansing: Always start with a clean face. Skipping this step can lead to pushing bacteria deeper into the skin.
- Using Too Much Pressure: Applying excessive force can cause skin trauma, leading to scarring and irritation. Gentle is key!
- Using a Dirty Tool: Always ensure your blackhead remover is sanitized before and after use to prevent infections.
- Overdoing It: Frequent use of the tool can irritate your skin. Limit yourself to once a week at most.
- Ignoring Skin Type: Using a tool designed for a different skin type can exacerbate problems. Always choose tools and treatments tailored to your needs.
- Forgetting Aftercare: As we discussed earlier, neglecting aftercare can lead to new breakouts or irritation.
Awareness of these common mistakes can help ensure your experience is not only effective but also safe for your skin. Happy blackhead removing!
Effective Techniques for Using a Blackhead Remover Tool for Clear and Smooth Skin
Blackhead remover tools can be an effective way to achieve clear and smooth skin when used correctly. These tools come in various styles, including loops and funnels, designed for precision in extracting blackheads. However, improper use can lead to skin irritation or scarring. Here are some effective techniques to ensure you get the best results:
Preparation
- Cleanse Your Skin: Begin with a gentle facial cleanser to remove dirt, oil, and makeup.
- Steam Your Face: Use steam or a warm towel on your face for about 5-10 minutes to open up pores, making the extraction process easier.
Using the Blackhead Remover Tool
When using the tool, keep the following techniques in mind:
- Choose the Right Tool: Different tools target different types of blackheads; ensure you select one that suits your skin condition.
- Positioning: Place the loop around the blackhead and press down gently without dragging the tool across your skin.
- Angle: Maintain a 45-degree angle to avoid excess pressure that can lead to skin damage.
- Aftercare: Clean the area with an antiseptic solution and apply a soothing moisturizer to calm the skin.
Important Tips
| Tip | Description |
|---|---|
| Don’t Overdo It | Avoid excessive extraction to prevent irritation. |
| Be Gentle | Apply only light pressure to prevent scarring. |
| Know When to Stop | If a blackhead doesn’t come out easily, don’t force it. |
In conclusion, using a blackhead remover tool can be effective in achieving smooth skin when done correctly. Preparing your skin, employing the right techniques, and maintaining proper aftercare are crucial for success. Always listen to your skin and consult a dermatologist if necessary for persistent issues.
 admin
admin


