Creating an outline of an image is a simple yet effective way to highlight certain elements, giving them a bold and distinct look. This technique is used across various industries, from graphic design to web development, to make images stand out. Whether you're looking to enhance product photos, create logos, or simply improve the clarity of an image, learning how to outline it properly can take your visuals to the next level. In this guide, we will walk you through the steps, tools, and best practices to create perfect outlines for your images.
Understanding the Basics of Image Outlining

Image outlining is a technique where a border or contour is added to an image, making the subject more prominent. Outlines can be used to separate objects, create contrast, or draw attention to specific parts of the
Here are the basic steps involved in outlining an image:
- Trace the Subject: Use a pen or brush tool to trace around the subject you want to highlight.
- Choose Outline Style: Decide if you want a thin, thick, dashed, or solid outline.
- Adjust Color: Select a color that contrasts well with the background.
- Refine the Edges: Smooth out the edges for a clean and polished look.
Also Read This: Mastering Image Cropping in Keynote
Choosing the Right Tools for Image Outlining

Choosing the right tools is crucial when creating an image outline. While there are many options available, selecting one that suits your needs and skill level can make the process smoother. Here are a few tools that are commonly used for outlining images:
| Tool | Best For | Platform |
|---|---|---|
| Adobe Photoshop | Professional Image Editing | Windows, macOS |
| GIMP | Free, Open-Source Editing | Windows, macOS, Linux |
| Canva | Quick, Easy Outlines for Beginners | Web-based |
| Procreate | Digital Drawing and Outlining | iOS |
Here’s a closer look at what makes each tool stand out:
- Adobe Photoshop: Ideal for professionals, offering advanced options like custom brushes, layer effects, and precise control over outlines.
- GIMP: A free alternative to Photoshop that provides many of the same features for outlining, though it may have a steeper learning curve.
- Canva: Great for beginners who want a simple and intuitive interface. It offers easy-to-use outline tools with preset shapes and styles.
- Procreate: Perfect for digital artists and illustrators who prefer a hand-drawn approach to outlining on tablets.
Choosing the best tool for outlining an image largely depends on your experience level and the complexity of the task. If you’re new to image editing, starting with an easy-to-use tool like Canva or Procreate might be the best option.
Also Read This: How to Contribute Photos to Getty Images for Aspiring Contributors
Step by Step Guide to Creating an Outline of an Image

Creating an outline for your image doesn’t have to be complicated. In fact, it can be a simple process with the right tools and techniques. Whether you're a beginner or more experienced, following a step-by-step guide can help you achieve the best results. Below, we break down the process into easy-to-follow steps.
Here’s how to create an outline of an image:
- Step 1: Open Your Image – Begin by importing your image into the editing software of your choice. Most programs allow you to open an image by clicking on the “File” menu and selecting “Open” or “Import.”
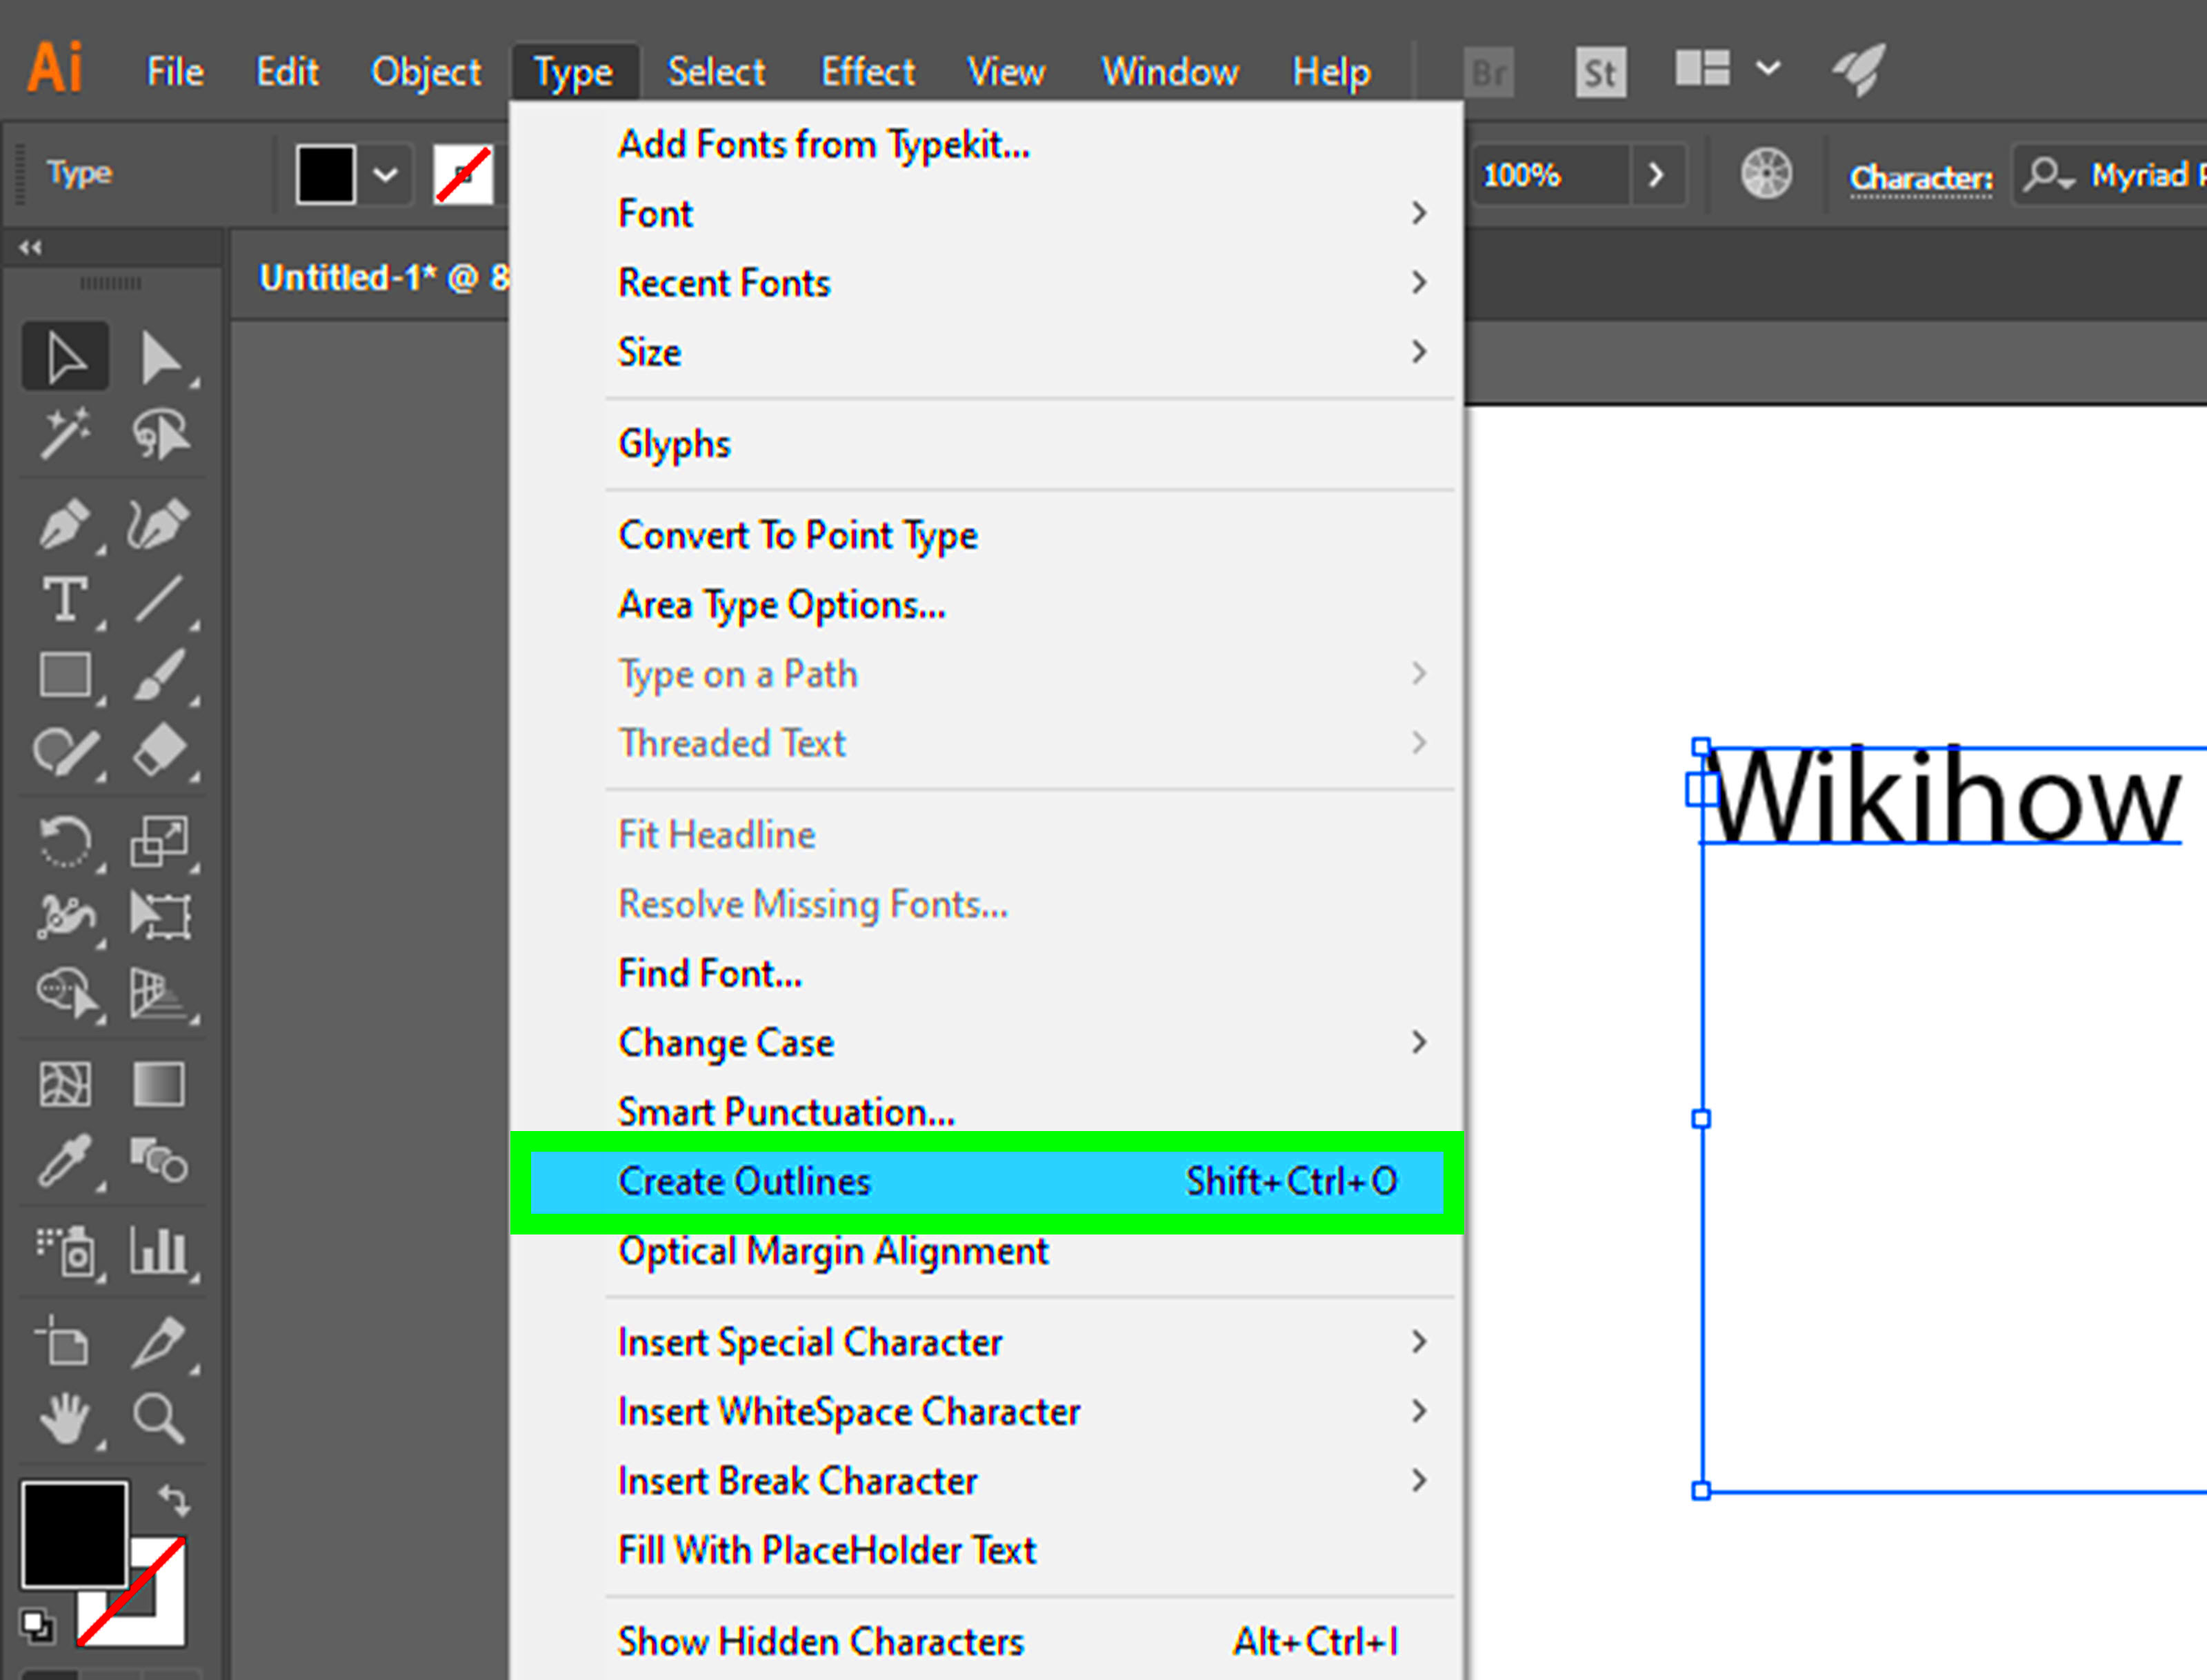
- Step 2: Select the Outline Tool – Once your image is open, look for the outline tool. Depending on your software, this might be labeled as a “Pen Tool,” “Shape Tool,” or “Brush Tool.”
- Step 3: Trace Around the Subject – Carefully trace around the edges of the image that you want to outline. If you’re using a brush tool, you can manually draw around the image, while the pen tool will allow for more precise control.
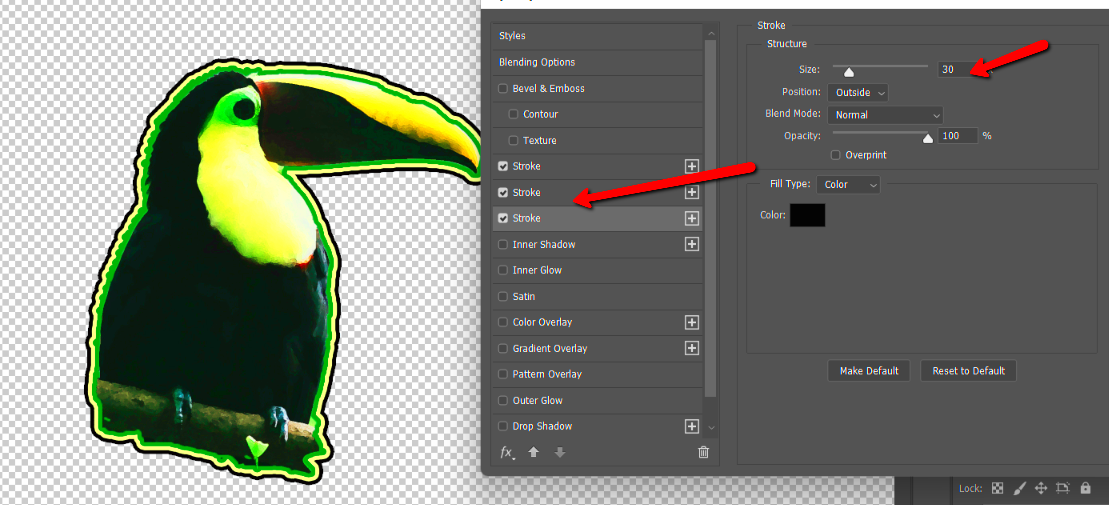
- Step 4: Adjust the Outline – After outlining, adjust the thickness, style, and color of the outline. Choose a contrasting color to make the outline stand out from the background.
- Step 5: Final Touches – Once you’re satisfied with the outline, you can add additional effects, such as shadowing or blending, to make it pop even more.
With these steps, you can create clean and effective outlines for any of your images in no time!
Also Read This: How to Share YouTube Videos on Instagram Effectively
Editing and Refining the Image Outline
Once you’ve created your image outline, it's important to refine it for the best visual appeal. Editing and refining the outline can enhance its quality, make it look sharper, and ensure that it complements the rest of the image. Here’s how you can edit and perfect your outline:
- Smooth Out Rough Edges: If your outline looks jagged or uneven, use the smoothing tool or brush tool to clean up the edges. Many programs have a "smooth" feature that can automatically smooth out rough paths.
- Adjust Thickness and Style: Make sure the outline thickness is appropriate for the image. If it’s too thick, it might overpower the subject. Conversely, if it’s too thin, it might not be noticeable enough. You can also experiment with different line styles, such as dashed or dotted lines, to achieve the desired effect.
- Change Outline Color: To make your outline stand out, choose a color that contrasts with the image. Avoid using colors that blend into the background, as this will make the outline hard to see.
- Apply Shadow or Glow Effects: For added depth, apply shadow or glow effects around the outline. This creates a sense of dimension and can help the outlined element stand out even more.
- Use Layers for Flexibility: When refining the outline, work with layers. This allows you to adjust or remove the outline without affecting the rest of the image.
By carefully editing and refining the outline, you can make sure it complements your image and enhances its overall appearance.
Also Read This: How to View Saved Posts on LinkedIn and Organize Your Content
Best Practices for Clear and Effective Image Outlines
To ensure your image outlines are both clear and effective, there are a few best practices to follow. These guidelines can help you create outlines that enhance the image without distracting from it. Here’s a list of best practices for creating professional-looking image outlines:
- Choose a High Contrast Color: The outline should contrast well with the colors in the image, ensuring it stands out. If you have a light image, use a darker outline, and vice versa.
- Keep the Outline Simple: Avoid making the outline too complicated. A simple, clean outline works best for most images. Too many details in the outline can clutter the design.
- Use Consistent Line Thickness: A uniform line thickness ensures that the outline looks balanced. Inconsistent thickness can make the image appear unprofessional.
- Test Different Styles: Try experimenting with various line styles, like solid, dashed, or dotted outlines. Each style gives a different feel and works better for certain types of images.
- Ensure the Outline Fits the Image: The outline should not overshadow the subject of the image. Keep it subtle yet visible, so the focus remains on the main subject.
- Don’t Overdo It: Outlines should enhance an image, not overpower it. Be careful not to add too many outlines, as this can take away from the overall impact of the design.
By following these best practices, you can create image outlines that are both professional and visually appealing, ensuring your images grab the viewer's attention in the best way possible.
Also Read This: How to Get Accepted into Getty Images Tips for Getting Your Photos Approved by Getty
Common Issues When Creating an Image Outline
While outlining images is a straightforward process, there are some common issues that can arise. Understanding these potential challenges can help you avoid mistakes and create the best possible outlines for your images. Let’s take a look at some of the most frequent issues and how to resolve them.
- Jagged Edges: Sometimes, outlines can appear rough or jagged, especially when using low-resolution images or if the pen tool isn’t adjusted properly. To fix this, you can use a smoothing tool or increase the resolution of your image.
- Inconsistent Line Thickness: If your outline’s thickness isn’t consistent, it can create an uneven look. Ensure you adjust the stroke settings in your software to maintain a uniform line thickness throughout the outline.
- Outline Doesn’t Contrast with the Background: One of the most common mistakes is choosing an outline color that blends with the background, making it hard to see. Always choose a color that contrasts well with both the background and the subject of your image.
- Rough Tracing: When using the pen tool, it’s easy to make rough, uneven strokes. To avoid this, zoom in and take your time while tracing the outline. You can also adjust the curve handles to refine the edges.
- Accidental Cutoff: Sometimes, parts of the image may get accidentally cut off or overlapped during the outlining process. To fix this, zoom in to closely review the image and ensure every part of the subject is properly outlined.
By being aware of these common issues, you can make adjustments during the outlining process to achieve cleaner, sharper results.
Also Read This: Discover Top Strategies to Generate Income on Dailymotion
Frequently Asked Questions about Image Outlining
If you’re new to image outlining or even if you’ve been doing it for a while, you may have some questions about the process. Here are answers to some of the most frequently asked questions:
- What tools are best for outlining an image?
There are many great tools for outlining images, including Adobe Photoshop, GIMP, and Canva. The best tool depends on your needs and experience level. Photoshop is great for professionals, while Canva is perfect for beginners. - How do I create a smooth outline?
To create a smooth outline, use a higher resolution image and a tool with smoothing features. Adjust the curves of your path carefully, and use tools that automatically smooth the outline. - Can I change the outline color after it's created?
Yes, most editing software allows you to change the color of the outline after you’ve drawn it. Simply select the outline and choose a new color. - How thick should my outline be?
The thickness of your outline should depend on the size and style of the image. A thicker outline works well for larger subjects, while a thinner outline is better for smaller or more detailed images. - Why does my outline look pixelated?
Pixelation often occurs if the image resolution is too low. To prevent this, always work with high-resolution images and ensure your output settings are optimized for clarity. - How do I make the outline look more professional?
A clean, smooth line with appropriate contrast against the background is key to a professional-looking outline. Avoid using overly thick lines and ensure that the outline complements the overall design.
These FAQs should help clear up any doubts you may have about outlining images. If you have more specific questions, experimenting with the tools or searching for additional tutorials can offer further guidance.
Conclusion and Final Thoughts on Creating an Image Outline
Creating an outline for an image is an essential skill for designers, photographers, and anyone working with visuals. It can help emphasize important elements and improve the overall composition of the image. With the right tools and techniques, you can easily add an outline to any image, whether you’re looking to create a bold effect or simply highlight key details.
Here are some final thoughts to keep in mind:
- Practice Makes Perfect: The more you practice outlining images, the more confident you’ll become. Don’t be afraid to experiment with different styles and techniques to see what works best for each project.
- Focus on Quality: Always work with high-resolution images and take the time to refine your outlines. A little attention to detail can make a big difference in the final result.
- Keep It Simple: Sometimes, less is more. A simple, clean outline is often more effective than an overly complex one. Make sure the outline complements the subject without overwhelming it.
By following the steps, best practices, and tips shared in this guide, you can master the art of outlining images and create stunning visuals that stand out. Whether you’re working on a personal project or a professional design, a well-done outline can add depth and clarity to any image.

 admin
admin


