Blender is an amazing 3D software used for creating animations, models, and visual effects. Adding images to your Blender project can help enhance the look of your 3D creations. Whether you are looking to use images as backgrounds, textures, or references, Blender offers several ways to incorporate them into your scene. In this guide, we will explore different methods for adding images, including how to set up backgrounds, apply textures, and more. With just a few simple steps, you can bring your project to life with images in Blender!
Preparing the Image for Blender
Before you add an image to your Blender scene, it’s important to prepare it properly. Here are some key steps to ensure the image fits into your project seamlessly:
- Check the Resolution: Make sure the image has a resolution that suits your project. Higher resolutions work better for detailed textures, while lower resolutions can help with performance if you’re working with multiple images.
- File Format: Blender supports various file formats like PNG, JPG, TIFF, and more. Choose a format that best suits the purpose of the image, for instance, use PNG for transparency.
- Aspect Ratio: Ensure the aspect ratio of the image matches what you need in Blender. You can adjust the image in an image editor to fit your project’s needs.
- Color Space: Blender works well with sRGB and linear color spaces. Ensure your image is in the correct color space for the most accurate rendering.
By preparing your image before importing it into Blender, you’ll avoid unnecessary adjustments later on and ensure it fits into your project just right.
Also Read This: Editing an ISO Image: Step-by-Step Guide
How to Import Images into Blender
Importing images into Blender is an easy process, and there are several ways to do it depending on how you plan to use the image in your project. Here's how you can import images in Blender:
- Method 1: Using the Image as a Background
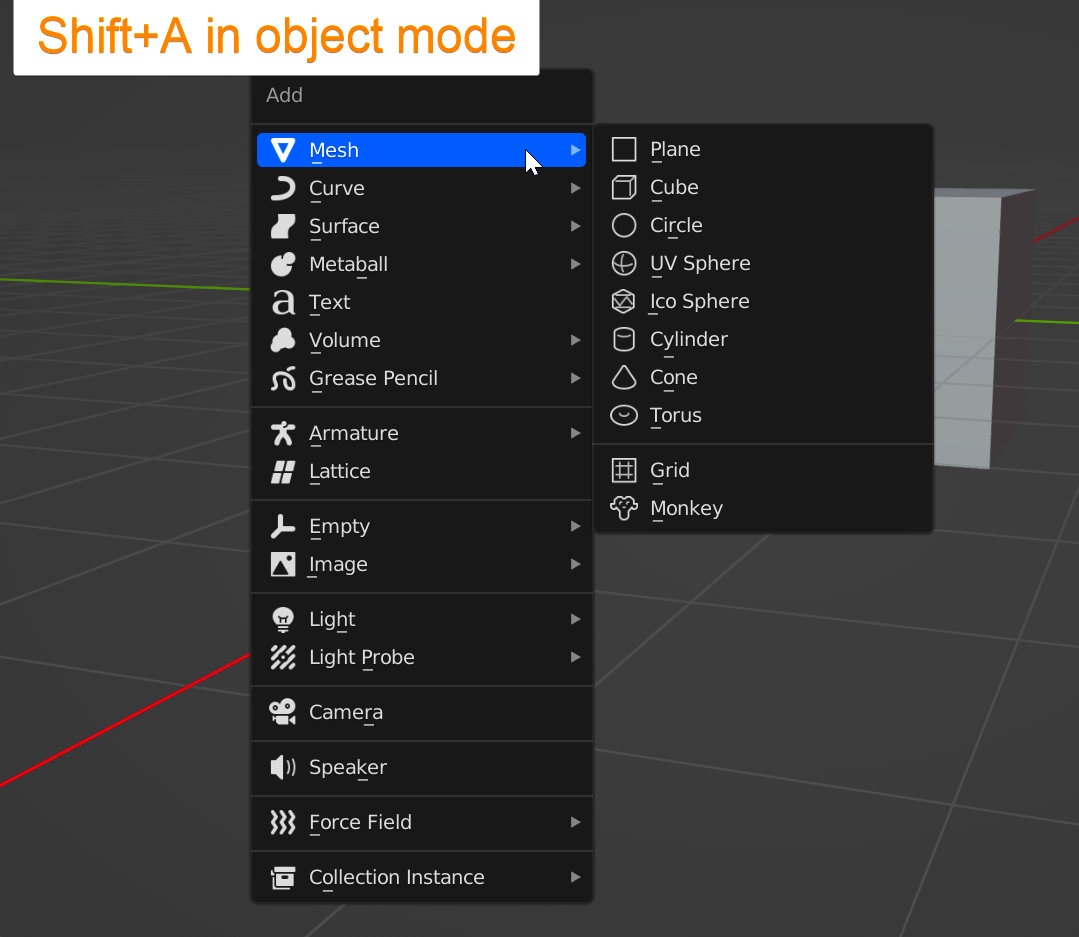
1. Go to the 3D view, and press Shift + A to open the Add menu.
2. Select Image then Background to add an image as a reference in your scene.
3. Navigate to the location of the image, select it, and press Enter to add it to the background. - Method 2: Using the Image as a Texture
1. Select the object you want to apply the texture to.
2. In the Shading tab, create a new material and add an Image Texture node.
3. In the Image Texture node, click on the open button to select the image from your file directory. - Method 3: Image as a Plane
1. Go to the File menu, then Import > Images as Planes.
2. This option automatically creates a plane with the image applied as a texture, which is great for quick setup.
Each method can be adjusted based on the specific needs of your project, and once the image is imported, you can move, scale, and rotate it within your 3D scene as needed. Blender makes it easy to bring your images into the project and start using them right away.
Also Read This: Resizing Images in GIMP Made Easy
Setting Up the Image as a Background
Setting up an image as a background in Blender can be incredibly useful, especially when you need reference images for modeling or creating scenes. The process is simple and ensures that you have a clear visual guide for your work. Here’s how you can easily set up an image as a background:
- Step 1: Open the 3D View
Start by opening the 3D View in Blender. This is where you’ll place the image as a background to guide your modeling. - Step 2: Add the Image
Press Shift + A to bring up the Add menu. From the options, choose Image and then Background to import your image into the scene. - Step 3: Position the Image
After adding the image, you can adjust its position and scale to suit your needs. Use the G key to grab and move it around, or S to scale it. This helps in getting the correct reference for modeling. - Step 4: Set Image Properties
You can adjust the opacity and other properties of the image through the properties panel to make it less intrusive while you work. Set the transparency to a level that works best for your scene.
By following these steps, you can easily set up an image as a background in Blender and use it for accurate modeling and scene creation. It’s a simple yet powerful way to enhance your workflow.
Also Read This: Curving Images for Unique Designs
Using Images for Texture Mapping
Texture mapping is one of the most common uses for images in Blender. It’s the process of applying a 2D image to a 3D object to give it surface details. Whether you’re adding wood grain to a table or skin texture to a character, here’s how you can use images for texture mapping in Blender:
- Step 1: Select the Object
First, select the 3D object that you want to apply the texture to. You can do this by right-clicking the object in the viewport. - Step 2: Open the Shading Workspace
Go to the Shading tab at the top of Blender’s interface. This opens up the node editor where you can control the material and textures applied to your object. - Step 3: Add an Image Texture Node
In the node editor, add an Image Texture node by pressing Shift + A, selecting Texture, and then Image Texture. Connect this node to the Base Color input of the Principled BSDF shader node. - Step 4: Load the Image
In the Image Texture node, click Open and select the image you want to use for the texture. Once loaded, the image will be mapped onto the object’s surface. - Step 5: Adjust the Mapping
You may need to adjust the way the texture is mapped. You can use the UV Mapping method for more control over how the texture fits on the object.
Using images for texture mapping in Blender can add realistic details to your models. It’s a technique used across many industries, from game development to animation, and once you get the hang of it, it can really enhance your creative projects.
Also Read This: Unblurring a YouTube Video with Effective Techniques and Tools
Adjusting the Image's Transparency
Adjusting the transparency of an image can be especially helpful when you need the image to blend with the background or other objects in your scene. In Blender, you can modify an image’s transparency using the Alpha channel. Here's how you can adjust the transparency of an image:
- Step 1: Ensure the Image Has an Alpha Channel
First, make sure your image has an alpha channel. Formats like PNG support transparency, so use an image with transparency for best results. If your image is not transparent, you can use an image editor to add transparency before importing it into Blender. - Step 2: Add the Image as a Texture
Just like in texture mapping, add the image as a texture to your object. Once the image is loaded in the Image Texture node, you will be able to control its transparency. - Step 3: Set the Transparency in the Shader
To adjust transparency, connect the Alpha output of the Image Texture node to the Alpha input of the Principled BSDF shader node. This will allow the image’s transparency to affect the object it’s applied to. - Step 4: Adjust the Transparency Factor
You can adjust the transparency by modifying the Alpha value in the Image Texture node or by using a Mix Shader to blend the texture with a transparent material. A lower alpha value makes the image more transparent, while a higher value increases opacity. - Step 5: Fine-Tune with Render Settings
In the render settings, make sure you have transparency enabled in the render engine (like Cycles or Eevee). This will ensure that the transparent areas of the image render correctly in your final output.
Adjusting an image’s transparency in Blender adds flexibility to your designs. It can be used for effects like glass, water, or even faded images that allow the background to show through. Mastering this technique opens up new creative possibilities for your projects.
Also Read This: How to Rotate an Image in Snipping Tool
Common Issues When Adding Images in Blender
While adding images to your Blender project can enhance your work, it’s not always a smooth process. You may encounter a few common issues that can make things frustrating. Don’t worry, though! These problems are easy to fix once you know what to look for. Let’s explore some of the most common issues you might face when adding images to Blender:
- Image Not Displaying in the Viewport: This is a common issue when you add an image as a background or reference. It might not show up in the 3D viewport because of incorrect settings. Ensure that your image is set to the correct display mode (e.g., Background or Plane) and check the viewport display options. You can also try reloading the image to see if it fixes the problem.
- Texture Not Showing on Object: If your texture is not appearing on your 3D object, it’s likely due to incorrect mapping or material settings. Check that your image is properly connected to the material and ensure the object has the correct UV mapping. Sometimes, switching between rendered and solid view modes can also affect texture visibility.
- Transparency Issues: If your image has transparent areas but they’re not showing up in the render, you may need to adjust the material’s settings. Make sure the transparency option is enabled in your material settings and that your image has an alpha channel (for example, PNG). You may also need to enable transparent rendering in the render settings for it to appear correctly.
- Image Resolution Problems: Using very high-resolution images in Blender can slow down your project, especially if you’re working with multiple textures. Try resizing your images before importing them into Blender to avoid performance issues. Additionally, low-resolution images can appear blurry when applied to large objects, so it's important to find the right balance.
By being aware of these issues and knowing how to fix them, you’ll be able to handle images in Blender like a pro and avoid common mistakes that could hinder your progress.
Also Read This: Understanding EPS on iStock for File Formats
FAQ
Here are some frequently asked questions that can help you with adding images in Blender:
- What file formats are best for images in Blender?
Blender supports a variety of image formats, but for best results, use PNG for images with transparency or JPG for standard images without transparency. TIFF and EXR formats are also useful for high-quality textures. - How can I use a background image in Blender?
To set a background image in Blender, press Shift + A in the 3D view, choose Image, and select Background. Then, select the image from your file explorer. You can adjust its position and opacity from the properties panel. - Can I add images as textures on multiple objects?
Yes! You can apply the same image as a texture to multiple objects. Just use the same image texture node in the material settings for each object, or link the material to multiple objects to share the texture. - Why isn’t my image showing up in the render?
If your image is not appearing in the render, it could be due to several reasons such as incorrect material settings, missing transparency in the image, or wrong render engine settings. Make sure your image has the correct settings and that the render engine supports transparency if applicable. - How do I fix texture stretching on an object?
Texture stretching happens when the UV map of the object is distorted. To fix this, go to the UV Editing workspace, and adjust the UV map to match the shape of the object. You can also use different unwrapping methods to improve the texture mapping.
Conclusion
Adding images in Blender is a powerful technique that can bring your 3D creations to life. Whether you're using images as textures, backgrounds, or references, understanding how to properly import and use them can elevate your work. From ensuring image transparency to fixing common issues like texture visibility, mastering these steps is key to creating realistic and detailed projects. Remember to always check the file format, resolution, and UV mapping, and don't hesitate to troubleshoot when things don’t go as planned. With these tips, you’ll be able to use images in Blender effectively and efficiently, boosting the quality of your 3D designs.

 admin
admin


