Word Wizardry: Rotating a Picture in Microsoft Word
By: HD Stock Images
February 5, 2024
722
Rotating pictures in Microsoft Word might seem like a basic task, but it holds significant importance in document creation. Here's why you should consider incorporating picture rotation into your Word wizardry:
Enhanced Document Layout: Rotating pictures allows you to fine-tune the layout of your document. Whether you're creating a report, presentation, or a simple flyer, adjusting the orientation of images can improve the overall composition.
Improved Aesthetics: Visual appeal matters, and rotated pictures can contribute to a more visually appealing document. By strategically positioning images, you can create a dynamic and eye-catching design that captures the reader's attention.
Effective Information Conveyance: Sometimes, the direction in which an image faces can convey information more effectively. For instance, in a step-by-step guide, aligning images in the direction of the associated text can enhance comprehension.
Now, let's delve into the details of how to rotate pictures in Microsoft Word:
Step-by-Step Guide
Rotating a picture in Microsoft Word is a straightforward process. Follow these simple steps:
Select the Picture: Click on the image you want to rotate.
Go to the "Format" Tab: Navigate to the "Format" tab in the Word ribbon at the top of the screen.
Click "Rotate": Find the "Rotate" option in the toolbar. You can choose to rotate the image left or right, flip it horizontally or vertically, or use the "Free Rotate" option for more precise adjustments.
Adjust as Needed: Use the rotation handle on the image to fine-tune the angle. Microsoft Word provides a live preview, allowing you to see the changes in real-time.
Additionally, consider these tips and tricks to make the most out of picture rotation in Microsoft Word:
Combine rotation with other image editing features, such as resizing and cropping, for comprehensive adjustments.
Experiment with different angles to find the orientation that best complements your document's overall design.
Ensure that rotated images align harmoniously with the surrounding text and other visual elements.
By mastering the art of rotating pictures in Microsoft Word, you open up a realm of possibilities for creating documents that not only convey information effectively but also leave a lasting visual impact on your audience.
Step-by-Step Guide
Rotating pictures in Microsoft Word is a breeze when you follow these step-by-step instructions. Whether you're a seasoned Word user or just starting, here's a simple guide to help you effortlessly rotate images within your documents:
Select the Picture: Begin by clicking on the image you want to rotate. This will activate the picture, allowing you to apply various modifications.
Navigate to the "Format" Tab: Head to the top of your Word window and locate the "Format" tab in the ribbon. Clicking on this tab will reveal a range of formatting options for your selected image.
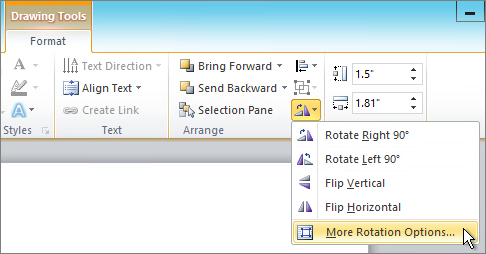
Access the "Rotate" Option: Within the "Format" tab, look for the "Rotate" option. Clicking on it will present you with several choices, including "Flip Vertical," "Flip Horizontal," "Rotate Left 90 degrees," and "Rotate Right 90 degrees."
Choose Your Rotation: Depending on your preference, select the appropriate rotation option. If you want to make a precise adjustment, consider using the "Free Rotate" option, allowing you to manually set the angle of rotation.
Utilize the Rotation Handle: Once you've selected a rotation option, a rotation handle will appear on the image. Click and drag this handle to visually rotate the picture in real-time. Microsoft Word provides a live preview, ensuring you achieve the desired orientation.
For a quick reference, here's a table summarizing the rotation options available in Microsoft Word:
Rotation Option
Effect
Flip Vertical
Mirror the image vertically.
Flip Horizontal
Mirror the image horizontally.
Rotate Left 90 degrees
Rotate the image counterclockwise by 90 degrees.
Rotate Right 90 degrees
Rotate the image clockwise by 90 degrees.
Free Rotate
Manually set the angle of rotation for precise adjustments.
Remember to experiment with different angles and explore the live preview feature to achieve the perfect rotation for your image. By mastering this step-by-step guide, you'll have the skills to effortlessly enhance the visual appeal of your Microsoft Word documents.
Unlock the full potential of picture rotation in Microsoft Word with these insightful tips and tricks. Whether you're a design enthusiast or someone looking to spruce up your documents, these strategies will elevate your Word wizardry:
Combine Features: Don't limit yourself to just rotating pictures. Experiment with combining rotation with other image editing features, such as resizing and cropping, to achieve comprehensive adjustments that enhance the overall document layout.
Varied Angles: Play with different rotation angles to discover what works best for your document. Sometimes, a slight tilt or a specific angle can add a touch of creativity and uniqueness to your visuals.
Align with Text: Ensure that rotated images align harmoniously with the surrounding text. Use the alignment tools in Microsoft Word to create a seamless integration of images and text, contributing to a polished and professional look.
As you dive into the realm of picture rotation, consider these advanced tips to further enhance your Word document design:
Layering Effects: Experiment with layering effects by overlaying rotated images on top of each other. This can create visually appealing collages or emphasize specific elements within your document.
Text-Wrapping: Utilize text-wrapping options to integrate rotated pictures seamlessly into your document's flow. This is particularly useful when you want text to wrap around a rotated image in a natural and aesthetically pleasing manner.
Consistency Matters: Maintain a consistent style throughout your document. If you choose to rotate pictures, ensure that the rotation angles align cohesively, providing a professional and polished appearance.
For quick reference, here's a table summarizing the advanced tips and tricks for picture rotation in Microsoft Word:
Tip or Trick
Description
Combine Features
Experiment with multiple image editing features for comprehensive adjustments.
Varied Angles
Play with different rotation angles to discover creative and unique visual effects.
Align with Text
Ensure that rotated images align harmoniously with surrounding text for a polished look.
Layering Effects
Create visually appealing collages by overlaying rotated images on top of each other.
Text-Wrapping
Use text-wrapping options to integrate rotated pictures seamlessly into the document's flow.
Consistency Matters
Maintain a consistent style by ensuring that rotation angles align cohesively throughout the document.
By incorporating these tips and tricks into your Microsoft Word endeavors, you'll not only master the art of picture rotation but also unleash your creativity to craft visually stunning documents.
While rotating pictures in Microsoft Word can be a straightforward process, it's essential to be aware of common pitfalls that users may encounter. By steering clear of these mistakes, you can ensure a smooth and seamless experience in enhancing your document's visual appeal:
Forgetting to Select the Picture: One of the most common errors is attempting to rotate an image without selecting it first. Always click on the picture you want to rotate before accessing the rotation options.
Overlooking Live Preview: Microsoft Word provides a live preview feature during picture rotation. Some users overlook this valuable tool, missing the opportunity to see real-time adjustments before finalizing the rotation. Always take advantage of the live preview to achieve the desired angle.
Ignoring Alignment: Failing to align rotated pictures properly with the surrounding text or other visual elements can disrupt the document's flow. Ensure consistent alignment to maintain a professional and polished appearance.
Let's explore these common mistakes in more detail to help you navigate potential pitfalls:
1. Forgetting to Select the Picture
Before attempting to rotate an image, ensure that you have selected it by clicking on the picture. Microsoft Word needs to recognize the specific picture you want to modify, and overlooking this step is a common oversight.
2. Overlooking Live Preview
The live preview feature is a powerful tool that allows you to see how your image will appear after rotation in real-time. Some users skip this step and miss the chance to make precise adjustments. Always pay attention to the live preview to achieve the perfect rotation angle.
3. Ignoring Alignment
Proper alignment is crucial when working with rotated pictures. Disregarding the alignment with surrounding text or other elements can result in a visually disjointed document. Take the time to align your rotated images consistently for a cohesive and professional look.
For a quick reference, here's a table summarizing the common mistakes to avoid when rotating pictures in Microsoft Word:
Mistake
Description
Forgetting to Select the Picture
Attempt to rotate an image without selecting it first, leading to unrecognized modifications.
Overlooking Live Preview
Miss the real-time adjustments provided by the live preview feature, resulting in imprecise rotations.
Ignoring Alignment
Disregard proper alignment with surrounding text or visual elements, leading to a disjointed document appearance.
By avoiding these common mistakes, you'll navigate the world of picture rotation in Microsoft Word with confidence and finesse, ensuring your documents shine with professional polish.
As you embark on your journey to master picture rotation in Microsoft Word, it's natural to have questions. Here's a compilation of frequently asked questions to provide clarity and guidance:
Q: Can I Rotate Multiple Pictures at Once?
A: Yes, you can rotate multiple pictures simultaneously in Microsoft Word. Hold down the "Ctrl" key while clicking on the images you want to rotate, then follow the rotation steps. This is a convenient way to maintain consistency in orientation across multiple visuals.
Q: Is There a Limit to the Rotation Angle?
A: While the standard rotation options include 90-degree increments, the "Free Rotate" feature allows you to set a custom angle. There is no strict limit to the rotation angle, providing flexibility for precise adjustments.
Q: Can I Undo a Rotation?
A: Yes, you can undo a rotation in Microsoft Word. Simply press "Ctrl + Z" immediately after making the rotation to revert to the previous state. This allows you to experiment with different angles without the fear of permanent changes.
Q: Will Rotating Pictures Affect Image Quality?
A: Rotating pictures in Microsoft Word does not inherently affect image quality. However, repeated rotations or resizing may lead to a gradual loss of quality over time. It's advisable to work with high-resolution images and avoid excessive adjustments for optimal results.
Take your document design skills to the next level by delving into advanced techniques for picture rotation in Microsoft Word. These methods go beyond the basics, allowing you to unleash your creativity and achieve stunning visual effects:
Layering Effects: Experiment with layering by overlaying rotated images on top of each other. This technique adds depth to your document, creating visually appealing collages or emphasizing specific elements within your content.
Text-Wrapping Mastery: Master the art of text-wrapping to seamlessly integrate rotated pictures into your document's flow. This technique is especially useful when you want text to wrap around a rotated image in a natural and aesthetically pleasing manner.
Grouping Rotated Elements: Consider grouping multiple rotated elements together. This advanced technique allows you to treat a combination of images as a single entity, making it easier to manage and manipulate complex visual arrangements.
Let's explore these advanced techniques in more detail to empower you with a deeper understanding:
1. Layering Effects
Experiment with layering effects by overlaying rotated images on top of each other. This technique is ideal for creating dynamic visuals that capture attention. To implement layering, select multiple images, rotate them as desired, and arrange them to achieve the desired composition.
2. Text-Wrapping Mastery
Mastering text-wrapping allows you to integrate rotated pictures seamlessly into your document's flow. This technique ensures that text flows naturally around rotated images, preventing disruptions in your document's layout. Explore different text-wrapping options in Microsoft Word to find the style that best complements your design.
3. Grouping Rotated Elements
Consider grouping multiple rotated elements together to streamline your document editing. Grouping allows you to treat a combination of images as a single unit, making it easier to move, resize, or rotate complex visual arrangements. To group elements, select them, right-click, and choose the "Group" option from the context menu.
For quick reference, here's a table summarizing the advanced techniques for picture rotation in Microsoft Word:
Technique
Description
Layering Effects
Overlay rotated images to create visually appealing collages or emphasize specific elements.
Text-Wrapping Mastery
Integrate rotated pictures seamlessly into the document's flow by mastering text-wrapping options.
Grouping Rotated Elements
Streamline editing by grouping multiple rotated elements together for easier manipulation.
By incorporating these advanced techniques into your Microsoft Word toolkit, you'll have the tools to create visually stunning documents that go beyond the ordinary, showcasing your proficiency in the realm of document design.
Explore the collaborative possibilities and enhanced visual impact that rotated pictures bring to the table in Microsoft Word. Collaborative editing becomes a dynamic and creative process when combined with strategically rotated images. Here's a closer look at how you can leverage this feature for impactful collaboration:
Enhancing Document Visuals: Incorporating rotated pictures in collaborative documents adds a layer of visual sophistication. Whether you're co-authoring a report, presentation, or proposal, strategically placed images contribute to a more engaging and professional appearance.
Communication Through Imagery: Rotated pictures can serve as visual cues or highlights, conveying specific information without the need for extensive written explanations. This is particularly valuable in collaborative projects where clarity and efficiency are paramount.
Team Consistency: Implementing a consistent approach to picture rotation within a team ensures uniformity across documents. Establishing guidelines for image orientation helps maintain a cohesive visual style, enhancing the overall professionalism of collaborative efforts.
Let's delve into the details of collaborative editing with rotated pictures in Microsoft Word:
1. Enhancing Document Visuals
Collaborative documents often benefit from a polished visual presentation. By strategically rotating pictures, you not only contribute to the overall aesthetics but also create a document that stands out. Ensure that the rotation aligns with the document's theme and enhances its visual appeal.
2. Communication Through Imagery
Images have the power to convey messages effectively. In collaborative projects, rotated pictures can act as visual aids, emphasizing key points or guiding the reader's attention. This visual communication reduces the reliance on extensive text, making documents more accessible and engaging.
3. Team Consistency
Establishing consistency within a team is crucial for a professional outcome. When multiple individuals are working on a document, having guidelines for picture rotation ensures a unified visual style. This consistency contributes to the document's coherence and elevates the overall quality of collaborative work.
By incorporating rotated pictures into collaborative editing processes, you not only enhance visual appeal but also streamline communication and maintain a professional team aesthetic. Take advantage of this creative feature in Microsoft Word to elevate collaborative document projects.
Conclusion
As we wrap up our exploration of Word Wizardry and the art of rotating pictures in Microsoft Word, it's evident that this seemingly simple feature holds the key to unlocking a world of creative possibilities. From enhancing document layouts to adding a touch of visual flair, the ability to rotate pictures empowers users to craft documents that not only inform but captivate.
Throughout this journey, we've covered essential aspects, from a step-by-step guide for beginners to advanced techniques for seasoned document designers. We've highlighted common mistakes to avoid, provided insightful tips and tricks, and even ventured into the realm of collaborative editing, where rotated pictures become valuable communication tools.
Remember to experiment with various rotation angles, explore layering effects, and master text-wrapping to create documents that truly stand out. Consistency is key, both in individual projects and collaborative endeavors, ensuring a professional and polished outcome.
As you continue to refine your Word wizardry skills, keep in mind that the ability to rotate pictures is just one tool in your arsenal. Combine it with other features, experiment with different styles, and let your creativity flourish. Whether you're crafting reports, presentations, or any other document, the skillful use of rotated pictures adds a dynamic element that sets your work apart.
So, embrace the magic of Word Wizardry, and may your documents always reflect your unique style and creativity. Happy rotating!
About Author
admin
Making up design and coding is fun. Nothings bring me more pleasure than making something out of nothing. Even when the results are far from my ideal expectations. I find the whole ceremony of creativity completely enthralling. Stock Photography expert.
 admin
admin


