In your presentations, circular images can lend a unique touch to them making them more appealing and interesting from the visual point of view. Compared to standard rectangular images, circular images appear softer in nature and help direct audience’s attention to important details. This is because they are often employed in profiles, logos as well as infographics creating harmony and balance.
This article will explore some valid reasons why using Round photographs may be relevant; these include:
- Enhanced Aesthetics: Circular images can break the monotony of straight lines and sharp corners.
- Improved Focus: Circular cropping draws the eye directly to the subject of the image.
- Branding: Circular images are commonly used in logos and profiles, making them instantly recognizable.
- Versatility: They can be used in various contexts, from personal presentations to professional portfolios.
Getting Started with Google Slides
Prior to us plunging into circular images, let’s get used to Google Slides. This is a free online tool perfect for creating presentations and it can be accessed from any device that has internet connectivity.
In order to start out, follow these instructions:
- Open your web browser and go to Google Slides.
- Log in with your Google account.
- Create a new presentation by clicking on the “+” button.
- Select a blank slide layout for more flexibility.
After opening your presentation, it’s time to get started with circular images!
Also Read This: Top Image Enhancement Companies Across the USA
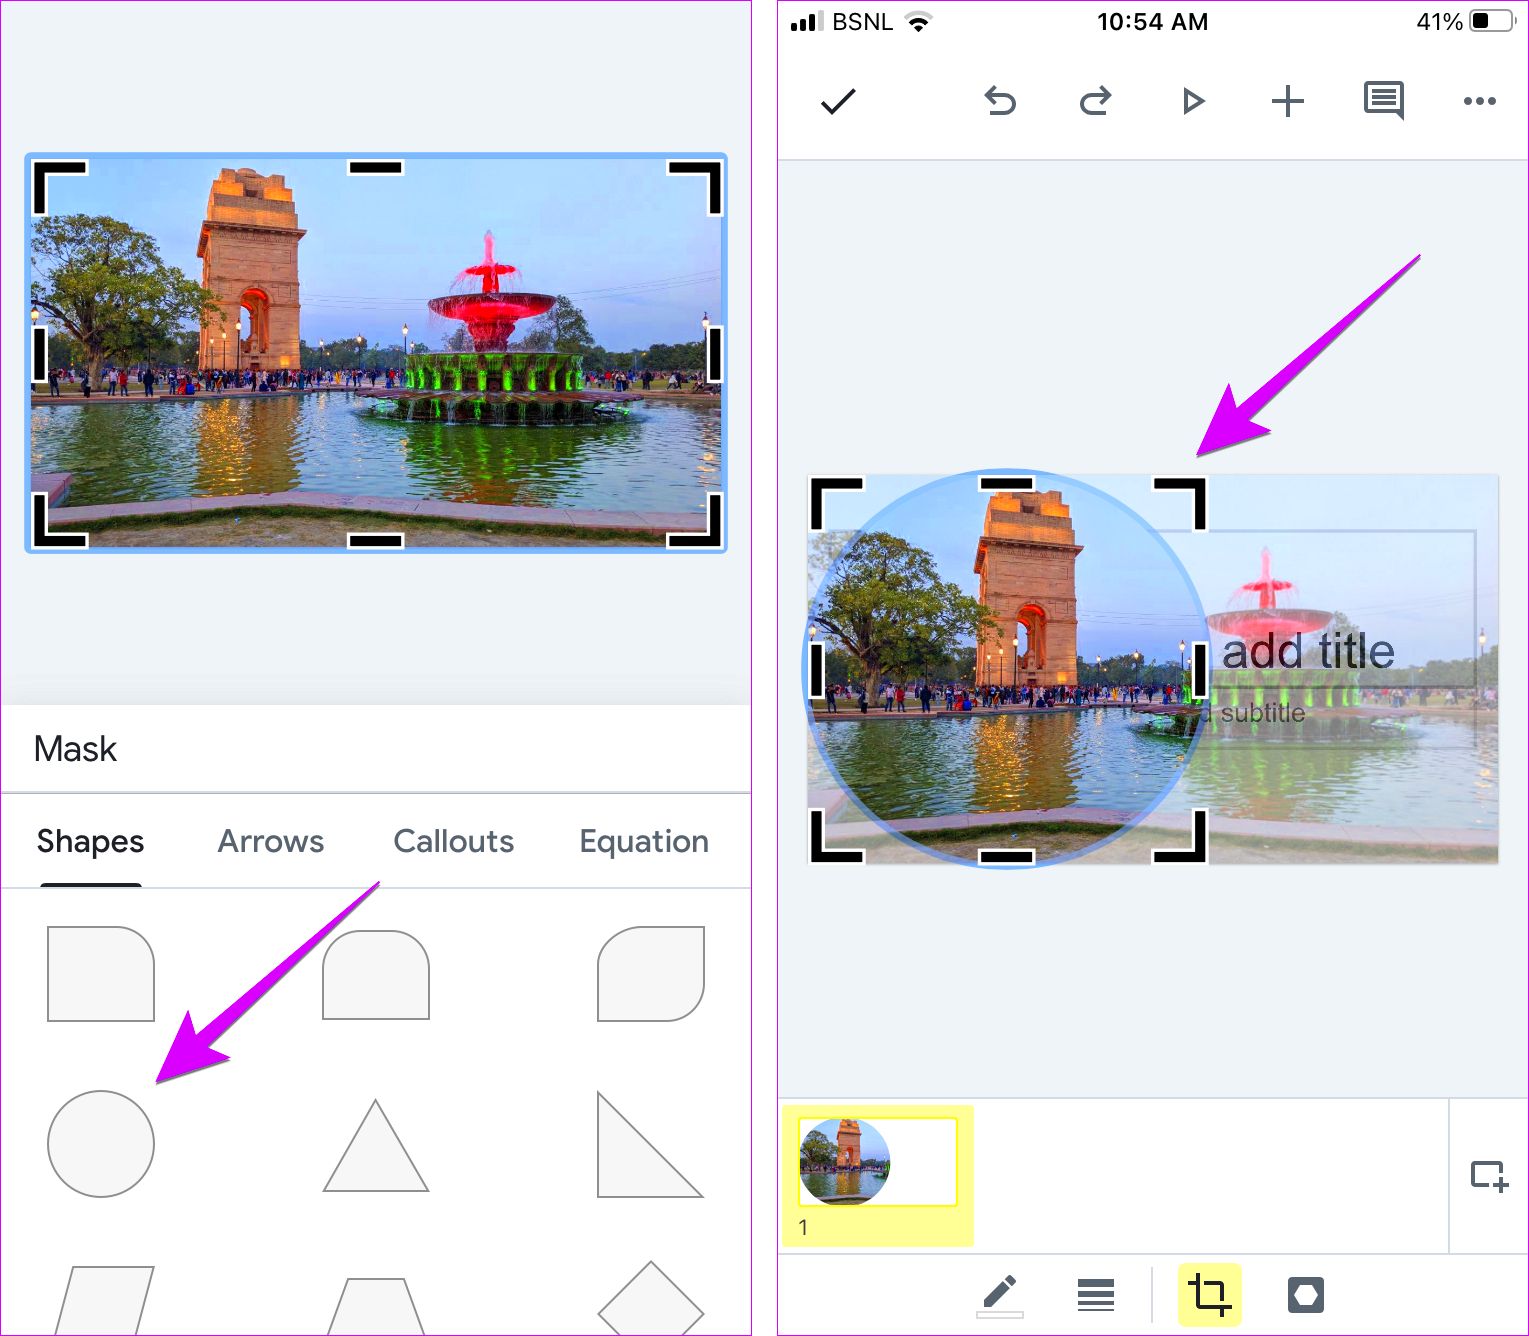
Using Shapes to Create Circular Images

Now that your Google Slides presentation is prepared, let’s utilize shapes to create circular images. It’s an easy procedure that make your images neat.
The following is the procedure for doing it:
- Go to the slide where you want to add a circular image.
- Click on the “Shape” icon in the toolbar.
- Select “Shapes” and then choose the circle option.
- Click and drag on the slide to draw a circle.
After obtaining your circle, you may customize its size and position to suit your design.
This is your next step: please insert the image into the circular object.
- Right-click on the circle and select “Format options.”
- Choose “Fill color” and then click on “Image.”
- Upload your image from your device or insert it from Google Drive.
Accordingly, your picture shall be displayed in another circular style! This is not only a professional way, but it also ensures that all the designs of your presentation remain uniform and consistent.
Also Read This: How to Find the Original Image: Methods for Tracing Image Sources
Inserting Your Image into Google Slides
Having made a circular form for the graphic material now, you need to put the image in Google Slides. The importance of this phase cannot be overrated as it enables your viewers to visualize the graphical contents connected with what you are communicating. No cause for alarm; this is easy!
In order to put your image, do the following things:
- Make sure you have your circular shape selected on the slide.
- Right-click on the shape and choose the “Fill” option from the menu.
- Select “Image” and then choose “Upload from computer” if the image is stored on your device.
- If your image is in Google Drive or on the web, select the appropriate option to find your image.
Once you pick the image, it will by itself fill up the round portion. If however, the photo seems not fitting; adjust and crop in order to have a perfect fit.
Always select high-definition images for best quality sounds like my advice. Your slides will appear more professional if you have sharper images!
Also Read This: Behind the Scenes of TikTok’s Algorithm: How Your Videos Are Ranked
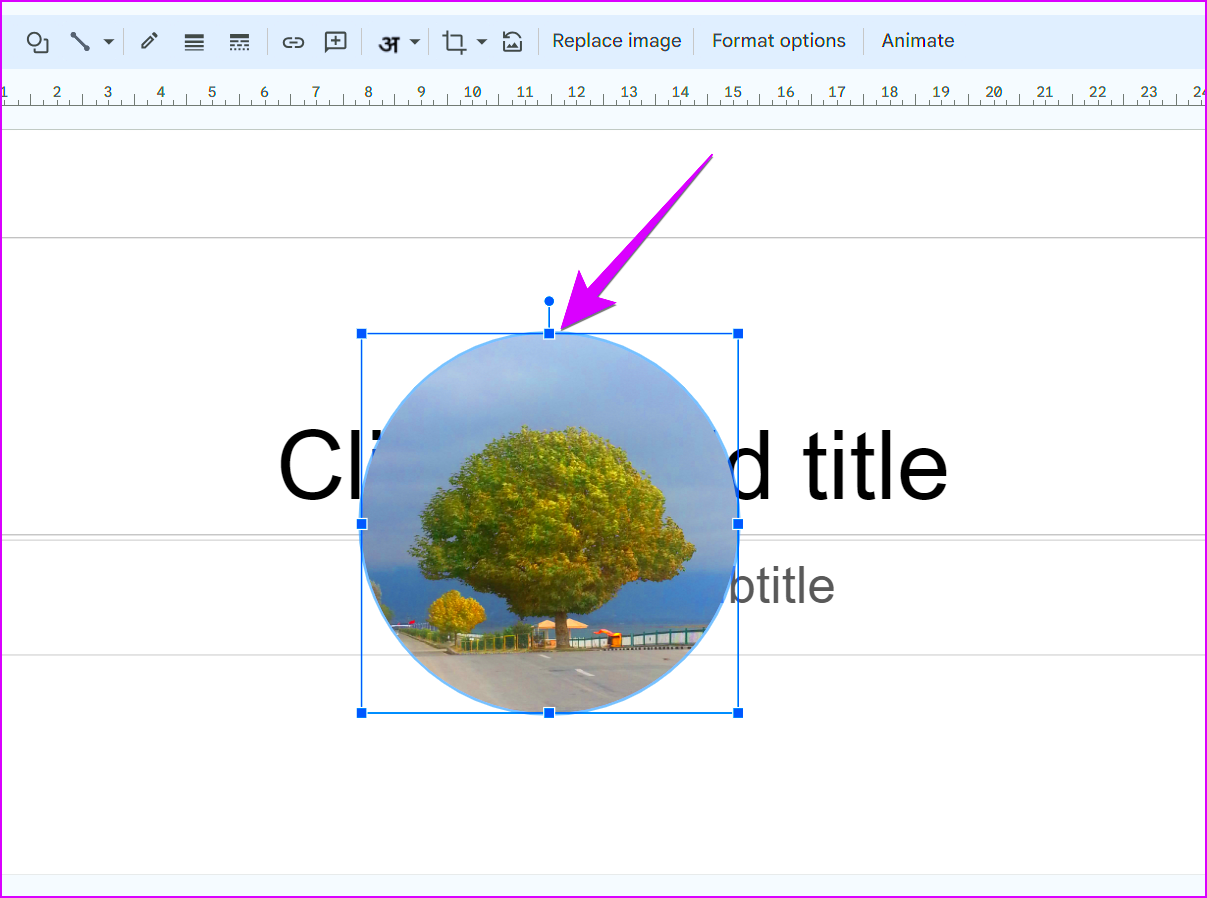
Adjusting and Cropping the Image
Once your picture is placed into the round shape, a couple of minor tweaks might be required. This makes certain that the image’s central point is correctly shown and boosts the overall appeal of your slide.
You can use the following steps to crop and adjust the image:
- Click on the circular shape to select it.
- Right-click and select “Format options.”
- Look for the “Crop” tool and click on it.
- Adjust the image by dragging the edges until the desired part of the image is visible.
The image you have may be moved within the circular field as per your discretion. Additionally, the size of the circle shape can be changed by clicking and dragging on its corners. This will enable better alignment with your text and also with other components on the slide.
Always ensure that your image is not just present but also supports your communication in terms of clarity.
Also Read This: How to Print Two Images on a Single Page
Enhancing Your Circular Images with Effects
With your circular image correctly placed, it is time to discuss ways of improving it with effects. The addition of effects is very important in making the images more outstanding and thus giving the slides a professional look.
Some ways of improving your circular images include the following:
- Add a Border: Right-click on your image, select “Format options,” and then choose “Border.” You can adjust the color and thickness to make it pop.
- Shadow Effects: In the same “Format options” menu, you can add a drop shadow. This creates depth and makes the image feel more integrated into the slide.
- Reflection: Consider adding a reflection effect to give a polished, elegant look. This is also found under “Format options.”
Furthermore, if a minimalistic impact that does not overshadow your writing is what you wish for; then modifying the opacity of the picture would be of great help. This is particularly handy if you wish to put images or writings over your round photo.
Style it out until you find what is appropriate for you with these effects. Think of a well designed slide and how influential it could be!
Also Read This: How to Lock an Image in Word
Saving and Exporting Your Presentation
It is important to save and export your presentation with round images properly after doing the extensive work. This way, one can ensure that changes are protected and share the work easily. Google Slides however avails an easy way for this!
In order to save your presentation:
- Google Slides automatically saves your work as you go. You’ll see “All changes saved in Drive” at the top of the screen.
- If you want to make sure everything is saved, click on “File” and then “Save.”
There are different formats in which you can export your presentation or offline work in case you want to share it:
- Click on “File” in the menu.
- Select “Download.”
- Choose the format you need, such as Microsoft PowerPoint (.pptx), PDF document (.pdf), or even as an image file.
Various formats are meant for different uses. For example, exporting as PDF is a good option if you want to share a document without changing its format but a .pptx file allows further editing with Microsoft PowerPoint. Hence, always select the best suited format!
Also Read This: how to save images from flickr
Frequently Asked Questions
When it comes to using Google Slides and round images, there might be a number of things you want to understand better. The following are some frequent questions that may assist you in the course:
- Can I edit the circular image after inserting it? Yes, you can click on the shape and access the “Format options” to make adjustments at any time.
- What if my image doesn’t fit perfectly in the circle? You can crop and reposition the image within the shape until you’re satisfied with how it looks.
- Are there any size limitations for images? While there are no strict limits, larger images may take longer to upload and may affect the performance of your slides.
- Can I use circular images in printed presentations? Absolutely! Circular images can enhance the look of printed materials just as much as they do in digital formats.
In case of inquiries or challenges encountered, you can always refer to Google Slides’ assistance tools or online discussion platforms!
Conclusion
Make your presentations have an eye-catching and formal look by forming and utilizing round images in Google Slides. Just stick to the steps given above, and you will get to insert, modify and improve your images without much effort so that they will align well with your content.
Make sure to save and export your presentation correctly so that all your efforts remain intact and can be shared easily. Also, remember to make use of various effects and styles so that you can identify the ones that suit your individual presentation in the best way possible!
Developing skill in Google Slides would make you be at ease for its use and application, enabling you to make striking presentations which will hold the interest of your audience. Therefore, start working on your next project; let yourself express your imaginative side!
 admin
admin


