Procreate is a powerful digital painting app designed for artists, designers, and anyone who loves to create. Available exclusively on iPad, it offers a user-friendly interface and a wide array of features that make drawing, painting, and editing images an enjoyable experience. One of the standout features of Procreate is its intuitive touch controls, allowing for smooth brush strokes and effortless navigation.
Some key features of Procreate include:
- Layer System: Work with multiple layers to create complex artworks without losing detail.
- Custom Brushes: Create or download a variety of brushes for different artistic effects.
- High-Resolution Canvases: Start projects with high DPI settings for print-ready images.
- Animation Assist: Add movement to your creations easily.
- Time-Lapse Recording: Record your drawing process automatically to share your journey.
With its robust set of tools and features, Procreate has become a favorite among digital artists of all skill levels.
Steps to Open Your Image in Procreate

Getting started with Procreate is easy. Follow these steps to open an
image in the app:
- Launch Procreate: Tap the Procreate icon on your iPad to open the app.
- Select a Canvas: Choose an existing canvas or create a new one. If you want to crop an existing image, it’s often easier to create a new canvas that matches your image's dimensions.
- Import the Image: Tap the wrench icon (Actions menu) in the top left corner, then choose “Insert a photo.”
- Locate Your Image: Browse through your photo library and select the image you want to work on.
Now your
image will appear on the canvas, ready for cropping or any other edits you wish to make!
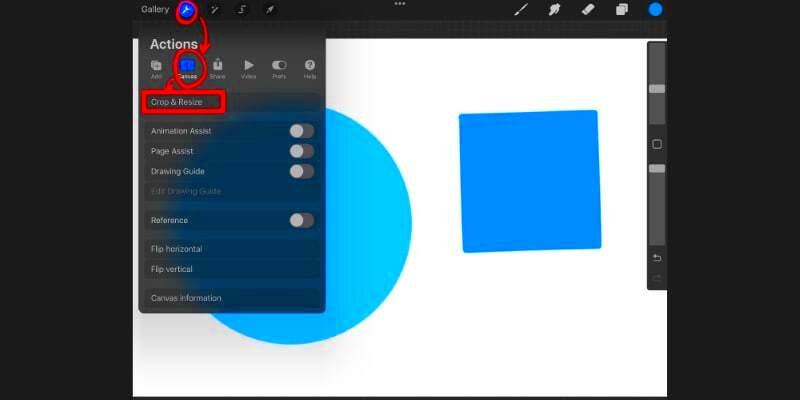
How to Access the Crop Tool
Accessing the Crop Tool in Procreate is simple and straightforward. Here’s how you can find it:
- Open the Actions Menu: Tap the wrench icon in the top left corner of your screen.
- Select Canvas: From the Actions menu, tap on “Canvas.” This will bring up options related to your canvas settings.
- Choose Crop and Resize: Now, select “Crop and Resize.” This will activate the Crop Tool, allowing you to adjust the dimensions of your image.
Once the Crop Tool is active, you’ll see a crop box appear around your
image. You can adjust this box to select the area you want to keep. It’s a quick and easy way to focus on the parts of the
image that matter most to you!
Adjusting the Crop Area with the Crop Tool
Once you’ve accessed the Crop Tool in Procreate, the real fun begins! Adjusting the crop area allows you to focus on the most important parts of your
image, enhancing its overall composition. Here’s how to do it effectively:
After selecting the Crop Tool, you'll see a box appear around your
image. This box indicates the area that will be kept after cropping. You can adjust it by:
- Dragging the Corners: Use your finger or Apple Pencil to drag the corner handles to resize the crop area. This is great for narrowing down your image to highlight specific elements.
- Moving the Box: Tap inside the crop box and drag it around to reposition it without resizing. This is useful if you want to center a particular feature in your image.
- Using the Grid Lines: Procreate offers grid lines that can help you align your crop with the rule of thirds or other compositional guides.
Once you’re satisfied with your adjustments, look for the “Done” button in the top right corner. Tapping it will apply the crop, and you'll see the changes immediately. Adjusting your crop area is all about enhancing your image, so take your time and experiment with different settings!
Saving Your Cropped Image
After cropping your image, the next step is saving it. Procreate makes this process simple, so you can easily share your work with others or keep it for yourself. Here’s how to save your cropped image:
- Open the Actions Menu: Again, tap the wrench icon in the top left corner of your screen.
- Select Share: In the Actions menu, choose the “Share” option. This will present you with various formats to save your image.
- Choose a File Format: Procreate allows you to save your image in different formats, such as PNG, JPEG, or TIFF. For most uses, PNG is a good choice due to its quality and transparency support.
- Save or Share: After selecting your format, you can choose to save the image to your device or share it directly via email or social media.
And just like that, your cropped image is ready to go! Make sure to check your photo library or the designated folder to ensure it saved correctly. Happy sharing!
Tips for Effective Image Cropping
Cropping isn’t just about cutting down an image; it’s about enhancing the overall composition and focus. Here are some helpful tips to make the most of your cropping:
- Focus on the Subject: Always consider what you want to highlight. Ensure the crop area emphasizes the main subject of your image.
- Use the Rule of Thirds: Align important elements along the grid lines or at their intersections for a more balanced composition.
- Leave Some Space: If the subject is looking or moving in a particular direction, consider leaving space in that direction to give it room to “breathe.”
FAQ
1. What is Procreate?
Procreate is a digital painting app designed for artists and creators, available exclusively on iPad. It features a user-friendly interface and offers a wide range of tools for drawing, painting, and editing images.
2. What are some key features of Procreate?
Procreate includes a layer system, custom brushes, high-resolution canvases, animation assist, and time-lapse recording.
3. How do I open an image in Procreate?
To open an image, launch Procreate, select or create a canvas, tap the wrench icon to access the Actions menu, and choose “Insert a photo” to import your image.
4. How can I access the Crop Tool?
Open the Actions menu by tapping the wrench icon, select “Canvas,” then choose “Crop and Resize” to activate the Crop Tool.
5. How do I adjust the crop area?
You can drag the corner handles to resize the crop area or tap inside the crop box to reposition it. Use grid lines for better alignment.
6. How do I save my cropped image?
To save your cropped image, tap the wrench icon, select “Share,” choose a file format (like PNG or JPEG), and then save or share your image.
7. What are some tips for effective image cropping?
Focus on the subject, use the rule of thirds for balance, and leave space in the direction your subject is looking or moving.
Conclusion
Procreate is a versatile and powerful tool for digital artists, offering a plethora of features that enhance the creative process. With its intuitive interface, users can easily open images, crop them effectively, and save or share their work in various formats. By understanding key functionalities and employing effective cropping techniques, artists can focus on what truly matters in their compositions. Whether you’re a beginner or a seasoned creator, Procreate provides endless opportunities to bring your artistic vision to life. Happy creating!
 admin
admin


