Have you ever wished you could effortlessly manage your LinkedIn posts without scrambling at the last minute? Well, you're in luck! LinkedIn allows users to schedule posts, making it easier to maintain a consistent online presence. This feature is particularly beneficial for professionals looking to engage with their network at optimal times. In this blog post, we’ll explore where to find and manage your scheduled posts on
Understanding LinkedIn's Scheduling Features

LinkedIn’s scheduling features can significantly enhance your ability to post timely and relevant content. Let’s walk through some key aspects that can help you make the most out of this tool.
1. What is Post Scheduling?
Post scheduling allows you to choose a specific date and time for your content to go live on your LinkedIn profile or company page. This means you can plan ahead, ensuring you’re sharing valuable insights even when you're busy.
2. Finding the Scheduling Option
To find the feature:
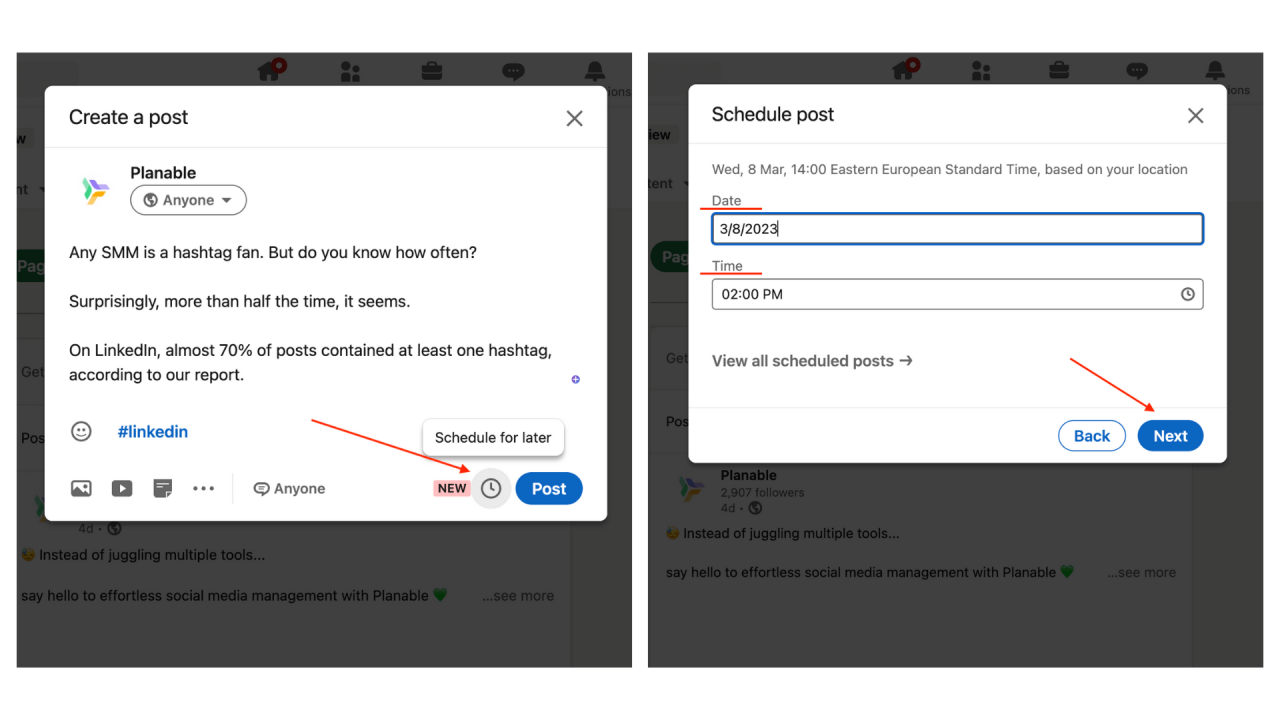
- For Individual Profiles: Start a new post. You’ll see the option to schedule right next to the “Post” button.
- For Company Pages: Go to your company page, click on the “Start a post” box, and look for the scheduling icon.
3. Setting Up Your Schedule
When you click on the scheduling icon, a calendar will pop up where you can:
- Select the date.
- Select the time (including the time zone).
Don’t forget to preview your post before scheduling it. This allows you to check for any errors or formatting issues.
4. Managing Scheduled Posts
To manage your scheduled posts:
- Navigate to your profile or company page.
- Click on “Manage scheduled posts” where you can see a list of your upcoming posts.
- From here, you can edit, reschedule, or delete as needed.
Understanding how to effectively use LinkedIn's scheduling features can save time and help you stay organized, allowing you to focus more on engaging with your audience rather than worrying about when to post. Enjoy your scheduling journey!
How to Access Your Scheduled Posts

Accessing your scheduled posts on LinkedIn is a breeze once you know where to look. Here's a simple step-by-step guide to help you navigate through the platform:
- Log into Your LinkedIn Account: Use your credentials to sign in to LinkedIn. Once you’re in, you’ll see your home feed.
- Go to the 'Work' Section: Locate the grid icon in the top right corner of the page. Click on it to blow up a menu where you’ll find various LinkedIn tools.
- Select 'Content Creation': From the menu, look for the option that refers to managing posts or content creation (this may vary slightly based on updates or changes LinkedIn makes).
- Find the 'Scheduled Posts': In the content creation dashboard, find the tab or section specifically for scheduled posts. This is where all your upcoming content will be lined up.
And there you have it! Just a few clicks and you're in. You can see all the posts you’ve scheduled for future publication, along with their intended dates and times.
Managing Your Scheduled Posts
Once you've accessed your scheduled posts, managing them is crucial to ensure you’re sharing the right content at the right time. Here’s how you can effectively manage these posts:
- Edit Posts: If you need to tweak your content, simply select the post and look for an 'Edit' button. You can change text, images, or even links.
- Reschedule Posts: Life happens! If you need to change the timing, just find the post you want to adjust and select 'Reschedule.' Choose a new date and time that works better.
- Delete Posts: If you’ve decided a post is no longer relevant, find the option to delete it. Be sure as this action is usually irreversible!
- Analyze Performance: Regularly check how your scheduled posts perform. You can do this through analytics linked to each post, allowing you to make informed decisions for future content.
By managing your scheduled posts thoughtfully, you can maximize your engagement and get the most out of your LinkedIn presence! Remember, it’s about presenting your best self and your ideas to the world.
Troubleshooting Common Issues
Even the most experienced LinkedIn users can run into bumps along the road when scheduling posts. Don't worry! Here are some common issues you might face and tips to overcome them:
- Post Not Appearing: If your scheduled post doesn't show up when expected, make sure that you didn't accidentally delete it or change the privacy settings. Check your scheduled posts section to confirm it's still there.
- Time Zone Confusion: Sometimes, scheduled posts go live at odd hours. This could be due to mismatches in time zones. Ensure your LinkedIn account is set to the correct time zone to avoid premature or delayed postings.
- Content Issues: If you find that your post gets flagged, it could be due to violating LinkedIn’s content policies. Review their guidelines to ensure your content is compliant before scheduling it again.
- Connection Problems: Sometimes, connectivity issues can disrupt your scheduled post. Always double-check your internet connection before scheduling. If it's unstable, it might affect your ability to save your post properly.
- Drafts Disappearing: If your drafts seem to vanish, check if you are logged into the correct LinkedIn account or if there's been an update to the platform.
By being proactive and knowing where to look, you can overcome these common pitfalls and keep your LinkedIn scheduling smooth and efficient!
Best Practices for Scheduling Posts on LinkedIn
Scheduling posts on LinkedIn can elevate your social media game significantly. Here are some best practices to keep in mind for effective scheduling:
- Know Your Audience: Understanding when your audience is most active can greatly influence engagement. Use LinkedIn Analytics to determine peak times and schedule accordingly.
- Quality Over Quantity: Instead of bombarding your followers with numerous posts, focus on sharing valuable content. Aim for a consistent posting schedule—one well-thought-out post per week can be more effective than daily posts laden with fluff.
- Use Visuals: Posts with images or videos tend to capture more attention. Incorporate engaging visuals in your scheduled posts to grab your audience’s interest right away.
- Engage with Comments: Scheduling doesn't end when your content goes live. Be available to respond to comments and questions promptly. This engagement can help build your brand and foster connections.
- Utilize Hashtags Wisely: Hashtags can enhance visibility, but don't overdo it! Stick to a few relevant hashtags to reach your target audience without cluttering your message.
By implementing these best practices, you can maximize the effectiveness of your scheduled posts on LinkedIn, fostering better engagement and growing your professional network!
Where to Find and Manage Your Scheduled Posts on LinkedIn
LinkedIn has evolved into a vital platform for professionals, and one of its impressive features is the ability to schedule posts. This allows users to plan their content for optimal engagement. However, knowing where to find and manage these scheduled posts can be confusing. Below is a detailed guide on navigating LinkedIn's scheduling feature.
To locate your scheduled posts, follow these steps:
- Log into your LinkedIn account.
- Navigate to your homepage.
- On the left sidebar, click on your profile picture or the "Me" icon.
- Select "Posts & Activity" from the dropdown menu.
- In the "Activity" section, look for the "Posts" tab.
Once in the "Posts" tab, you will see a list of your recent activities including scheduled posts. To manage your scheduled posts effectively, consider the following:
Managing Scheduled Posts
Here are some practical tips to manage your scheduled posts:
- Review Regularly: Check your scheduled posts weekly to ensure they align with your current objectives.
- Edit Content: You can make changes to the content or scheduling times by clicking on the post and selecting "Edit."
- Delete Unwanted Posts: If your plans change, simply click on the "Delete" option to remove any scheduled posts.
- Analyze Engagement: After posting, use LinkedIn analytics to track engagement and refine future content.
By following these steps and tips, you can efficiently find and manage your scheduled posts on LinkedIn, maximizing your professional presence on the platform.
In conclusion, mastering the scheduling feature on LinkedIn not only streamlines your posting process but also enhances your networking and engagement opportunities, ensuring you connect effectively with your audience.
 admin
admin


