Image Capture is a simple yet powerful tool on Mac that allows you to easily import images from a variety of devices such as cameras, scanners, and smartphones. Whether you’re a photographer or just need to transfer files from your phone, this app makes the process seamless and efficient. It can save you time by letting you choose specific images to download, while also providing options to organize your files automatically. If you're looking to streamline your image management,
What is Image Capture on Mac?

Image Capture is a built-in app on macOS that enables users to import photos and videos from external devices. Unlike other apps, it doesn’t rely on iCloud or require the use of specialized software for specific cameras or phones. With Image Capture, you can simply plug in your device, and it will show up on your Mac, ready for you to download your images with just a few clicks. You can import images from a variety of sources, including:
- Cameras
- Smartphones
- Scanners
- Memory cards
One of the great features of Image Capture is its ability to customize the import process. You can choose to transfer all images, or selectively pick the ones you need. The app also allows you to set the destination folder for your files, making organization simple and straightforward.
How to Access Image Capture on Mac?
Getting started with Image Capture is easy. Here’s how you can access it on your Mac:
- Click on the Finder icon in your Dock to open a Finder window.
- In the Finder sidebar, scroll down to the Applications section.
- Locate and double-click on the Image Capture app to open it.
Alternatively, you can quickly launch Image Capture using Spotlight:
- Press Command + Space to open Spotlight search.
- Type Image Capture and press Enter to open the app.
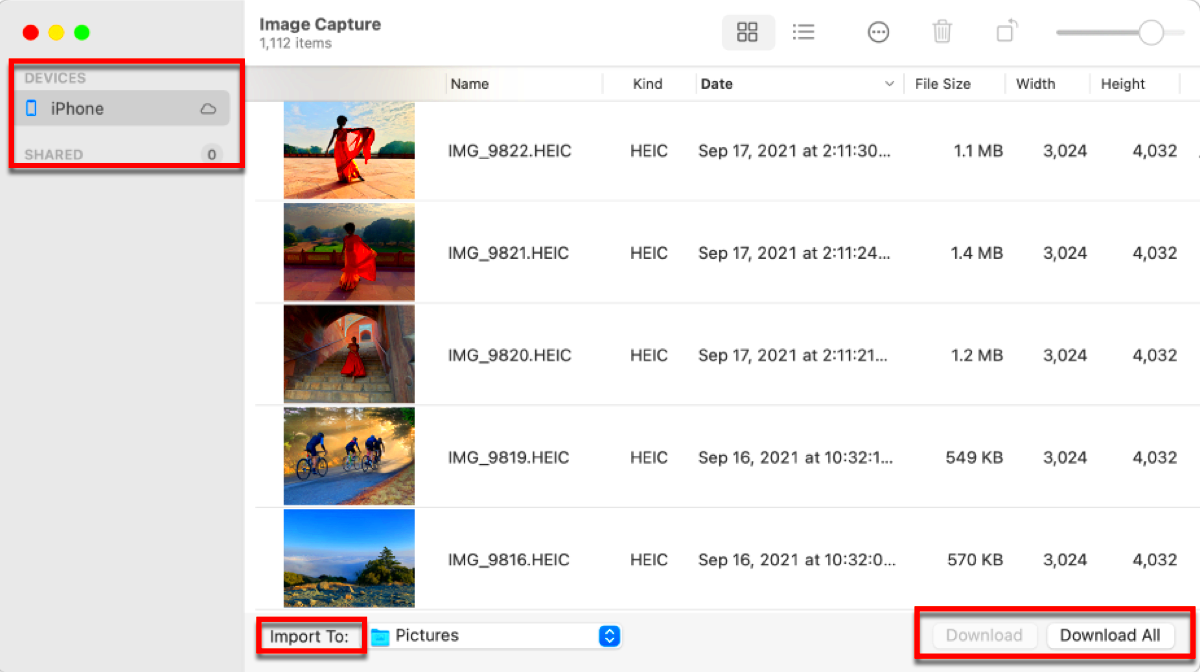
Once open, you’ll see a list of all connected devices on the left side of the window. If you’ve connected a camera, smartphone, or scanner, it will appear here, ready for you to start transferring your images.
Using Image Capture to Download Images
Image Capture makes downloading images from external devices a breeze. Whether you're transferring photos from a camera, smartphone, or scanner, the process is quick and easy. Here’s how you can use Image Capture to download your images:
- Connect your device (camera, phone, scanner, etc.) to your Mac using the appropriate cable or wireless connection.
- Open the Image Capture app (as described earlier).
- Your device will appear in the left sidebar. Select the device you want to download images from.
- Once selected, you’ll see thumbnails of all the images on your device.
- Choose the images you want to download by clicking on them. If you want to select all images, click the Select All button at the bottom.
- Click the Import button to start downloading the selected images to your Mac.
Image Capture allows you to control where the files are saved, so you can organize your photos as they’re being downloaded. If you’re working with a large collection of images, you can import them in batches or one at a time, depending on your preference. This flexibility helps you stay organized and prevents clutter on your Mac.
Customizing Image Capture Settings
One of the best features of Image Capture is the ability to customize settings according to your needs. By adjusting the app's settings, you can make your workflow more efficient. Here’s how you can customize the app:
- Destination Folder: You can choose where you want your downloaded images to go. Under the Import To drop-down menu, select a folder on your Mac or create a new one.
- File Type and Size: For certain devices, like cameras, you can choose the file format (JPEG, PNG, TIFF, etc.) and even the resolution for downloaded images.
- Auto-Import: If you want the app to automatically import photos as soon as a device is connected, enable the Automatically import when device is connected option.
- Delete After Import: You can set Image Capture to automatically delete the images from your device after they’ve been downloaded, ensuring you won’t need to manually clear space later.
These options allow you to fine-tune how Image Capture works, making it more suited to your personal or professional needs. Customizing settings not only saves time but also keeps your images organized as soon as they’re imported.
Using Image Capture to Import Images from External Devices
Importing images from external devices like cameras, smartphones, or even scanners is one of the key features of Image Capture. Here's how to import your images smoothly:
Once you’ve connected your device (via USB, Wi-Fi, or Bluetooth), follow these steps:
- Open the Image Capture app.
- On the left sidebar, select your connected device. It could be your camera, smartphone, or a scanner.
- Browse through the thumbnails of the images or videos available for import. You can preview them by clicking on each thumbnail.
- Choose the images you want to import. You can either click each one individually or select all images at once.
- Choose the destination folder where you want the images to be saved (as explained in the previous section). You can create a new folder directly within the app or select an existing one.
- Click the Import button to begin the process.
If you prefer, you can also use the Import All option to transfer every image on the device. This is particularly useful if you're working with a large collection and don’t want to manually select each one.
Additionally, when importing images from a camera or smartphone, Image Capture offers the option to rotate or crop images before transferring them. This gives you a little extra control over the photos you want to keep.
Using Image Capture to import images from external devices ensures that the process is quick, easy, and customizable to fit your needs. Whether you’re a photographer transferring high-resolution images or simply backing up your phone's photos, Image Capture provides a reliable solution.
Common Issues and Troubleshooting Tips
While Image Capture is a user-friendly app, you may occasionally encounter some issues. These problems can often be easily fixed with a few simple troubleshooting steps. Let’s look at some common problems and how to resolve them:
- Device Not Showing Up: If your device doesn’t appear in Image Capture, try these steps:
- Ensure your device is properly connected, either via USB or Wi-Fi.
- Check if the device is powered on and unlocked (for phones or tablets).
- Try restarting both your device and Mac to resolve any connectivity issues.
- Images Not Importing: If Image Capture won’t import your images, check the following:
- Ensure you have selected the correct images or the “Import All” option.
- Check if there’s enough free space on your Mac to store the imported images.
- Make sure your device is compatible and properly configured (for example, some older cameras may need specific software or updates).
- Slow Performance: If Image Capture is running slowly, try these solutions:
- Close any unnecessary apps to free up system resources.
- Disconnect and reconnect your device to reset the connection.
- Delete unnecessary or duplicate images from the device to speed up the process.
Most issues with Image Capture are simple to troubleshoot, and the app is generally very reliable. However, if problems persist, consider visiting the official Apple support website or contacting customer support for more advanced help.
FAQ about Using Image Capture on Mac
Here are some frequently asked questions about using Image Capture on Mac. Hopefully, these answers will help clear up any doubts you may have:
- Q: Can I use Image Capture with my iPhone or iPad?
A: Yes, Image Capture works with iPhones and iPads as long as they are unlocked and connected to your Mac. You’ll see your device listed in the sidebar for easy importing. - Q: Does Image Capture support all camera models?
A: Image Capture supports most modern cameras. However, some older or specialized models may require additional software or drivers to work properly with macOS. - Q: How do I transfer images from a scanner using Image Capture?
A: Simply connect your scanner, and it will appear in the sidebar of Image Capture. Select it, choose the images you want to scan, and import them directly to your Mac. - Q: Can I delete images from my device after importing?
A: Yes, Image Capture gives you the option to delete images from your device once they’ve been successfully imported. This can be done manually or set up to happen automatically in the app’s settings. - Q: Can I import videos using Image Capture?
A: Yes, you can import videos the same way you import photos. Just select the video files you want and follow the same process.
These FAQs cover some of the most common questions users have. If you need further assistance, the Image Capture app’s Help section or Apple support can provide additional resources.
Conclusion
Image Capture is an easy-to-use and efficient tool that simplifies the process of importing and managing images on your Mac. Whether you're working with a camera, smartphone, scanner, or other external devices, this app makes it easy to transfer photos, videos, and documents. Customizing the settings allows you to tailor the app to your specific needs, ensuring a smooth and organized workflow every time. If you encounter any issues, the troubleshooting tips provided can help resolve most problems quickly. With its simple interface and reliable performance, Image Capture is a great tool for Mac users who need to manage and transfer their images with ease.

 admin
admin


