If you're looking to create unique designs, tracing images in Canva is a fantastic skill to have. This process allows you to transform regular images into beautiful, stylized graphics that you can customize to your heart's content. Whether you're making social media posts, presentations, or marketing materials, tracing can add a personal touch to your projects. In this tutorial, we will guide you step-by-step through the tracing process in Canva, so you can start making your designs stand out.
Understanding the Basics of Image Tracing

Before diving into the tracing process, it's essential to understand what image tracing actually is. In simple terms, image tracing involves converting a bitmap image (like a photo) into a vector graphic, which is made up of paths, points, and curves. Here are a few key points to keep in mind:
- Bitmap vs. Vector: Bitmap images are made of pixels and lose quality when resized, while vector graphics can be scaled infinitely without losing clarity.
- Why Trace? Tracing can give your images a clean, polished look and allow for more customization options.
- Tools in Canva: Canva offers various tools and features that can help you with the tracing process.
Also Read This: How to Wrap Text Around an Image in Canva
Preparing Your Image for Tracing
Preparation is key to successful image tracing. Here are some steps to get your image ready:
- Select a High-Quality Image: Choose an image that is clear and has defined shapes. The better the quality, the easier it will be to trace.
- Upload to Canva: Once you have your image, upload it to your Canva account. You can do this by clicking the “Uploads” tab and selecting the image from your device.
- Choose the Right Format: For best results, consider using images in formats like PNG or SVG, which work well for tracing.
- Adjust Image Size: Ensure your image is appropriately sized for tracing. You can resize it within Canva to fit your canvas.
By following these steps, you’ll set yourself up for a smooth tracing experience. Now, let’s move on to using Canva’s tools for tracing!
Also Read This: How to Save an Image on Google Slides for Use in Other Projects
Using Canva’s Built-in Tools for Tracing
Canva is packed with useful tools that can help you trace images effectively. Knowing how to navigate these features will make your tracing process much smoother. Here’s a breakdown of the main tools you can use:
- Grid and Guidelines: Use the grid feature to align your images perfectly. This can help in getting the proportions right as you trace.
- Shapes Tool: You can overlay basic shapes to create outlines for your tracing. This is particularly useful for complex images where details matter.
- Color Picker: This tool allows you to match colors accurately as you trace, ensuring that your final image has a cohesive look.
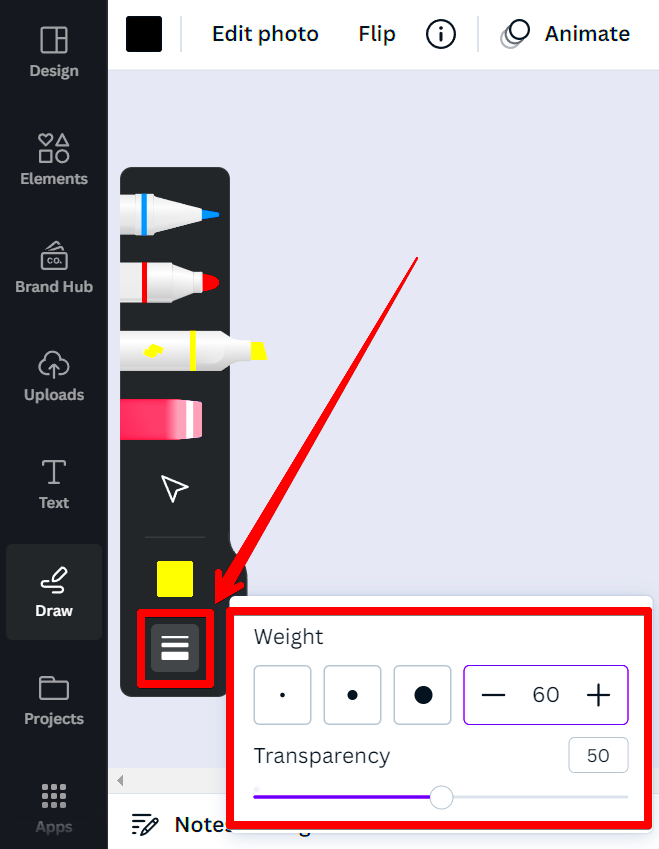
- Transparency Slider: Adjusting the transparency of your original image can help you see the paths you’re creating more clearly.
These built-in tools are designed to make your design process easier. By familiarizing yourself with them, you can enhance the quality of your traced images and unleash your creativity in ways you never thought possible.
Also Read This: How to Download Files and Projects from Behance
Step-by-Step Guide to Trace Images in Canva
Tracing images in Canva can seem daunting at first, but breaking it down into steps makes it easy. Here’s a simple guide to get you started:
- Upload Your Image: Start by uploading the image you want to trace to your Canva workspace.
- Adjust the Image: Set the transparency of your image to around 50% so you can see your tracing paths clearly.
- Select the Shapes Tool: Begin outlining the main shapes of your image using the shapes tool. Adjust the size and color as needed.
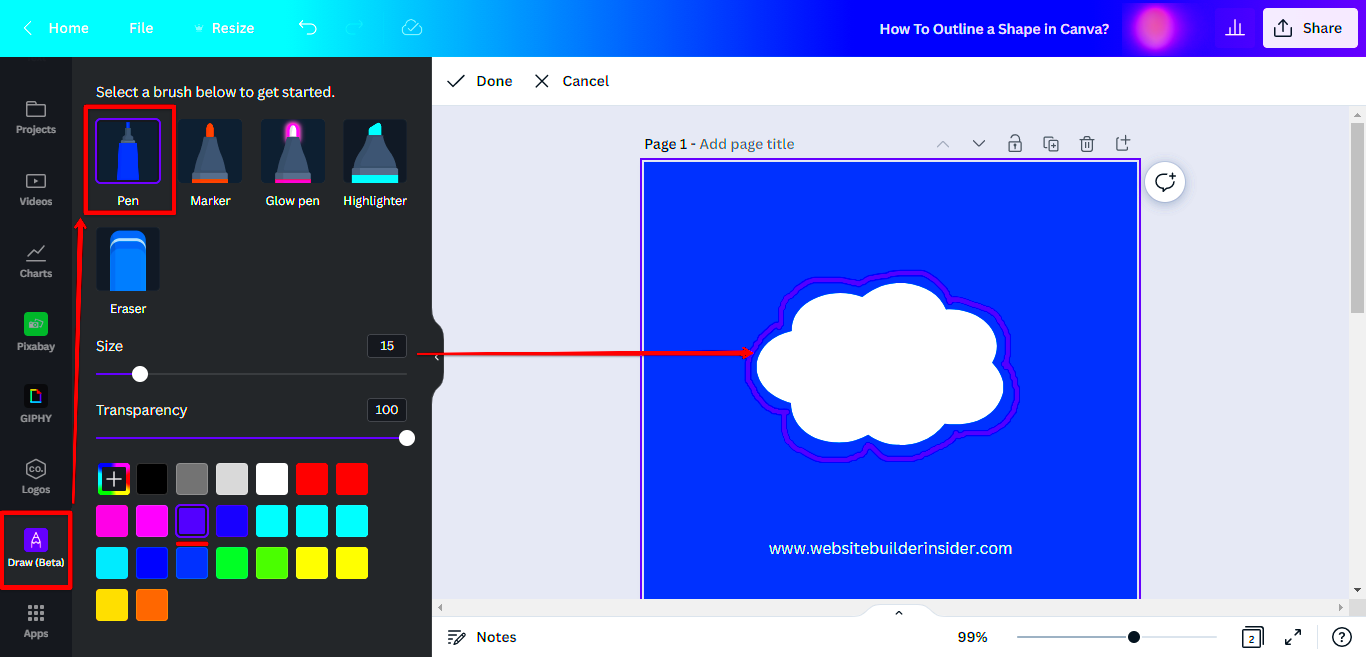
- Use the Pen Tool: For more complex outlines, the pen tool is your best friend. Click to create points and curves to match the image closely.
- Refine Your Paths: After outlining, adjust the curves and angles to smooth out your traced lines.
- Add Color: Once you have your traced outline, fill in the shapes with colors using the color picker.
- Finalize Your Design: Make any final adjustments to your traced image, ensuring everything looks just right.
Following these steps will help you create stunning traced images in no time. With practice, you'll develop your style and find new ways to express your creativity!
Also Read This: Stylish Hijab Styles and How to Wear Them Confidently
Tips for Enhancing Your Traced Images
Now that you know how to trace images, let’s discuss some tips for enhancing them further. Adding those extra touches can make your designs really pop. Here are some effective strategies:
- Experiment with Textures: Incorporate different textures into your traced images to give them depth. Canva has a library of textures you can use.
- Play with Shadows: Adding shadows can create a three-dimensional effect. Use the shadow tool to give your designs more life.
- Layering Elements: Layer your traced images with other design elements like text or additional graphics to create a more complex look.
- Adjust Color Gradients: Instead of using flat colors, try gradients to add visual interest and make your images more dynamic.
- Use Filters: Apply filters to give your traced images a unique style. Filters can help unify the overall look of your project.
By applying these tips, you can elevate your traced images and create truly standout designs. Remember, the more you experiment, the more you'll discover what works best for your style!
Also Read This: how to make image on google slides transparent
Common Mistakes to Avoid While Tracing
Tracing images can be a lot of fun, but it’s easy to make mistakes if you’re not careful. Here are some common pitfalls to watch out for, so you can improve your tracing skills and avoid frustration:
- Using Low-Quality Images: Always start with high-quality images. Low-resolution images can lead to blurry traces that are hard to work with.
- Neglecting to Zoom In: It’s tempting to trace everything at a distance, but zooming in allows you to see details better and create cleaner lines.
- Forgetting to Adjust Transparency: Not adjusting the transparency of your original image can lead to inaccurate tracing. Make sure to set it to around 50% to see your paths clearly.
- Rushing the Process: Tracing is a meticulous task that requires patience. Take your time to get the details right, rather than hurrying through it.
- Overusing Colors: While it’s great to be creative, using too many colors can make your design look cluttered. Stick to a cohesive color palette.
By avoiding these common mistakes, you’ll find that your tracing will improve significantly, leading to better results in your designs!
Also Read This: How to Put Images in Minecraft Bedrock Edition for Custom Designs
FAQ About Tracing Images in Canva
Have questions about tracing images in Canva? You’re not alone! Here are some frequently asked questions that might help clear up any confusion:
| Question | Answer |
|---|---|
| Can I trace any image in Canva? | Yes, you can trace most images, but it’s best to choose images with clear outlines and defined shapes. |
| Is tracing images in Canva free? | Canva offers many features for free, but some advanced tools may require a Canva Pro subscription. |
| What if my traced image looks messy? | Don't worry! You can always adjust your paths, colors, and layers to refine your design until it looks just right. |
| Can I use traced images for commercial purposes? | Make sure to check Canva’s licensing terms to ensure that your traced images comply with their usage policies. |
If you have more questions, feel free to explore Canva’s help section or community forums!
Conclusion on Tracing Images in Canva
Tracing images in Canva opens up a world of creative possibilities. With the right tools, techniques, and a little practice, you can transform ordinary images into stunning graphics that reflect your personal style. Remember, it’s all about patience and experimentation.
As you continue to trace and design, don’t be afraid to try new things. Use the tips shared in this guide to enhance your traced images and make them truly unique. Whether you’re creating content for social media, marketing materials, or personal projects, tracing can significantly elevate your designs. Happy tracing!
 admin
admin


