Tracing images in Procreate is a simple yet effective way to enhance your digital artwork. Whether you're new to digital art or an experienced artist, tracing can help improve your skills and create professional-looking designs. With Procreate’s powerful tools and intuitive interface, you can trace images with precision and ease. This guide will walk you through the process of setting up your canvas, choosing the right image, and using the tools available in Procreate to create clean and detailed traced artwork. Let's get started!
Setting Up Your Canvas in Procreate
Before you start tracing an image in Procreate, it’s essential to set up your canvas properly. This ensures that you have the right dimensions and resolution for your artwork. Here’s how to set up your canvas:
- Open Procreate: Tap on the Procreate icon to open the app.
- Create a New Canvas: Tap the "+" button to create a new canvas. Choose from preset sizes or create a custom size for your project.
- Adjust the Resolution: Make sure the resolution is set to 300 DPI if you plan to print your artwork. For digital use, 72 DPI is sufficient.
- Select the Color Profile: Choose a color profile (such as sRGB) that matches your intended output. This is especially important for accurate color representation.
- Tap Create: Once your settings are ready, tap the "Create" button to open your new canvas.
Now that your canvas is ready, you’re set to begin tracing. Adjusting these settings early on will help ensure your traced image is sharp and clear, whether you’re working on a detailed sketch or a simple outline.
Also Read This: Making an Image Transparent in Procreate
Choosing the Right Image for Tracing
Selecting the right image is key to making the tracing process smooth and enjoyable. The image you choose should have clear outlines and enough contrast to make tracing easier. Here are some tips for choosing the perfect
- High Contrast: Choose an image with good contrast between the subject and the background. This makes the outlines more visible and easier to trace.
- Clear Details: The more defined the lines and shapes in the image, the easier it will be to trace. Avoid blurry or pixelated images.
- Simple Composition: Images with simple, clean compositions are ideal for tracing. Complex backgrounds or too much detail can make the process harder.
- Resolution: Opt for high-resolution images. Low-resolution images will result in pixelated or unclear lines when zoomed in during the tracing process.
- Personal Preference: Make sure the image aligns with your artistic goals. Whether it's a photograph, illustration, or sketch, the image should inspire your artwork.
Once you’ve found the right image, you’re ready to upload it into Procreate and start the tracing process. The better the image, the smoother and more enjoyable your tracing will be.
Also Read This: How to Sell on 123RF: A Step-by-Step Guide for Photographers
Using the Reference Layer for Tracing
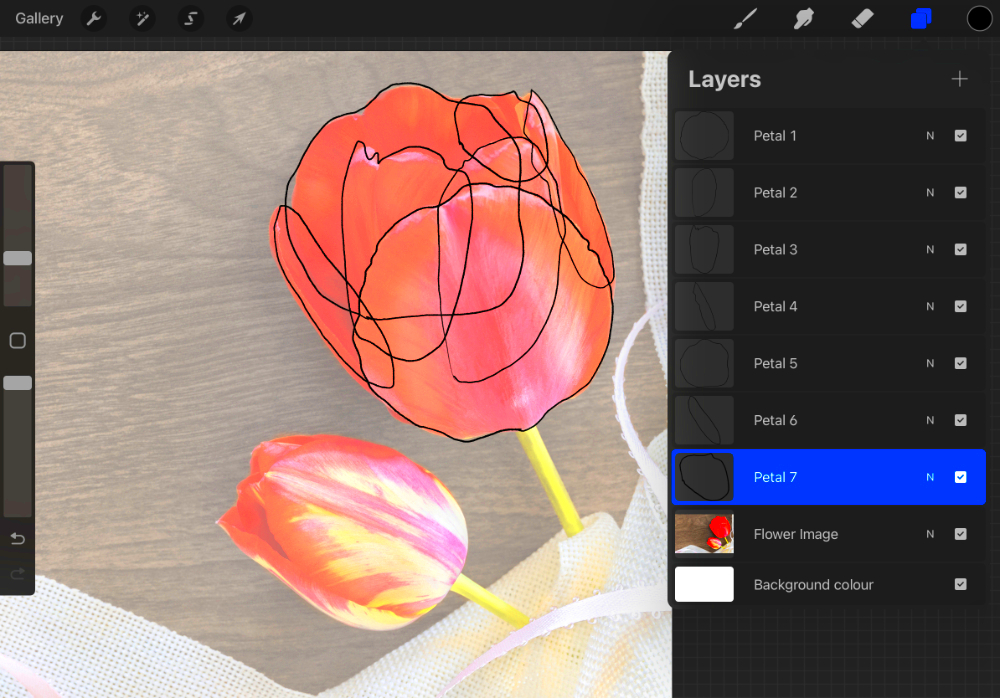
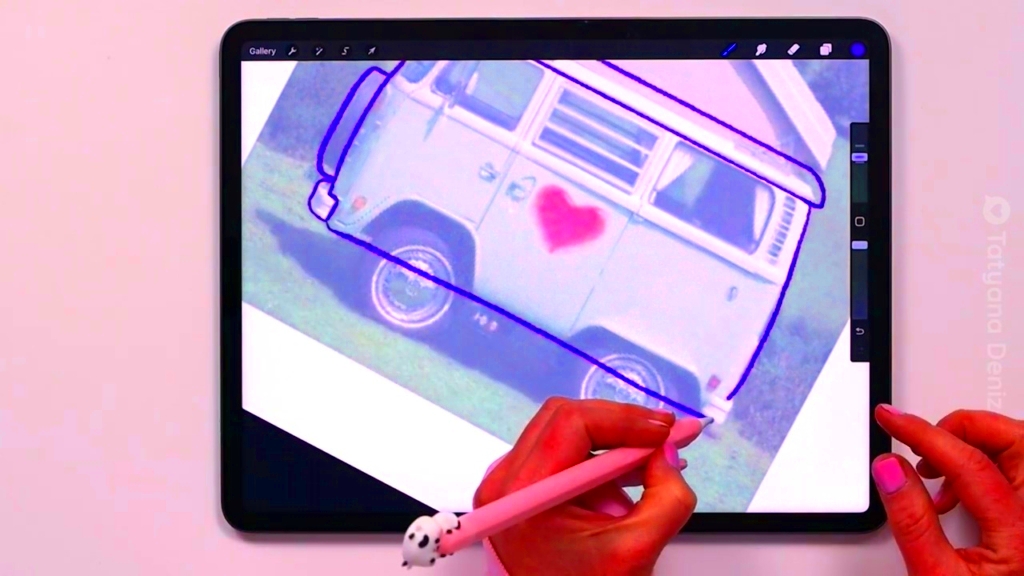
One of the most helpful features in Procreate when tracing an image is the Reference Layer. This allows you to use the image as a guide without interfering with your artwork. By setting the image as a reference layer, you can easily trace over it while maintaining clean and organized layers for your own work. Here’s how to use the Reference Layer in Procreate:
- Insert Your Image: First, import the image you want to trace into Procreate. You can do this by tapping the wrench icon, selecting "Insert a Photo," and choosing the image from your library.
- Activate the Reference Layer: Once the image is placed on a new layer, tap the layer’s thumbnail. A menu will appear. Select "Reference" from the options. This will set your image as a guide for your brush strokes.
- Start Tracing: Create a new layer above the reference layer. As you draw on this layer, Procreate will treat the reference image as a guideline, allowing you to easily trace over it while keeping your drawing separate.
- Turn Off the Reference Layer: After you've traced the image, you can hide the reference layer to see your artwork clearly. Simply tap the visibility icon (the checkbox) on the reference layer to hide it.
Using the Reference Layer makes the tracing process smoother, especially when working with complex images, as you won’t have to worry about accidentally drawing over your reference image. It keeps everything organized and neat!
Also Read This: How to Embed an Image in Adobe Illustrator for Quick Access
Adjusting Opacity and Layer Settings
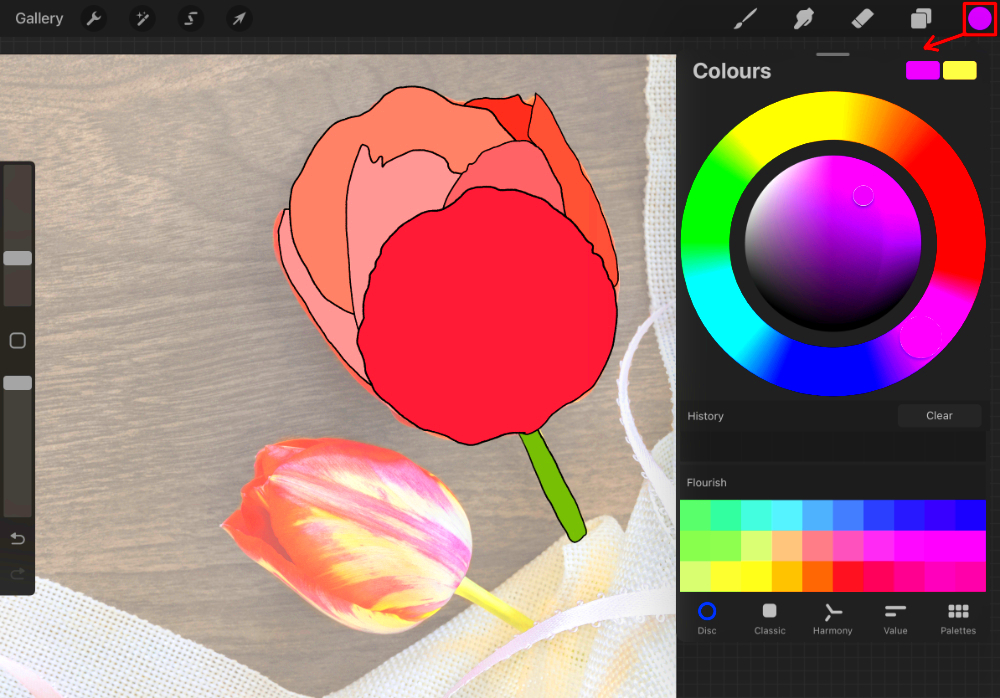
Adjusting the opacity of your image and layer settings in Procreate is crucial for achieving a clean trace. By lowering the opacity of your reference image, you can clearly see your drawing as it develops without the image overpowering your artwork. Let’s dive into how you can adjust opacity and tweak your layer settings:
- Adjust Image Opacity: Tap on the layer with your reference image, then select the “N” (for Normal) next to the layer’s name. This opens a menu where you can adjust the opacity slider to make your reference image more transparent, allowing you to see your drawing clearly.
- Set Layer Blending Mode: You can experiment with blending modes for your tracing layer. The most common blending mode for tracing is "Normal," but sometimes changing it to “Multiply” can help you see the lines better over darker images.
- Layer Opacity for Tracing: Lower the opacity of your tracing layer if you need to adjust your lines or add additional details. This gives you more control over how your lines interact with the reference image.
- Lock Layers: Once you’re done with your reference image and tracing, you can lock the layers to prevent accidental changes. To lock a layer, swipe left on the layer and tap the lock icon.
These adjustments can make a significant difference in the quality of your tracing, helping you create artwork that is clean and clear while giving you full control over each layer.
Also Read This: How to Vector an Image in Procreate
Tracing with Different Brushes and Tools
Procreate offers a wide variety of brushes and tools that can help you achieve different effects when tracing an image. Whether you want smooth, crisp lines or a more textured feel, Procreate gives you the flexibility to experiment with different styles. Here's how to make the most of your brushes and tools while tracing:
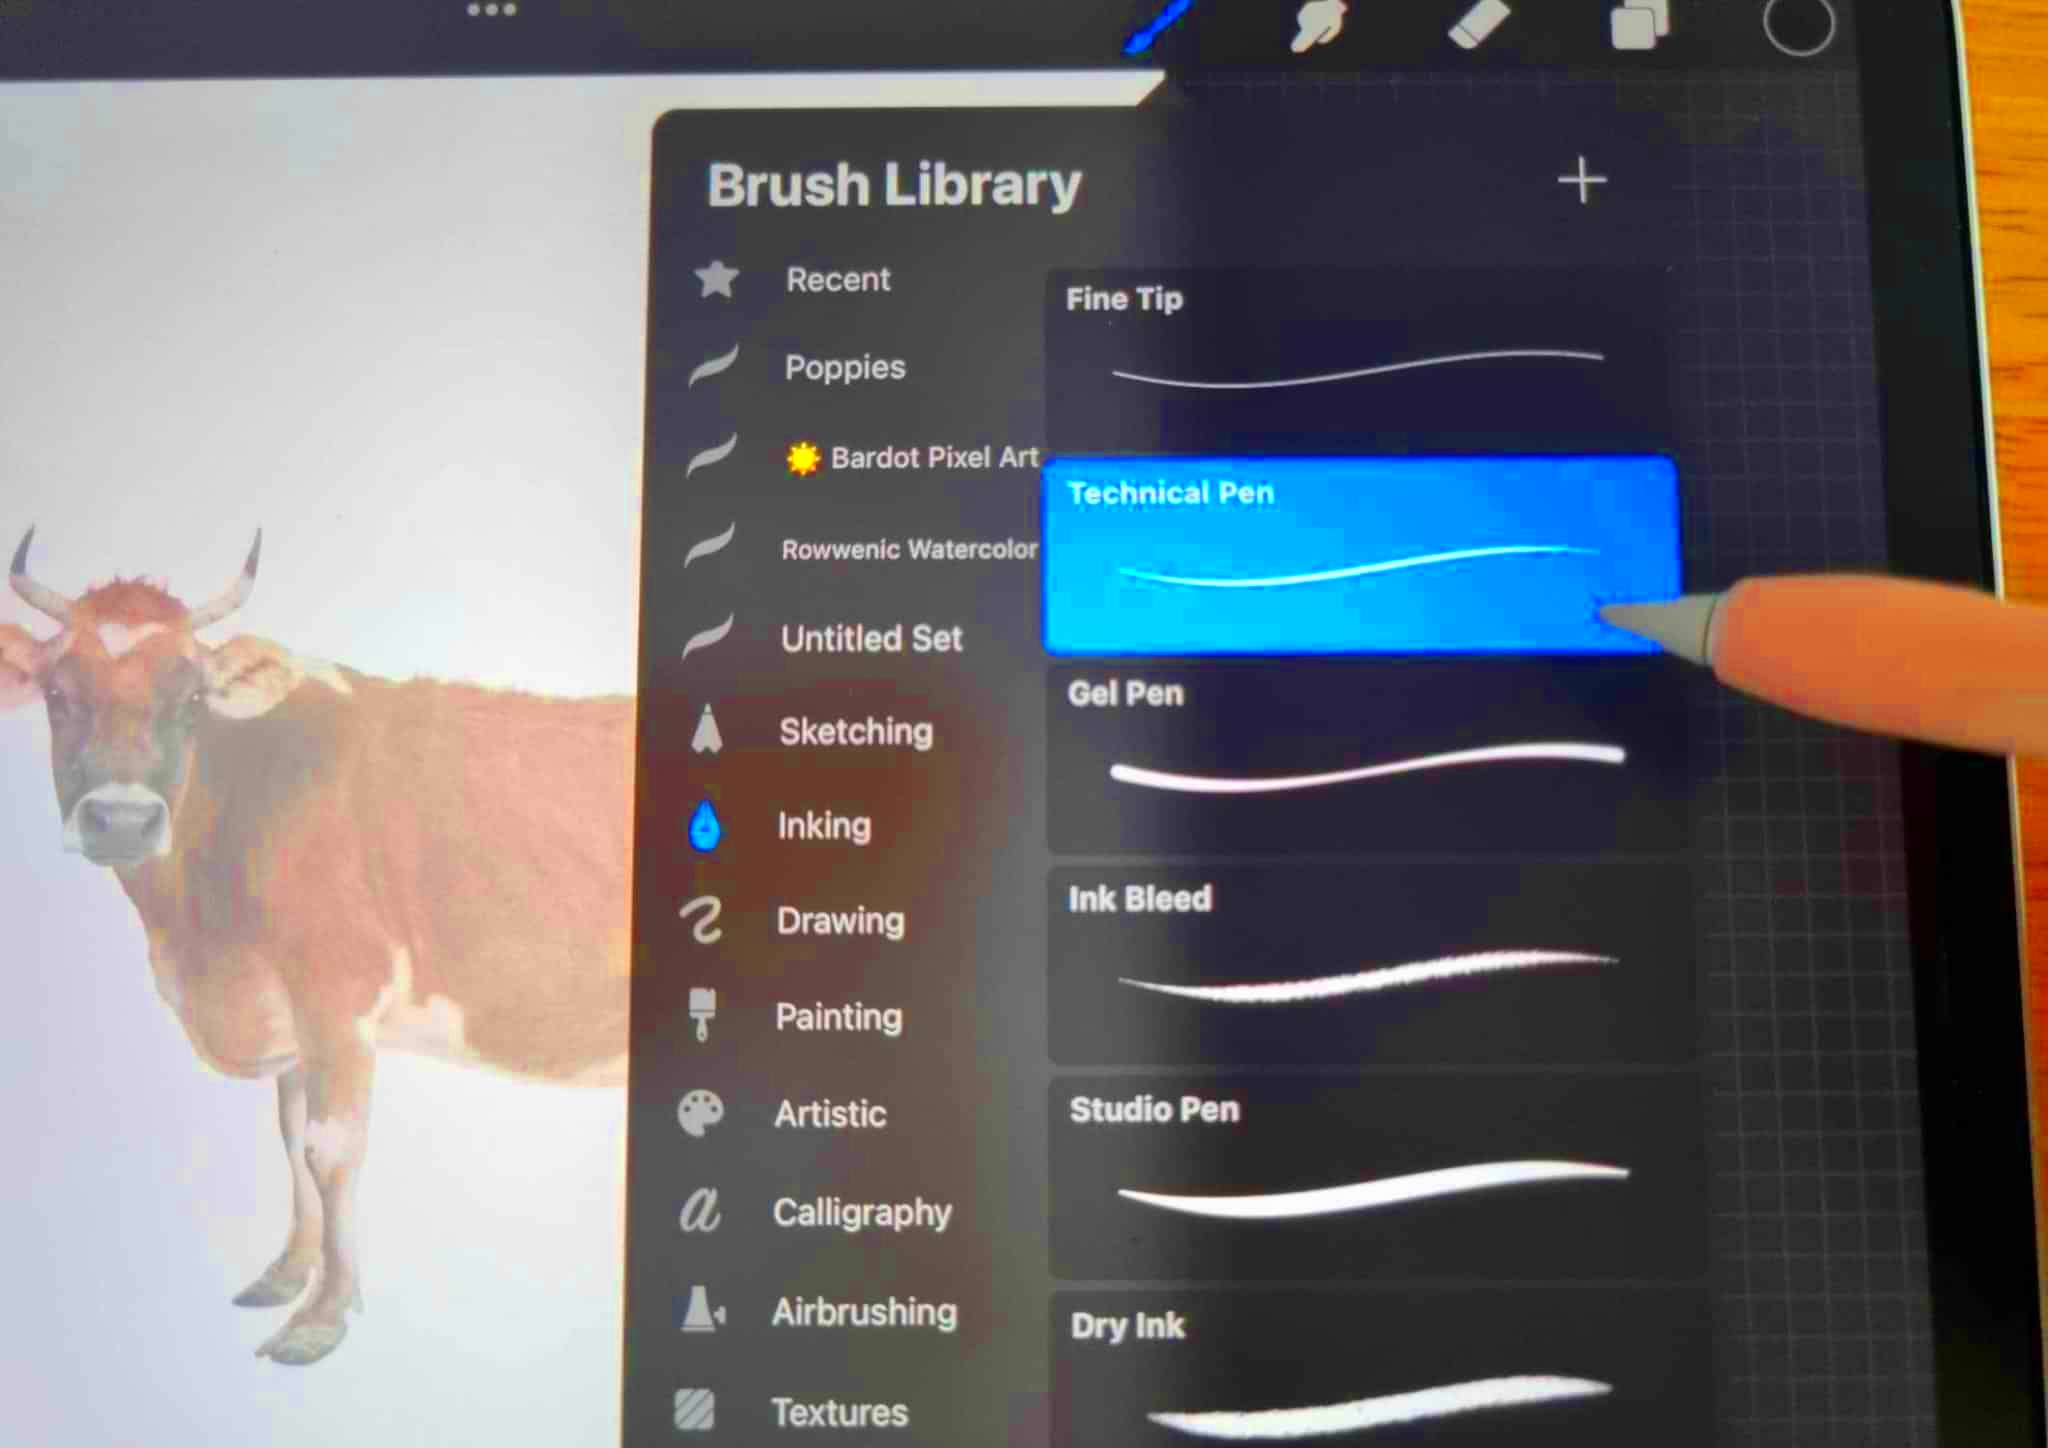
- Choose the Right Brush: Procreate includes a range of brushes, from fine liners to textured brushes. If you want precise, clean lines for tracing, a brush like “Studio Pen” or “Technical Pen” is ideal. These brushes provide smooth and sharp lines.
- Adjust Brush Settings: Tap on the brush icon at the top of the screen, then adjust the size, opacity, and streamline settings. Streamline helps you get smoother lines, while adjusting size and opacity can control how thick or faint your traced lines appear.
- Use the QuickMenu for Tools: Procreate’s QuickMenu allows you to access commonly used tools like Undo, Brush Size, and Opacity quickly. To enable it, go to the Actions menu, select “Prefs,” and toggle on the QuickMenu. This is a great time-saver when tracing.
- Test Different Brushes: Experiment with different brushes to see what suits your style. For example, if you want a sketchy look, you might prefer a brush like "6B Pencil" or "Gouache." These brushes provide a more organic, hand-drawn effect.
- Pressure Sensitivity: If you’re using an Apple Pencil, take advantage of pressure sensitivity. Varying the pressure you apply to the pencil will allow you to create lines with different thicknesses, adding depth and variation to your traced artwork.
By exploring the brushes and tools in Procreate, you can trace with precision, adding style and personality to your artwork. Don’t be afraid to experiment with different options to find the one that best suits your tracing needs.
Also Read This: Automatically Tracing Images in Procreate
Refining Your Tracing for Detail
Once you’ve completed your initial trace, it’s time to refine your work and add fine details. This step is essential if you want your tracing to look polished and professional. Procreate offers several tools to help you smooth out lines, add shading, and adjust proportions. Here’s how you can refine your tracing:
- Smooth Out the Lines: If your traced lines are too wobbly or rough, use Procreate’s "Liquify" tool to smooth them out. Select the "Push" tool under the Liquify options and gently drag along the edges of your lines to make them more fluid.
- Add Shading and Texture: For a more dynamic and realistic look, consider adding shading or textures. Use soft brushes like "Soft Airbrush" for smooth shading or "Charcoal" for a more textured look. Adjust the brush size to suit the level of detail you want to achieve.
- Refine Proportions: If you find that your tracing isn’t quite right, you can use the "Selection" tool to move or resize parts of the image. This is especially useful for adjusting elements that are slightly out of proportion.
- Use Layers for Details: Always use a new layer for finer details such as shadows, highlights, or additional lines. This allows you to work non-destructively, meaning you can make changes without affecting the original tracing layer.
- Zoom In for Precision: Zoom in on specific areas that need more attention. Procreate allows you to zoom in up to 200% without losing quality, so take your time to perfect the details.
Refining your tracing is where you can really make your artwork stand out. Adding intricate details and polishing the lines will give your tracing depth and life, turning it from a simple outline into a beautiful finished piece.
Also Read This: How to Remove Unwanted Content and Update Your Behance Profile
Saving and Exporting Your Final Artwork
Once you’ve finished tracing and refining your image, the next step is saving and exporting your work. Procreate makes it easy to save your artwork in a variety of formats depending on how you plan to use it. Whether you’re sharing it online or printing it out, here’s how to save and export your final piece:
- Save Your Artwork: First, save your work in Procreate’s native .procreate format. This allows you to return to your project and make edits later. To save, tap the wrench icon in the top left corner, then choose "Share" and select "Procreate." This will store your file in your iCloud or chosen location.
- Export as PNG or JPEG: If you’re ready to share your artwork, export it in a widely-used format like PNG or JPEG. PNG is best for transparent backgrounds, while JPEG is ideal for general sharing and printing. To export, tap "Share" and select either "PNG" or "JPEG" from the options. Adjust the resolution as needed.
- Export as PSD: If you want to continue working on your file in Photoshop, export it as a PSD (Photoshop Document). This will preserve all your layers, giving you full control when editing the artwork on your computer.
- Export as TIFF or PDF for Printing: For print purposes, you may want to export your artwork as a high-quality TIFF or PDF file. These formats ensure that your artwork prints with the best possible resolution and color accuracy.
- Back Up Your Work: To avoid losing your artwork, back it up on a cloud service like iCloud, Google Drive, or Dropbox. You can also export your work to a USB drive or external hard drive for safekeeping.
Once your artwork is saved and exported, you’re ready to share it with the world, print it out, or continue working on it in another program. Procreate makes it easy to manage and save your files in whatever format you need.
Also Read This: Getting Cricut to Draw an Image
Frequently Asked Questions
Here are some common questions people have when tracing images on Procreate. Hopefully, these answers will help clarify some points and make your tracing experience easier:
- Can I trace an image in Procreate without using the Reference Layer?
Yes, it’s possible to trace manually by placing the image on a separate layer, but using the Reference Layer makes the process more organized and efficient. - How do I make my traced lines look more polished?
To make your traced lines look smoother, use Procreate’s "Liquify" tool and adjust the pressure on your brush. You can also refine lines by zooming in for finer details. - What brushes are best for tracing?
The best brushes for tracing are those with fine, clean lines. Brushes like "Studio Pen," "Technical Pen," and "Monoline" are all great options for precise tracing. - How do I change the size of my brush?
To adjust the brush size, simply tap the brush icon at the top of the screen and move the size slider. You can also change the brush size on the QuickMenu for easier access while tracing. - Can I use tracing images for commercial purposes?
It depends on the image you’re tracing. If you’re tracing an image that is copyrighted, you should make sure you have the rights or permission to use it commercially. Always verify the copyright status of the original image.
These are just a few common questions, but don’t hesitate to experiment and learn as you go! The more you use Procreate for tracing, the more comfortable you’ll become with its tools and features.
Conclusion
Tracing images in Procreate is a valuable technique that can help artists of all skill levels create stunning artwork. By following the steps outlined in this guide—setting up your canvas, choosing the right image, using the reference layer, adjusting opacity, refining your lines, and selecting the best brushes—you can improve your tracing skills and produce professional-looking results. Whether you're working on a detailed piece or just practicing, the tools Procreate offers make the process easier and more enjoyable. Keep experimenting with different techniques, and don’t be afraid to add your own unique style to each traced image. Happy tracing!
 admin
admin


