Uploading images to Canvas is a key step for enhancing the visual appeal and engagement of your online courses. Whether you're a course creator, teacher, or student, adding images can make your content more interactive and memorable. Visual elements can break up long text, highlight important concepts, or even make assignments more exciting. In this section, we'll explore why it's essential to upload images to Canvas and how you can do it effectively. You'll learn the benefits of incorporating visuals and the steps to easily upload your images to the platform.
Why You Should Upload Images to Canvas

Images can bring a lot of value to your online courses. They not only make the content visually appealing but also improve the learning experience for students. Here are a few reasons why uploading images to Canvas is beneficial:
- Enhance Engagement: Visuals capture attention and can keep students engaged, especially in a virtual learning environment where distractions are plenty.
- Break Up Text: Too much text can be overwhelming for learners. Images help break up the content, making it easier to digest.
- Support Understanding: Images can clarify complex concepts, making it easier for students to grasp information.
- Increase Retention: Studies show that people tend to remember information better when it’s paired with relevant visuals.
By uploading images to Canvas, you're not only improving the aesthetic appeal of your courses but also creating a more effective learning environment. Whether it's an infographic, a chart, or a simple photo, visuals can have a lasting impact on student success.
Also Read This: How to Curve an Image on Canva
Step by Step Guide to Upload Images to Canvas

Uploading images to Canvas is simple, and the process can be completed in just a few steps. Here’s a detailed guide to help you through it:
- Step 1: Log into Canvas
First, log into your Canvas account. Once logged in, navigate to the course where you want to upload the image.
- Step 2: Select the Location
Decide where you want to upload the image. It could be in a page, assignment, discussion post, or even in your course’s media library.
- Step 3: Click the “Insert Image” Option
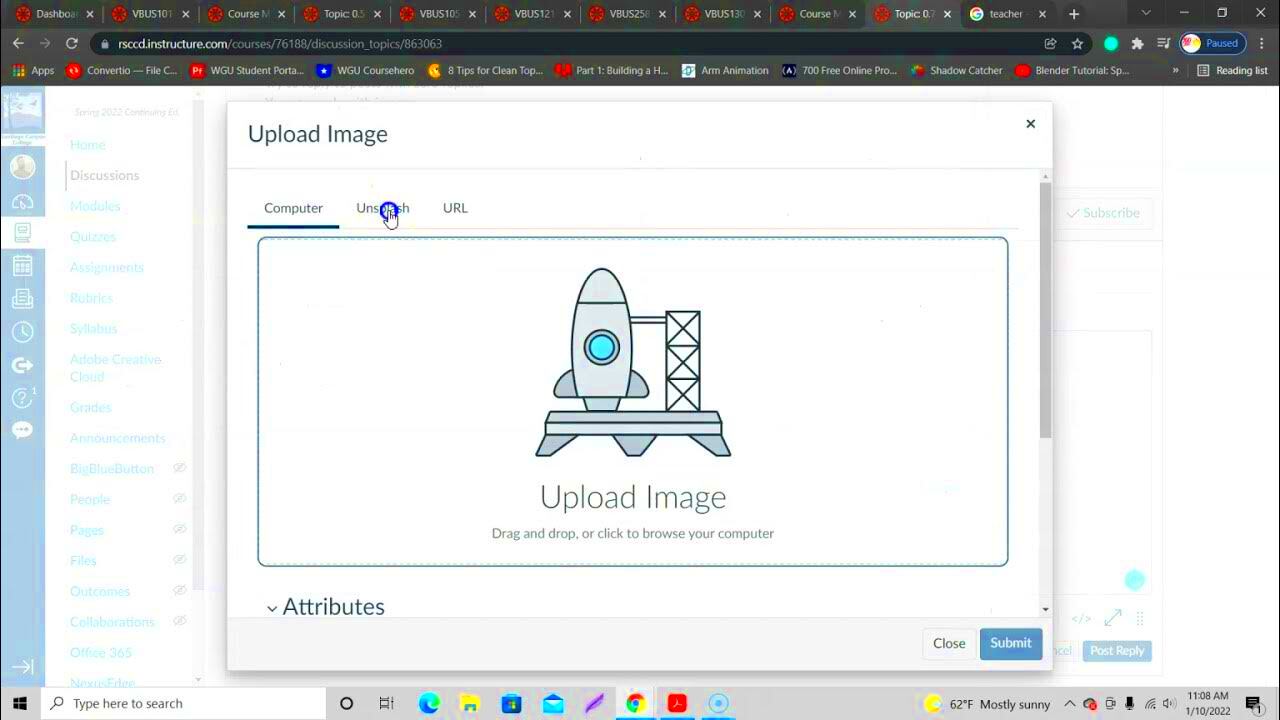
In your course’s content editor, look for the “Insert Image” button, usually represented by a picture icon. Click on it to start the upload process.
- Step 4: Upload the Image
You can upload the image by either dragging and dropping it from your computer or using the file picker to select the image from your files. Canvas supports a variety of
- Step 5: Adjust Image Settings
Once the image is uploaded, you can adjust its size, alignment, and add alternative text (for accessibility). Be sure to use descriptive alt text so that visually impaired students can understand the image through screen readers.
- Step 6: Save and Publish
After making all adjustments, don’t forget to save the image and publish the page or content. This ensures that the image is visible to students and integrated seamlessly into your course materials.
Now that you’ve learned the basics, you’re ready to upload images and enhance your Canvas course. This simple process can make a huge difference in how your students engage with the content.
Also Read This: How to Upload Spark Projects to Behance for Creative Showcase
Choosing the Right Image for Your Course

Choosing the right image for your online course can significantly enhance the learning experience. Images should support and clarify your course material, not just serve as decoration. It’s important to select visuals that align with your course content and resonate with your audience. In this section, we’ll discuss how to choose images that are not only appealing but also relevant and effective in conveying information.
Here are some tips for selecting the right image:
- Relevance is Key: Always ensure the image directly relates to the content you're teaching. It should complement or clarify key points rather than distract from them.
- Quality Matters: Choose high-resolution images that appear clear and crisp on any device. Avoid blurry or pixelated pictures that could detract from the professionalism of your course.
- Simple and Uncluttered: Opt for images that are simple and easy to interpret. Avoid overly complex or cluttered visuals that could confuse students.
- Inclusive and Diverse: Be mindful of the diversity and inclusivity of the images you select. Choose visuals that represent a variety of backgrounds, abilities, and experiences to make all students feel included.
- Consistency in Style: If you're using multiple images throughout your course, maintain a consistent style. This could mean using similar colors, themes, or types of visuals across all images to give the course a cohesive feel.
By carefully choosing the right images, you'll improve the clarity and appeal of your content, helping students understand and retain the material better.
Also Read This: How to Find Image Distance
Optimizing Image Size for Canvas
Optimizing your images before uploading them to Canvas is crucial to ensure that your course loads quickly and smoothly. Large image files can slow down the platform, causing frustration for both instructors and students. In this section, we’ll explore how to properly resize and optimize your images for a better experience on Canvas.
Here are some helpful tips to optimize image size:
- Resize Your Images: Before uploading, make sure your images are resized to the appropriate dimensions for your course. A good rule of thumb is to keep images no larger than 1500px in width or height.
- Compress the Image: Compressing images reduces file size without sacrificing quality. Use tools like TinyPNG or Photoshop to lower the file size while keeping the image visually appealing.
- Choose the Right Format: For photographs or images with gradients, JPEG is usually the best choice. For graphics, logos, or images with transparency, PNG might work better. Avoid using BMP or TIFF formats, as they tend to have much larger file sizes.
- Avoid Excessive Detail: If an image is too detailed, it can be unnecessary and large. Simplify the image by cropping or removing unimportant sections to reduce the size.
Optimizing image size not only ensures that your course loads faster, but it also helps with accessibility, ensuring that students with slower internet connections or mobile devices can still access your course content without delays.
Also Read This: Exploring the Biggest Technology Hubs and Growing Populations in the USA
Common Issues When Uploading Images to Canvas
Uploading images to Canvas is usually a straightforward process, but there are a few common issues that can arise along the way. By being aware of these potential problems, you can troubleshoot them quickly and avoid any disruptions to your course. In this section, we’ll go over some typical problems you may face when uploading images to Canvas, along with solutions to resolve them.
Here are some common issues and their solutions:
- File Format Not Supported: Canvas supports common file formats like JPG, PNG, and GIF. If you try to upload a file in an unsupported format (e.g., BMP or TIFF), Canvas will reject it. To fix this, simply convert the image to an acceptable format using an image editing tool.
- Large File Size: If the image file is too large, it may not upload properly or may slow down your course. Use image compression tools to reduce the size while maintaining quality, as mentioned earlier.
- Image Not Displaying: Sometimes an image might upload, but not display correctly on the course page. This could be due to incorrect file paths or broken links. Check the file's location and ensure it’s uploaded to the right place within Canvas.
- Incorrect Image Dimensions: If the image appears too large or small, it might not fit well within your course layout. Be sure to resize the image before uploading, or use Canvas’s image editing options to adjust the size once it’s uploaded.
- Access Issues for Students: Occasionally, students may report that they can’t view images in the course. This could be due to the image’s privacy settings or restrictions. Make sure the image is accessible by ensuring it’s public or has the proper sharing settings in Canvas.
By being proactive and addressing these common issues, you’ll ensure a smoother experience when uploading images to Canvas, making your course more professional and easier for students to navigate.
Also Read This: Can You Earn Money on Rumble and What Monetization Options Are Available
Tips for Organizing Your Images in Canvas
Organizing your images in Canvas is key to maintaining a streamlined and efficient course. Whether you’re a teacher, course creator, or student, it’s essential to have a system in place for easy access and management of your images. Well-organized images not only help with course clarity but also save you time when creating content. In this section, we’ll explore some tips on how to keep your images neatly arranged and accessible within Canvas.
Here are some tips to help you stay organized:
- Use Folders for Storage: Canvas allows you to create folders in your course files. Create separate folders for images based on the content type, such as “Lecture Images,” “Assignments,” or “Quizzes.” This will help you quickly locate and use the images when needed.
- Label Images Clearly: When uploading images, give them descriptive and clear filenames, such as “Module1_LectureImage.jpg” or “Assignment2_Chart.png.” This way, you won’t waste time figuring out what each image represents.
- Group Images by Topic or Section: If your course is divided into sections or modules, organize your images by these categories. For example, you could have folders like “Module 1 – Introduction” and “Module 2 – Case Studies” to make navigation easier.
- Use Canvas’ Media Library: Canvas has a media library where you can store and organize multimedia files, including images. Utilize this tool to manage your images and reuse them in different parts of your course.
- Regularly Review Your Image Organization: Over time, the number of images in your course can grow. Take a moment every few months to review and reorganize your images, archiving any unused ones to keep your course folder neat.
By staying organized, you can save time, reduce clutter, and maintain a more professional-looking course for your students.
Also Read This: Creating a Youtuber in Infinite Craft – A Step-by-Step Guide for Beginners
Best Practices for Image Accessibility on Canvas
Ensuring that images are accessible to all students, including those with disabilities, is a fundamental aspect of creating an inclusive learning environment. On Canvas, accessibility is important for meeting various standards and ensuring that every student can engage with your course material. In this section, we’ll discuss best practices for making your images accessible to all learners.
Here are some key practices to follow:
- Provide Alt Text for Every Image: Alt text (alternative text) is a description of the image that can be read by screen readers for visually impaired students. Always add descriptive alt text that explains the image’s content and purpose. For example, instead of “chart,” write “bar chart showing sales growth over the last quarter.”
- Use High-Contrast Images: Ensure that your images are clear and have enough contrast so that students with visual impairments can distinguish between different elements. Avoid using images that rely on subtle color differences.
- Consider Text-Only Alternatives: If an image contains important information, such as a chart or diagram, offer a text-only alternative. For example, you could provide a summary of the data presented in the chart for students who can’t see it.
- Don’t Rely Solely on Color: If your image contains information that relies on color (e.g., a color-coded chart), ensure that the information can also be understood by other means, such as labels or patterns.
- Test Images with Screen Readers: Before finalizing your course, use screen reader tools to ensure that your images are being interpreted correctly. This will help you catch any accessibility issues before students encounter them.
By following these best practices, you’ll ensure that your course is accessible to all students, regardless of their abilities, and comply with accessibility guidelines.
Also Read This: How to Purchase Multiple Images on iStock at Once
FAQ
Here are some frequently asked questions about uploading, organizing, and optimizing images on Canvas:
- How do I upload multiple images at once to Canvas?
To upload multiple images, simply select all the images you want to upload at once when using the file picker. Canvas will allow you to upload them all together and will store them in the course files, where you can organize them later.
- What’s the best image format for Canvas?
The most common image formats for Canvas are PNG, JPG, and GIF. PNG is best for images with transparency, while JPG is ideal for photographs. GIF is suitable for simple animations. Avoid using BMP or TIFF as these tend to be larger in file size.
- How can I resize images on Canvas?
You can resize images directly in the Canvas editor by selecting the image and adjusting its dimensions. However, it’s generally better to resize the image before uploading it to ensure that the file size is optimized.
- Can I use Canvas to create image galleries?
Yes, you can create image galleries using the Canvas platform. You can either upload images to a specific page or use a third-party tool to create galleries that students can navigate easily within the course.
- What happens if my image isn’t displaying correctly?
If an image isn’t displaying, make sure the file path is correct and that the image is properly uploaded. Sometimes clearing the browser cache can also help resolve display issues.
We hope these answers help clarify some of the common questions about working with images in Canvas. If you have any additional questions, don’t hesitate to reach out to your Canvas support team or consult the help section.
Conclusion
Uploading and organizing images in Canvas is an essential step for creating a more engaging and accessible online course. By choosing the right images, optimizing their size, and following best practices for accessibility, you can ensure that your course is both visually appealing and user-friendly for all students. Staying organized with your image files not only saves time but also enhances the clarity of your course material. With the tips and techniques provided, you're now equipped to improve your course design and create a more effective learning experience for everyone.

 admin
admin


