Flipping an image can seem like a small editing step, but it can have a big impact on the final result. In Adobe Lightroom, flipping is a simple yet powerful tool for transforming your photos, whether you're correcting the composition or experimenting with different perspectives. It’s especially useful when you need to adjust the orientation of an image or create a mirrored effect. In this section, we'll explore the importance of flipping images and why it’s a handy skill to have in your editing toolkit.
Understanding the Basics of Image Flipping

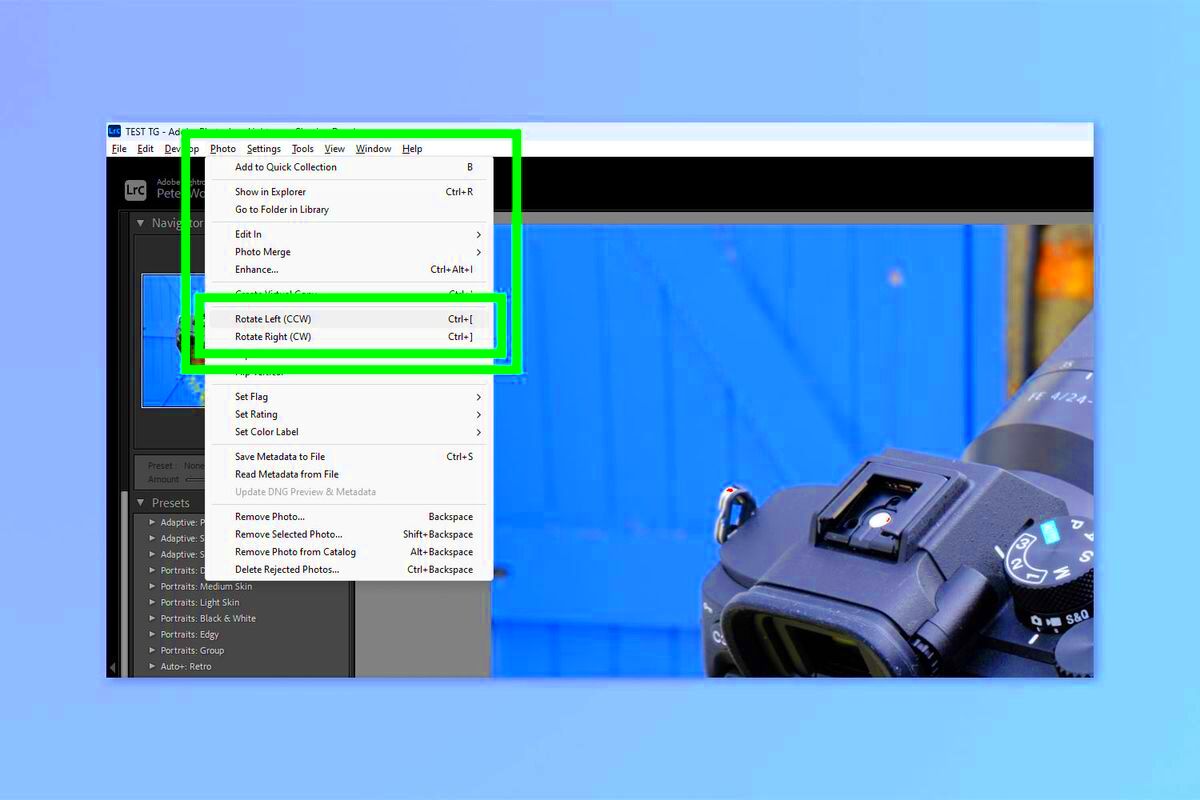
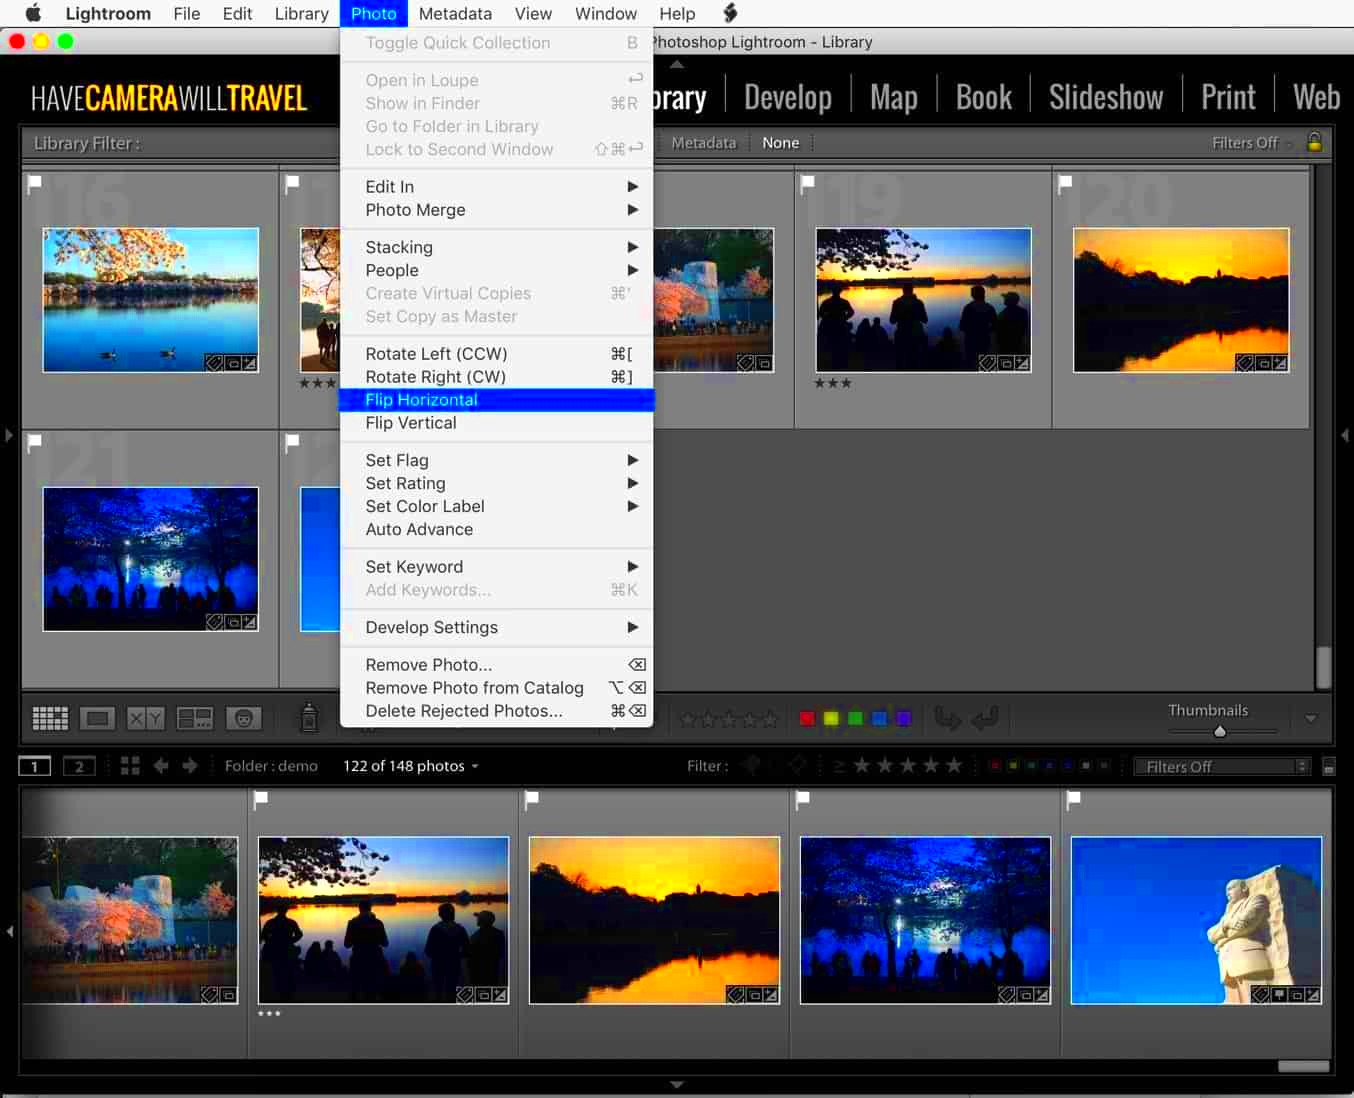
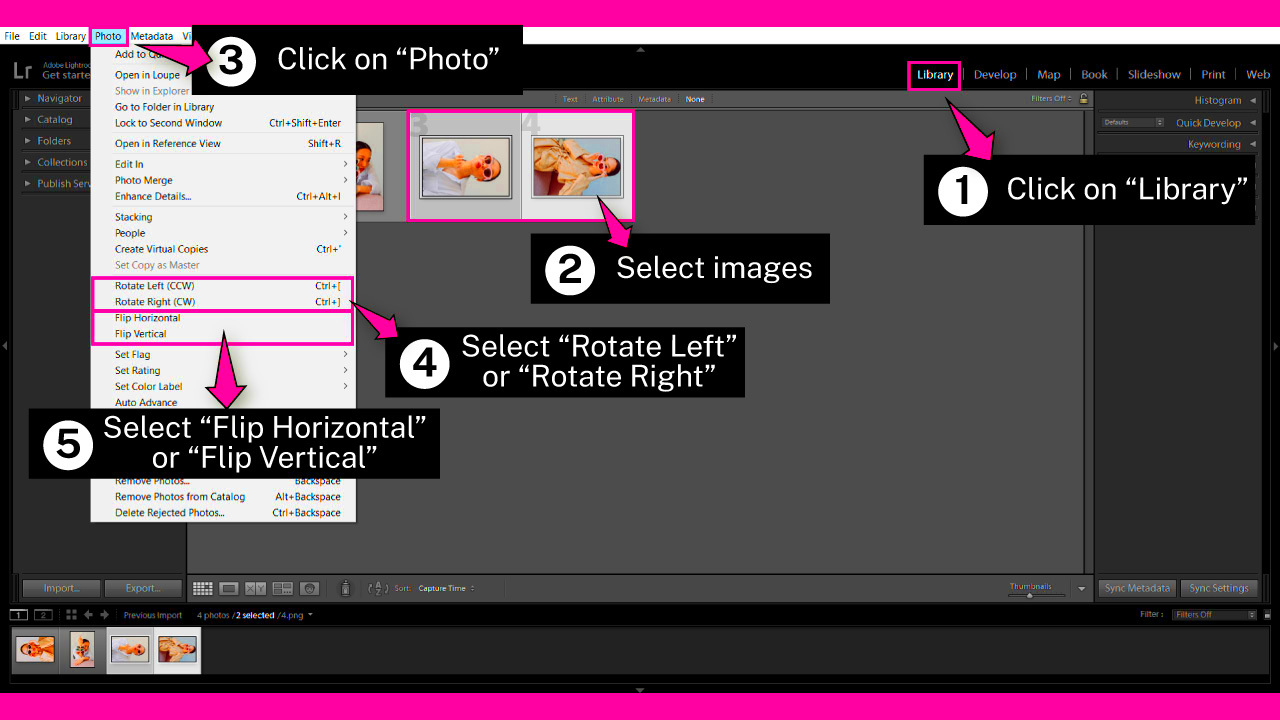
Flipping an image means reversing it horizontally or vertically. This process alters the image’s orientation, either mirroring it or flipping it upside down. In Lightroom, there are two main types of flips you can perform:
- Horizontal Flip: This mirrors the image from left to right, like flipping a photo over a vertical axis. It’s great for creating balance or for images with subjects facing the wrong direction.
- Vertical Flip: This flips the image upside down, mirroring it along a horizontal axis. It’s useful for changing perspectives or emphasizing certain elements of the photo.
Flipping can be a creative choice or a practical solution. Sometimes, flipping an image can improve its composition, making the photo feel more balanced or correcting an awkward alignment. Whether you’re working with portraits, landscapes, or artistic shots, understanding when and how to flip images is essential for achieving the desired effect in your photos.
Also Read This: YouTube Shorts vs TikTok Which Platform Offers Better Opportunities
Steps to Flip an Image in Lightroom Using the Develop Module

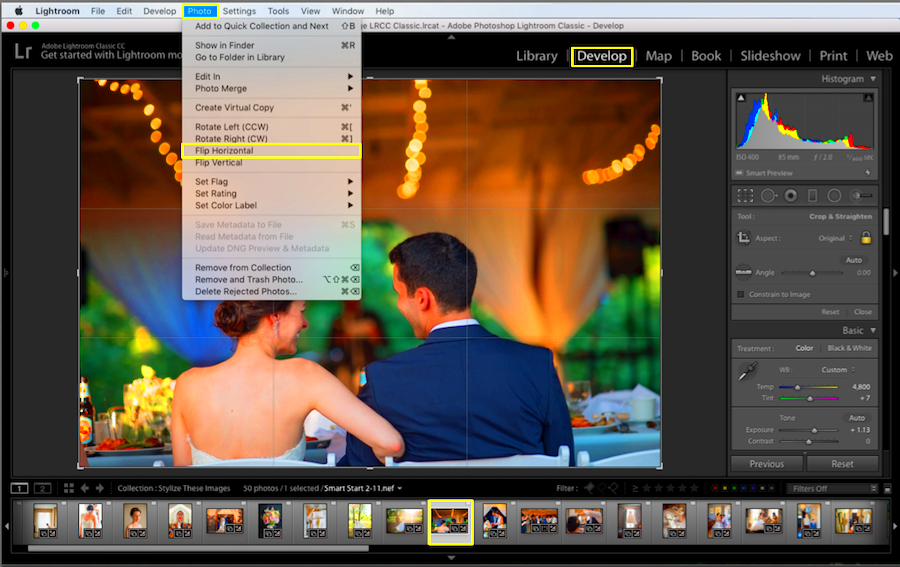
Flipping an image in Lightroom is simple and takes only a few steps. Here's how you can do it using the Develop module:
- Open the Develop Module: Begin by selecting the photo you want to flip in the Library module. Then, switch to the Develop module where most of the editing tools are located.
- Select the Crop Overlay Tool: On the right-hand panel, you’ll find the Crop & Straighten section. Click on the crop tool icon (it looks like a square with diagonal lines).
- Access the Flip Options: In the Crop Overlay tool, you’ll see options to rotate and flip your image. Look for the flip icons—one for horizontal flip and one for vertical flip.
- Flip Your Image: Click on the horizontal or vertical flip icon depending on how you want to flip your image. You’ll immediately see the change applied to your photo.
- Adjust the Composition (if needed): After flipping, you may need to reposition or crop your image to get the best composition. Use the crop tool to adjust the framing of your photo as necessary.
- Finish and Save: Once you’re satisfied with the flipped image, you can apply other adjustments or export your photo. Don’t forget to save your work!
And that’s it! Flipping an image in Lightroom is quick and easy. Whether you’re just correcting a composition or looking to experiment with new perspectives, these simple steps will help you flip your images in no time.
Also Read This: How to Change Background in Adobe Photoshop CS3
Flipping Horizontally vs. Vertically: When to Use Each

When it comes to flipping images, there are two main options: horizontal and vertical. Both can serve different purposes depending on your creative vision or practical needs. Understanding the difference between the two and knowing when to use each can make a significant impact on the outcome of your photo editing. Let’s break it down:
- Horizontal Flip: A horizontal flip mirrors the image from left to right, like flipping a photo over a vertical axis. This technique is perfect when you want to:
- Correct the orientation of a subject or object facing the wrong way.
- Create a balanced, symmetrical effect in the image.
- Improve the flow or composition by positioning elements more favorably.
- Vertical Flip: A vertical flip reverses the image upside down, as though you’re flipping the photo over a horizontal axis. It’s useful when:
- You want to create an interesting or surreal perspective.
- You’re enhancing certain compositions, like reflections or landscapes.
- You need to change the framing or emphasis of a subject that works better in an inverted position.
In short, the decision between flipping horizontally and vertically depends on what you're trying to achieve. Horizontal flips are often more common and practical for correcting composition, while vertical flips can add creativity and intrigue to your photos.
Also Read This: Find Out How to Upload Photos to Shutterstock
Adjusting the Image After Flipping

Once you flip an image in Lightroom, it’s not always perfect right away. The flip might change the balance, perspective, or framing, which means you may need to make a few additional adjustments to fine-tune your image. Here are some common adjustments to consider after flipping:
- Cropping: After flipping, the composition may need to be cropped to refocus on key elements or to improve the framing of your image. Simply use the Crop Overlay tool in the Develop module to trim the edges and adjust the view.
- Straightening: Sometimes, flipping can make the image appear tilted or askew. Use the Angle slider in the Crop tool to straighten the image and correct the horizon or any tilted lines.
- Repositioning the Subject: If the flipped image looks off-center, you can reposition the subject within the frame. Just drag the image around in the Crop Overlay area to adjust the placement.
- Enhancing Details: After flipping, certain elements of the image may appear in a new light. Use Lightroom's tools for exposure, contrast, and sharpness to enhance the subject or the overall look of your photo.
It’s always a good idea to revisit your image after flipping to make sure everything still looks balanced and cohesive. By tweaking a few settings, you can ensure that the flip enhances the photo rather than detracts from it.
Also Read This: Earn Money on Rumble and Transform Your Content into Revenue
Common Mistakes to Avoid While Flipping Images
Flipping images in Lightroom is straightforward, but it’s easy to make mistakes if you're not careful. Here are some common pitfalls to avoid:
- Not Checking the Composition: After flipping, the image’s composition may no longer work as effectively as before. Always check the balance and symmetry to make sure the flip doesn't disrupt the flow of the image.
- Forgetting to Crop: Flipping can sometimes cause unnecessary space on the edges or an awkward crop. Make sure to adjust the crop tool to remove any unwanted areas and focus on the essential parts of the image.
- Over-flipping: While flipping can help correct compositions, don’t overdo it. Flipping multiple times or using both horizontal and vertical flips in one image can result in a distorted look that doesn’t serve the photo well.
- Ignoring the Subject’s Direction: In portrait or people photography, flipping the image can change the direction a subject is facing, which can lead to an unnatural look. Always double-check that your subject’s gaze or posture still works after a flip.
- Not Using the Right Tool: Some beginners may try to flip images in the wrong editing section or outside Lightroom. Always use the Crop Overlay tool in the Develop module to ensure you’re flipping your image properly.
Being aware of these common mistakes and taking the time to correct them will make your flipped images look much more polished and professional. With a bit of practice, flipping can become an effective tool in your Lightroom workflow!
Also Read This: how to know if an image is high res
Using Lightroom Shortcuts to Speed Up the Process
Editing images in Lightroom can be a time-consuming task, but by mastering keyboard shortcuts, you can speed up the process and streamline your workflow. Lightroom has a variety of shortcuts that allow you to flip images, adjust settings, and navigate through the software without relying on the mouse. These shortcuts can be a game-changer, especially for photographers who work on multiple images at once or need to make quick adjustments. Let's look at some useful shortcuts for flipping images and speeding up your editing process:
- Flip Horizontally: Press Ctrl + Shift + H (Windows) or Cmd + Shift + H (Mac) to quickly flip your image horizontally.
- Flip Vertically: To flip your image vertically, press Ctrl + Shift + V (Windows) or Cmd + Shift + V (Mac).
- Zoom In and Out: Press Ctrl + + (Windows) or Cmd + + (Mac) to zoom in on the image. To zoom out, press Ctrl + - (Windows) or Cmd + - (Mac).
- Crop Tool: Press R to quickly activate the crop tool, which is useful after flipping to adjust the framing of your image.
- Undo/Redo: If you make a mistake while flipping or editing, use Ctrl + Z (Windows) or Cmd + Z (Mac) to undo the action. To redo, use Ctrl + Shift + Z (Windows) or Cmd + Shift + Z (Mac).
By memorizing these shortcuts, you'll spend less time navigating menus and more time editing your photos. It’s all about making your editing process more efficient, so you can focus on creativity rather than technicalities.
Also Read This: Top Platforms to Help You Earn as Much Money as iStock
FAQ
Here are some frequently asked questions about flipping images in Lightroom, which may help clear up any confusion:
- Q: Can I flip multiple images at once in Lightroom?
A: Unfortunately, Lightroom doesn't allow you to flip multiple images simultaneously. You'll need to flip each image individually, but you can speed up the process using keyboard shortcuts. - Q: Will flipping an image affect its quality?
A: No, flipping an image in Lightroom does not affect its quality. It’s simply a transformation of the image’s orientation, so the resolution and sharpness will remain the same. - Q: Can I flip an image in Lightroom and then export it as a mirrored version?
A: Yes, once you flip an image in Lightroom, you can export it like any other edited photo. The flip will be included in the exported file. - Q: Why should I flip an image in Lightroom instead of other software?
A: Lightroom is designed for photographers, offering non-destructive editing. This means that any changes you make, like flipping, can always be undone, making it safer than editing in other software. - Q: Is there a way to quickly flip an image back and forth in Lightroom?
A: Yes, by using the shortcuts to flip horizontally or vertically, you can quickly experiment with different orientations until you find the one that works best for your image.
Conclusion and Tips for Better Image Editing
Flipping images in Lightroom is a simple yet powerful tool that can help you adjust compositions, correct orientations, and add creative effects. While it’s easy to perform, it’s important to make sure the flip enhances your image rather than disrupting its flow. Here are a few tips to keep in mind when editing and flipping images in Lightroom:
- Use Flipping Sparingly: While flipping can fix certain compositional issues, over-flipping can create a disorienting effect. Be mindful of how each flip changes the feel of the image.
- Adjust the Crop and Alignment: After flipping, don’t forget to crop the image and adjust the alignment if needed. This will ensure that the composition looks balanced and appealing.
- Take Advantage of Shortcuts: Keyboard shortcuts can save you a lot of time, so get familiar with them to make your workflow faster and more efficient.
- Always Preview Your Work: After flipping, always preview your image to see how the changes affect the overall composition. It’s important to make sure everything aligns with your vision for the photo.
- Experiment with Creative Flips: Don’t be afraid to experiment with flipping your images in different directions. Sometimes, flipping vertically or horizontally can add an unexpected twist that improves the photo.
By following these tips and understanding when to flip your images, you can take full advantage of Lightroom’s editing capabilities to create striking, balanced photos that stand out. Happy editing!


