Have you ever wondered what it truly means to own a YouTube channel? It's not just about creating videos; it's about controlling your content and protecting your brand. Whether you're a budding creator or a seasoned pro, understanding ownership is key to ensuring your hard work pays off. In this post, we’ll break down the simple steps to claim your YouTube channel and why it's so essential.
Understanding the Importance of Claiming Your Channel
Claiming your YouTube channel isn’t just a formality—it’s a vital step in establishing your presence on one of the largest video platforms in the world. Here’s why you should prioritize this:
- Control Over Your Content: When you claim your channel, you gain complete control over your videos, playlists, and community interactions. This means you can edit, delete, or monetize your content without any hassles.
- Brand Protection: By claiming your channel, you protect your brand identity. This helps prevent impersonation or misuse of your content, which can damage your reputation and confuse your audience.
- Access to Features: Once your channel is verified, you unlock exclusive features like custom thumbnails, live streaming, and more. These tools can significantly enhance your content and viewer engagement.
- Engagement with Your Audience: A claimed channel allows you to build a community. You can respond to comments, create polls, and interact with your subscribers, fostering a loyal fan base.
- Monetization Opportunities: If you’re considering earning money from your content, you must claim your channel. Monetization eligibility requires a verified account, ensuring that you can profit from your creativity.
In essence, claiming your YouTube channel is your first step towards establishing a successful online presence. It empowers you, protects your brand, and opens up a world of possibilities. So, if you haven’t done it yet, let’s dive into the steps to claim ownership and take charge of your creative journey!
Also Read This: A Step-by-Step Guide on How to Add an Administrator to Your YouTube Channel
3. Step 1: Prepare Your YouTube Account
Before you dive into the ownership claim process, it’s essential to ensure that your YouTube account is ready. Think of this step as getting your house in order before inviting guests over. Here’s how to prepare:
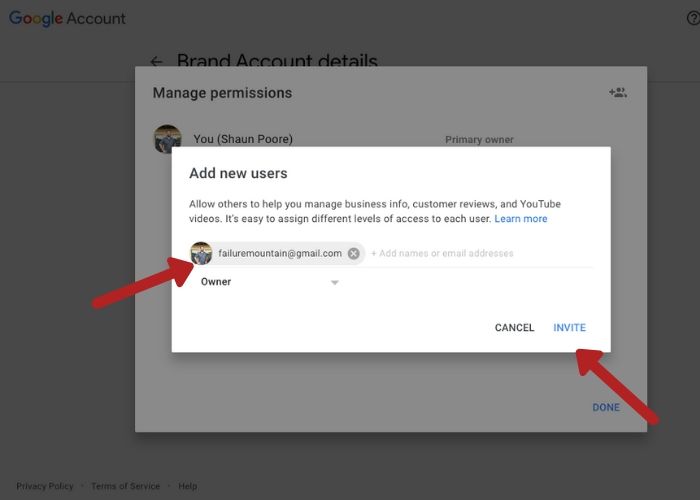
- Sign in to Your Account: First, make sure you’re signed in to the correct Google account associated with your YouTube channel. If you’ve got multiple accounts, double-check that you’re using the one tied to your channel.
- Review Channel Settings: Navigate to your YouTube Studio and check your channel settings. Ensure that all your details—like your channel name, description, and branding—are correct. This will not only make claiming ownership easier but also present a professional image.
- Enable Two-Step Verification: For added security, enable two-step verification on your Google account. This will safeguard your account from unauthorized access and is often a requirement for verification.
Once you’ve taken care of these tasks, you’re ready to move forward. It’s like checking your toolbox before starting a DIY project—you want to have everything you need at your fingertips!
Also Read This: What Time Does Airtel YouTube Night Start for Subscribers
4. Step 2: Verify Your Identity
Now that your YouTube account is primed and ready, it’s time to verify your identity. This step is crucial because it ensures that you are indeed the rightful owner of the channel. Here’s how to do it:
- Go to YouTube’s Verification Page: Head over to the YouTube verification page. You’ll find options to verify your account via phone or email. Choose the method that works best for you.
- Choose Your Verification Method: You can opt to receive a verification code via text message or phone call. If you prefer email, ensure that you have access to the email linked to your YouTube account. Always double-check that the number or email is correct to avoid any hiccups.
- Enter the Verification Code: Once you receive the code, input it into the required field on the verification page. This is the key step that proves you’re in control of the account.
And voilà! Once your identity is verified, you’ll gain access to additional features and functionalities that come with owning a YouTube channel. This includes the ability to customize your channel, access monetization features, and more!
Remember, taking these steps seriously not only helps in claiming ownership but also protects your content and community. So, take a deep breath, and let’s keep moving forward in this process!
Also Read This: Why Does YouTube TV Have Zen Breaks? Exploring YouTube TV’s Unique Features
5. Step 3: Gather Necessary Documentation
Alright, let’s dive into the nitty-gritty of gathering the necessary documentation to claim ownership of your YouTube channel. This step is crucial because having the right documents can make your ownership claim smoother and more straightforward. Don’t worry; I’ll walk you through what you need!
Here’s a handy checklist of documents you should consider:
- Proof of Identity: This can be a government-issued ID, like a passport or driver's license. Make sure your name on the ID matches the name associated with your YouTube channel.
- Proof of Channel Ownership: You’ll need something that shows you’ve been managing the channel. This could be the original email address used for account creation or previous correspondence from YouTube.
- Documented Evidence of Content Creation: If possible, gather any files or backups of your videos, thumbnails, or channel art. This can help establish that you are the creator.
- Additional Verification: Depending on your situation, YouTube might ask for other documents. Be prepared to provide any further evidence they request.
Make sure all your documents are clear and legible. It’s frustrating to have your claim delayed because of blurry images or unreadable text. Take a moment to double-check everything!
Once you have your documentation organized, you’ll be ready for the next step. Remember, the better prepared you are, the quicker you can get your ownership claim processed. So take your time here, and don’t rush!
Also Read This: How to Upload Voice Memos to YouTube: Quick Instructions
6. Step 4: Submit Your Ownership Claim
Now that you’ve gathered all the necessary documentation, it’s time to submit your ownership claim to YouTube. This may seem daunting, but I promise it’s just a matter of following a few simple steps!
Here’s how you can go about it:
- Visit the YouTube Help Center: Go to the YouTube Help Center and navigate to the section on channel ownership claims. This is where you’ll find the most current information and the link to the claim form.
- Fill Out the Claim Form: Once you find the form, fill it out carefully. Be honest and clear about your situation. The more straightforward you are, the better your chances of a quick response.
- Upload Your Documentation: When prompted, upload the documents you gathered in the previous step. Make sure you follow any guidelines regarding file size and format.
- Review Your Submission: Before hitting “submit,” take a moment to review everything. Ensure that your information is correct and that all required documents are attached.
- Submit and Wait: After submitting your claim, you’ll receive a confirmation email from YouTube. Now, it’s a waiting game. Typically, you should hear back within a few days, but it might take longer depending on the volume of claims they’re handling.
While waiting, try to stay positive! YouTube processes a lot of claims, and they’re thorough in their verification process. If you don’t hear back within a week or so, it’s perfectly fine to follow up through the Help Center.
Once your ownership is confirmed, you can finally regain control of your channel and all the content you’ve created. Good luck, and here’s to your success in claiming your YouTube channel!
Also Read This: Why Is CBS Not Working on YouTube TV? Troubleshooting Channel Issues
7. Step 5: Confirmation and Follow-Up
Congratulations! You've successfully submitted your ownership claim for your YouTube channel. But before you can kick back and relax, there are a few important follow-up steps to ensure everything is squared away. Here’s how to navigate this final phase:
1. Check Your Email: After submitting your claim, YouTube will send you an email confirming that they received your request. This is your first sign that things are moving in the right direction. Make sure to check your spam or junk folder, just in case the email landed there.
2. Await Verification: YouTube will typically take a few days to review your claim. During this period, they might reach out for additional information or clarification. It’s crucial to provide any requested details promptly to avoid delays. Be patient, as this process can vary in length depending on how busy YouTube’s support team is.
3. Access Your Account: If your claim is approved, you will receive another email confirming your ownership. This email will guide you on how to log back into your YouTube account. Make sure to follow these instructions carefully to regain access.
4. Update Your Channel: Once you've regained access, take a moment to review your channel settings. Make sure that your branding, descriptions, and any monetization settings are all up to date. This is also a great time to engage with your audience—perhaps posting a video explaining the changes or thanking viewers for their support during your ownership transition.
5. Monitor Your Channel: After claiming ownership, keep an eye on your YouTube analytics. Look out for any fluctuations in engagement metrics or comments that could indicate issues or confusion among your viewers. Being proactive can help you address any concerns swiftly.
8. Common Issues and Troubleshooting Tips
While claiming ownership of your YouTube channel is generally straightforward, sometimes hiccups can occur. Here are some common issues you might face and how to resolve them:
- Verification Email Not Received: If you haven’t received the verification email, first check your spam or junk folder. If it’s not there, try to request a new verification email through YouTube's support page. Make sure you use the same email address linked to your YouTube account.
- Claim Denied: If your claim gets denied, YouTube will usually provide a reason. It could be due to insufficient proof of ownership. Double-check that you submitted the correct documents. If you're unsure, consider reaching out to their support team for more guidance.
- Account Locked: Sometimes, accounts get temporarily locked due to unusual activity. If this happens, follow the instructions in the email from YouTube to verify your identity. You might need to provide additional documentation to regain access.
- Slow Response Time: If you feel that the response from YouTube is taking too long, don’t hesitate to reach out to them again. Be polite but firm in your communication, and reference your previous claims to help expedite the process.
Remember, patience is key during this process. Most issues are resolvable, and being proactive and communicative can make a world of difference. Focus on your content and community while you await the resolution, and soon enough, you’ll be back to creating great videos!
 admin
admin


