Sketching a face can be both a fulfilling and challenging endeavor, whether you're a seasoned artist or just starting out. The human face is an intricate landscape of unique features, emotions, and expressions that can be captured with just a pencil and paper. In this guide, we'll break down the process into manageable steps, making it easier for you to create a stunning portrait. So grab your materials and let's dive into the art of sketching faces!
Gathering Your Materials

Before you dive into sketching, it’s essential to gather the right materials. Having quality tools can make a world of difference in your drawing experience. Here’s a simple list of what you might need:
- Pencil: A range of pencils (2B, 4B, 6B) is recommended to achieve various shading effects.
- Sketchbook: A good-quality sketchbook with thicker pages will allow for easier erasing and blending.
- Eraser: A kneaded eraser is great for lifting graphite softly without damaging your paper.
- Blending Stumps: These help smooth out shading for a more polished look.
- Ruler: Useful for marking proportions and keeping features aligned.
- Reference Images: Pictures of faces can offer inspiration and guidance on shapes and shadows.
- Good Lighting: Natural light is ideal, but if sketching indoors, a good lamp can help illuminate your workspace.
Once you’ve gathered your materials, you’ll feel more prepared to tackle the various features of the face. Remember, having the right tools can enhance your creativity and help you express your artistic vision more effectively.
Also Read This: How to Achieve Flawless Skin with Base Makeup on Dailymotion
Understanding Facial Proportions

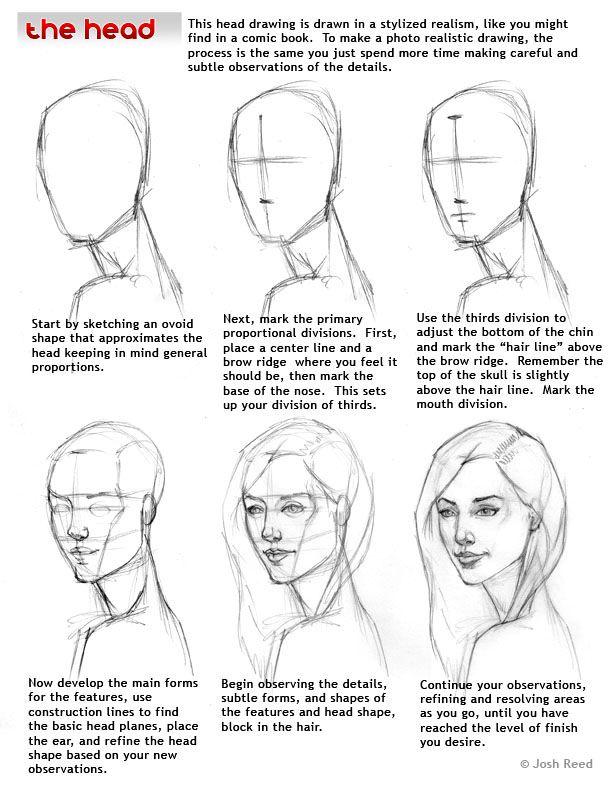
When it comes to sketching a face, understanding facial proportions is key. Proportions refer to the relationship in size between various features of the face. Knowing these proportions helps you capture a more realistic likeness, whether you’re drawing a portrait or a character.
Let’s break it down a bit. The average adult face is often described using certain measurement guidelines:
- The face can be divided into three equal horizontal sections:
- From the hairline to the eyebrows
- From the eyebrows to the bottom of the nose
- From the bottom of the nose to the chin
- The width of the face is typically five eye-widths across, with one eye-width space between the eyes.
- The ears generally align with the eyebrows and the bottom of the nose.
*Tip: Use light guidelines to mark these proportions on your paper, as they can be easily erased later. By keeping these measurements in mind, you’ll ensure that each feature fits well on the canvas.
Finally, remember that while these proportions are a great starting point, everyone's face is unique! Feel free to adjust these guidelines to suit the individual you are sketching. With practice, you will begin to develop an intuitive understanding of how proportions work for different faces.
Also Read This: How to Post Research on LinkedIn Sharing Your Research Insights with Your Network
Basic Shapes and Guidelines
Before diving into the intricate details of facial features, it's essential to map out the face using basic shapes and guidelines. This will serve as the foundation for your sketch and help maintain the correct proportions.
Start with these simple steps:
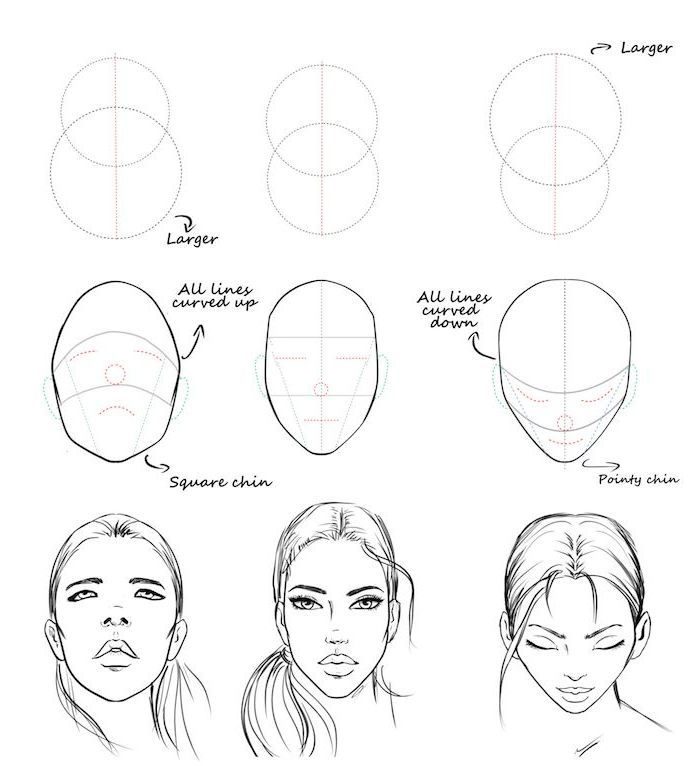
- Draw an Oval: Begin by sketching a light oval shape that represents the overall outline of the head. This oval will serve as the basic shape of the face.
- Divide the Face: Use gentle lines to divide the oval. Draw a vertical line down the center to help position the features symmetrically. Then draw a horizontal line across the middle to mark where the eyes will go.
- Add the Guidelines for Features:
- Draw horizontal lines for the eyebrows, nose, and mouth.
- Each feature should have a corresponding line, making it easier to keep them aligned.
- Shape the Chin: Adjust the bottom of the oval to form the chin, making it more angular or rounded, depending on the character you’re sketching.
Remember*: These shapes don't have to be perfect. The goal is to establish a loose structure that you can refine later. Once you have these basic shapes down, you can start to layer on the details of the eyes, nose, mouth, and hair. With practice, these initial shapes will help turn your simple sketches into more realistic portraits.
Also Read This: Stunning Graphics for Wedding Planners with VectorStock
5. Refining Features and Adding Details
Once you’ve got the basic structure of the face down, it’s time to refine the features and add those little details that bring your sketch to life. Think of this phase as adding the finishing touches to a canvas – the subtle brush strokes that can elevate your work.
Start with the eyes, as they are often considered the windows to the soul. Pay attention to the shape and size, making subtle adjustments to ensure they match your vision. Here’s a quick checklist to help you refine:
- Shape: Are they almond-shaped, round, or perhaps a bit slanted?
- Proportion: Do they line up correctly with other features?
- Expression: Are the eyebrows conveying the right emotion?
Next, focus on the nose and mouth. These features can express a lot about a person’s character and mood. Try sketching different mouth shapes to see which fits the personality of your subject best. Don’t forget to include that slight shadow beneath the nose and the subtle curves of the lips to add dimension.
For the hair, think about how it frames the face. Use quick, flowing strokes to indicate movement and texture. Long hair may require different techniques than short hair, so keep that in mind.
Finally, don’t overlook the ears—they can add a lot of personality and detail if sketched thoughtfully. Adding wrinkles, freckles, or other unique identifiers can also enhance the realism of your portrait. Your goal here is to make the face uniquely recognizable, so feel free to experiment!
Also Read This: How to Stretch Images in Canva for Custom Sizes
6. Shading Techniques for Depth
Now that you’ve refined those features, let’s talk about shading techniques that will really bring your face sketch to life. Shading isn’t just about making something darker; it’s about creating depth, adding dimension, and highlighting the play of light on the face.
Start by determining your light source. This will dictate where the shadows fall and where highlights should be placed. A common technique is to use the Hatching method, which involves drawing closely spaced parallel lines. This adds texture and can be varied in thickness for greater depth.
| Technique | Description |
|---|---|
| Hatching | Drawing parallel lines close together for shading. |
| Cross-Hatching | Layering intersecting lines to build depth. |
| Stippling | Using dots to create a gradient effect. |
Cross-hatching is another excellent technique that can add layers of complexity and tone. By layering lines in different directions, you can create darker shadows or softer transitions. For a more delicate approach, try stippling, which involves making small dots to create a gradual gradient—this can be particularly effective for skin textures.
When shading, always remember to blend! You can use a blending stump or even your finger to soften harsh lines and create a more natural look. This approach can help create realistic shadows under the cheekbones and around the jawline, giving your sketch its three-dimensional quality.
With these shading techniques in your arsenal, your face sketches will go from flat to fabulous, capturing the essence of the person you’re drawing in vivid detail!
Also Read This: Mastering Makeup Techniques to Conceal Acne
7. Final Touches and Presentation
Now that your face sketch is nearing completion, it's time to think about the final touches that will elevate your artwork to the next level. These details can make a significant difference, so take your time and enjoy this process!
1. Refining Details: Begin by going over your sketch to identify areas that need more definition. Perhaps the eyes could use a bit more shading around the lids, or the lips require a subtle hint of color to make them pop. Use the following technique:
- Take a step back and observe your sketch from a distance.
- Focus on the proportions and symmetry—does anything look off?
- Use a kneaded eraser to gently lift excess graphite from the highlights.
2. Adding Texture: Textures can really bring your sketch to life. Consider using varied pencil pressures or cross-hatching techniques to create depth, especially in the hair and skin. This layering approach will help your sketch feel more dynamic.
3. Presentation: Once you're satisfied with the details, think about how you'd like to present your artwork. A few options may include:
| Option | Description |
|---|---|
| Framing | Choose a frame that complements your sketch, enhancing its overall appeal. |
| Digital Scanning | Scan your sketch for digital preservation or sharing on social media. |
| Displaying | Hang your artwork in a well-lit area to showcase your talent. |
By thoughtfully adding these final touches and considering your presentation options, your face sketch will not only be a personal triumph but also a beautiful piece to share with others!
8. Conclusion
Congratulations! You've successfully navigated through the intricate journey of sketching a face. While this process can seem daunting at first, with practice and patience, you can develop your unique style and approach.
Remember, every great artist started somewhere, and each line you draw brings you one step closer to mastering the art of portraiture. Here are some final thoughts to keep in mind:
- Practice Makes Perfect: Keep sketching regularly to improve your skills. The more you practice, the more comfortable you’ll become with proportions and expressions.
- Seek Feedback: Don't hesitate to share your work with friends or online communities. Constructive criticism can provide valuable insights and encouragement.
- Embrace Mistakes: Every artist slips up now and then. Use mistakes as learning opportunities, and don’t shy away from experimenting.
So grab your sketchbook, unleash your creativity, and remember: every line tells a story. Happy sketching!
 admin
admin


