Designing a dress can be an incredibly satisfying and creative pursuit, whether you're a seasoned fashionista or someone looking to explore a new hobby. The magic of dress design lies in its blend of art, practicality, and personal expression. It's an opportunity to capture a feeling, express your personality, and even make a statement. Whether you're aiming for a casual sundress, an elegant evening gown, or something entirely unique, getting started in dress design can be both exciting and a little daunting.
By breaking the process down into manageable steps, anyone can dive into the world of garments without feeling overwhelmed. In this guide, we'll cover everything from conceptualization to execution, equipping you with the right tools and techniques to turn your vision into a reality. So grab a sketchbook and allow your imagination to run wild—your dress design journey is about to begin!
Gathering Your Materials
Before you start sketching designs or choosing fabrics, it’s essential to gather your materials. Having everything ready at your fingertips will make the entire design process smoother and more enjoyable. Here’s a breakdown of what you need:
- Sketchbook or Design Software: This is where you'll bring your ideas to life. Whether you prefer traditional sketching or digital designs, choose what feels most comfortable.
- Pencils and Markers: Stock up on a range of drawing tools. Pencils for initial sketches and markers for adding color and depth.
- Measuring Tape: Essential for noting down measurements—both yours and potential wearers’, if you’re designing for others.
- Fabric Samples: Gather various fabrics to see how they drape, feel, and behave. Common choices include cotton, silk, linen, and synthetic blends.
- Patterns: If you’re new to dressmaking, using pre-made patterns can be incredibly helpful. You can find them at fabric stores or online.
- Sewing Kit: Basic sewing supplies, including needles, threads, scissors, pins, and a sewing machine, will be instrumental as you construct your design.
- Reference Material: Consider magazines, books, and online resources showcasing designs you admire. These will help inspire your creativity.
By gathering these materials upfront, you’ll set yourself up for success, ensuring that your creative flow isn’t interrupted later on. Dive in, explore, and let your creativity unfold!
3. Understanding Fashion Basics
Before you dive into designing your dress, it's crucial to grasp some fundamental fashion concepts. Understanding the basics will not only boost your confidence but also enhance your creativity!
- Silhouettes: This refers to the shape of the dress. Know various silhouettes like A-line, sheath, and empire waist. Each offers a different vibe and enhances different body types.
- Fabrics: Fabrics play a significant role in the look and feel of your dress. Familiarize yourself with materials such as cotton, silk, chiffon, and denim. Each fabric behaves differently, so choose wisely based on your design and occasion.
- Color Theory: Colors evoke emotions and convey messages. Understand the color wheel and learn about complementary and contrasting colors to make your dress stand out.
- Trends vs. Timelessness: Stay updated on current fashion trends but also focus on classic styles. A balance will ensure your dress remains stylish both now and in the future.
- Body Types: A crucial part of designing is knowing how different styles flatter various body shapes. Familiarize yourself with pear, apple, hourglass, and athletic shapes to make more informed design choices.
By mastering these basics, you will set a strong foundation for your dress design journey. Remember, the more you know, the more innovative you can be!
4. Creating Your Dress Sketch
Once you've wrapped your head around the fashion basics, it’s time to let your imagination run wild with your dress sketch! This is an exciting part where your ideas come to life on paper.
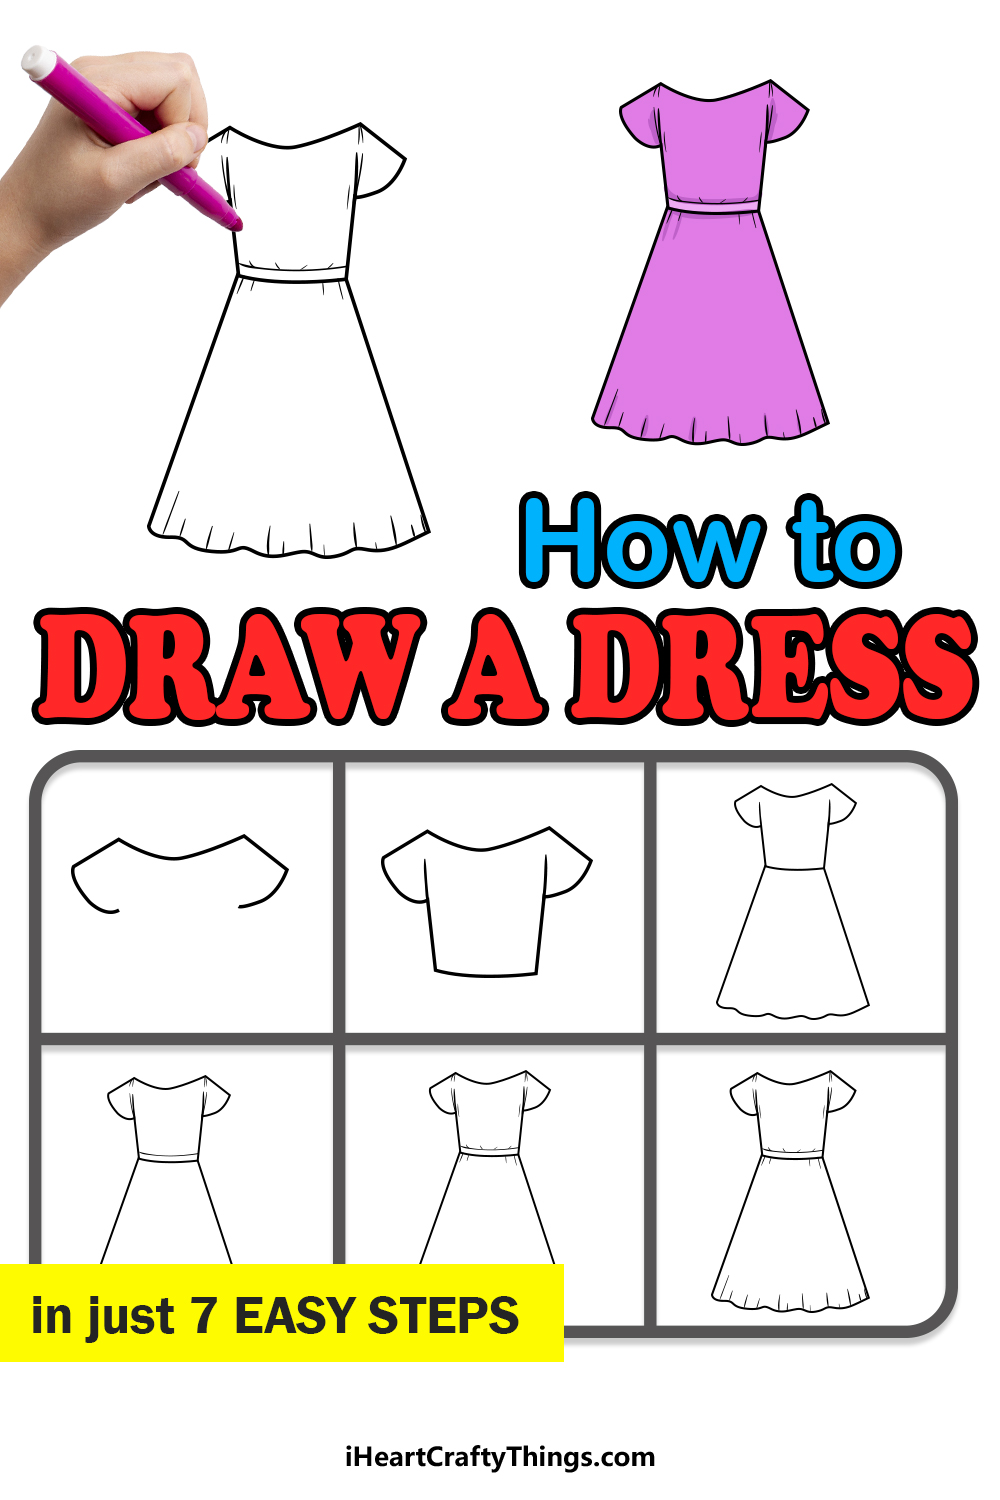
Here’s a step-by-step approach to help you create a stunning dress sketch:
- Gather Your Materials: You'll need some quality sketch paper, pencils, erasers, and colored pens or markers.
- Start with a Basic Figure: Draw a simple fashion figure outline. This could be a straight line for a standing pose or a slight curve to depict movement.
- Outline Your Dress: Using your understanding of different silhouettes, sketch the shape of your dress. Focus on key features such as neckline, sleeves, and hemline.
- Add Details: Bring your sketch to life! Include elements like pockets, a belt, or any unique designs that define your dress.
- Color It In: Use your knowledge of color theory to fill in your design. Experiment with color combinations that fit the mood you want to evoke.
- Finalize Your Sketch: Go over your lines with a pen, erase any unnecessary marks, and make sure your design communicates your vision clearly.
Creating a sketch is your opportunity to visualize the final product, so have fun with it! Remember, the more detailed and expressive your sketch, the easier it will be in the later stages of making your dress.
Selecting Fabrics and Colors
Choosing the right fabrics and colors for your dress is one of the most exciting aspects of the design process. It’s like painting a masterpiece; the materials and hues you choose can make all the difference.
When selecting fabrics, consider the following:
- Functionality: What occasion is your dress for? A flowing chiffon might be perfect for a summer wedding, while a sturdy cotton works well for casual wear.
- Texture: Think about how the fabric feels against the skin. Soft fabrics like silk or rayon create an elegant look, while thicker materials like denim add structure and durability.
- Care Requirements: Some fabrics require specific washing methods. Always check the care labels as they can impact your choice considerably.
- Weight: The weight of the fabric will affect how the dress drapes and moves. Lightweight fabrics tend to flow beautifully, while heavier fabrics offer more support and shape.
Color selection is equally important. Follow these tips:
- Skin Tone: Understand what colors complement your skin tone. For warm skin tones, colors like earthy browns and yellows will look stunning, while cool tones might shine in blues and greens.
- Season: Think about the seasons. Light, pastel colors often work well for spring and summer, while rich, deep tones can enhance fall and winter wear.
- Color Psychology: Colors evoke emotions. Bright red could be bold and daring, while soft pink can feel gentle and romantic. Choose colors that reflect the vibe you want!
Once you’ve considered all these factors, you’ll feel confident choosing the perfect fabric and colors to bring your dress design to life!
Drafting Your Dress Pattern
Now that you've selected your fabrics and colors, it’s time to move on to drafting your dress pattern. This is where your creativity turns into a tangible plan! Here’s how to get started:
Begin with a few key elements:
- Measurements: Take accurate measurements of your body, including bust, waist, hips, length from shoulder to hem, and arm length. Having precise numbers is crucial for a well-fitting dress.
- Basic Blocks: Create basic slopers or blocks, which are templates used for various dress designs. These slopers serve as a foundation that you modify according to your design.
Once you have your measurements and basic blocks ready, follow these steps:
- Sketch Your Design: Draw your dress idea, marking important features like the neckline, sleeves, and hemline.
- Modify Your Sloper: Start adjusting the basic sloper to match your sketch. Add or subtract material where necessary to achieve the desired shape. Don’t hesitate to experiment!
- Add Seam Allowances: Don’t forget to include seam allowances around the edges of your pattern. This gives you the space needed to sew the pieces together later on!
- Test with Muslin: Before cutting into your chosen fabric, create a mock-up with muslin. This allows you to check the fit and make necessary adjustments without wasting your fancy fabric.
Once you’ve finalized your pattern, you’re ready to cut your fabric and embark on the exciting journey of sewing your dress! Remember, practice makes perfect, and don’t be afraid to modify your pattern until it’s just right.
7. Cutting the Fabric
Cutting the fabric is a crucial part of dress making, as it sets the foundation for your entire project. A misstep at this stage can lead to uneven seams or even a complete ruin of your fabric. Let's break down this process step by step.
1. *Preparation: Start by preparing your workspace. Make sure it's clean, well-lit, and large enough to accommodate your fabric. Lay out your fabric, ensuring it’s wrinkle-free. If needed, iron it out gently.
2. Pinning the Pattern: Place your chosen dress pattern on top of the fabric. Use sewing pins to secure it in place, ensuring that the grainline is aligned properly. This is super important because it helps your dress hang correctly.
3. Cutting Technique: When you cut the fabric, always use sharp fabric scissors for a clean edge. Cut along the pattern’s edges, making sure to not stretch the fabric as you go. If you're using a rotary cutter, roll it along the edges carefully.
4. Allowing for Seam Allowance: Don't forget to leave extra fabric on the edges for seam allowance, usually around 1/4 to 5/8 of an inch, depending on the type of seam you’re planning to use.
5. Check Twice: Once you have cut out all your pieces, double-check them against your pattern. This is your last chance to ensure everything is symmetrical and accurately cut.
Once you've confidently cut the fabric, you're ready to move on to assembling the dress!
8. Assembling the Dress
Now that your fabric pieces are cut, it's time to bring your dress to life by assembling those pieces together. This is where the magic happens, and you'll start to see your design take shape!
1. Organize Your Pieces: Start by organizing all your cut fabric pieces. Lay them out in the order you will be sewing them. This way, you won't lose track and you'll avoid potential confusion. You should have at least two main components: the bodice and the skirt, along with any linings, facings, or embellishments.
2. Sewing the Bodice: Begin by sewing together the bodice pieces. Place the right sides of the fabric together and pin along the edges. Use a straight stitch for most seams, and a zigzag stitch for stretch fabrics to avoid puckering. Once sewn, press the seams flat for a neat finish.
3. Attaching the Skirt: After the bodice is assembled, it's time to attach it to the skirt. Align the bodice and skirt at the waistband, ensuring that all edges match up. Pin them together and sew along the edge, again using a straight stitch.
4. Adding Zippers and Closures: If your design includes zippers or other closures, now’s the time to incorporate them. Follow the instructions specific to the type of closure you’re using, ensuring it's secured properly for a seamless look.
5. Finishing Touches*: Finally, give your dress a good press to remove any wrinkles. Add any finishing touches like hems, embellishments, or lining as desired. The extra detail can elevate your dress from simple to simply stunning!
Take your time, and don’t rush this part. The assembly stage is what will give your dress its final shape and character, so enjoy the process!
9. Adding Finishing Touches
Once you've sewn the main components of the dress, it's truly time to add those finishing touches that take your creation from good to fabulous! This step is all about the details that make your dress unique and polished. Let’s go over some essential elements to consider.
Firstly, you might want to think about the hemming. This part is crucial because it determines how the bottom of your dress will look. You can choose a straight hem, a rolled hem, or even a scalloped edge for a more decorative effect. Whatever you choose, ensure it complements the style of your dress.
Next up, adding closures is imperative if your design requires them. Zippers, buttons, and hooks can serve both functional and decorative purposes. A hidden zipper can give a sleek look, while vibrant buttons can offer a pop of color or character.
Don't forget to consider decorative elements! Whether it's lace trim, embroidery, or embellishments like beads or sequins, these little extras can enhance your dress significantly. Think about how you want these to be arranged; placement can completely change the vibe of your dress.
Lastly, press your dress with a steam iron to give it a crisp, professional finish. A well-pressed dress makes all the difference—it helps eliminate any wrinkles.
- Hemming: straight, rolled, or scalloped
- Closures: zippers, buttons, or hooks
- Decorative elements: lace, embroidery, beads
- Pressing: essential for that polished look
10. Final Review and Adjustments
Once all your finishing touches are in place, it's time for the final review and adjustments. This step is crucial to ensure everything fits perfectly and looks as fabulous as you envisioned.
Start by putting the dress on a mannequin or on yourself if possible. This will give you a hands-on understanding of how it hangs, fits, and flows. Walk around, move your arms, and check for any areas that feel too tight or loose. Comfort is key!
Next, take a closer look at the seams and hems. Check for any uneven stitching or raw edges that might need an extra stitch or two. Don't be afraid to take out the seam ripper if something doesn't sit right; it’s all part of the process.
Additionally, ask for a second opinion! Sometimes a fresh set of eyes can spot things you may have missed. A friend or family member could provide valuable feedback on the fit or overall style.
If you find any imperfections or areas needing adjustment, grab your sewing tools and make those changes. Whether it’s taking in a side seam or re-doing a hem, don’t shy away from refining your work until it’s just right!
| Adjustment Type | Action Needed |
|---|---|
| Tight areas | Take in seams |
| Loose areas | Let out seams |
| Uneven hems | Re-hem |
Remember, the goal is to create a dress that you not only love but that feels good to wear, so take your time during this process!
Step by Step Guide to Designing a Dress
Designing a dress can be an exciting and creative process. Whether you are a beginner or an experienced designer, following a systematic approach can help you bring your vision to life. In this guide, we will outline essential steps to create a stunning dress from concept to completion.
Step 1: Brainstorm Ideas
- Consider the occasion: casual, formal, or special event?
- Research current fashion trends for inspiration.
- Gather images or sketches that resonate with your vision.
Step 2: Choose a Style
| Style Type | Description |
|---|---|
| A-Line | Fitted at the bodice and flares out at the hem. |
| Mermaid | Fitted through the bodice and flares out at the knee. |
| Shift | Straight cut dress that hangs loosely from the shoulders. |
Step 3: Select Fabric
- Choose appropriate fabric based on the style and occasion.
- Consider drape and comfort; common fabrics include cotton, silk, and polyester.
- Purchase samples to test for color and texture.
Step 4: Create a Sketch
- Draw the basic outline of your dress.
- Add details such as necklines, sleeves, and embellishments.
- Use coloring tools to visualize the final product.
Step 5: Make a Prototype
- Construct a muslin or fabric sample to test fit.
- Adjust your design based on the prototype's performance.
Step 6: Finalize the Design
- Once satisfied with the prototype, finalize the design elements.
- Prepare a detailed sewing pattern for accurate construction.
Step 7: Sew the Dress
- Cut out fabric pieces according to your pattern.
- Follow a step-by-step sewing process, ensuring precision with stitches.
- Add finishing touches such as hems, zippers, and embellishments.
Whether you're designing for personal use or a professional display, following this step-by-step guide can streamline the process and enhance creativity. Take your time, enjoy the journey, and celebrate your finished creation!