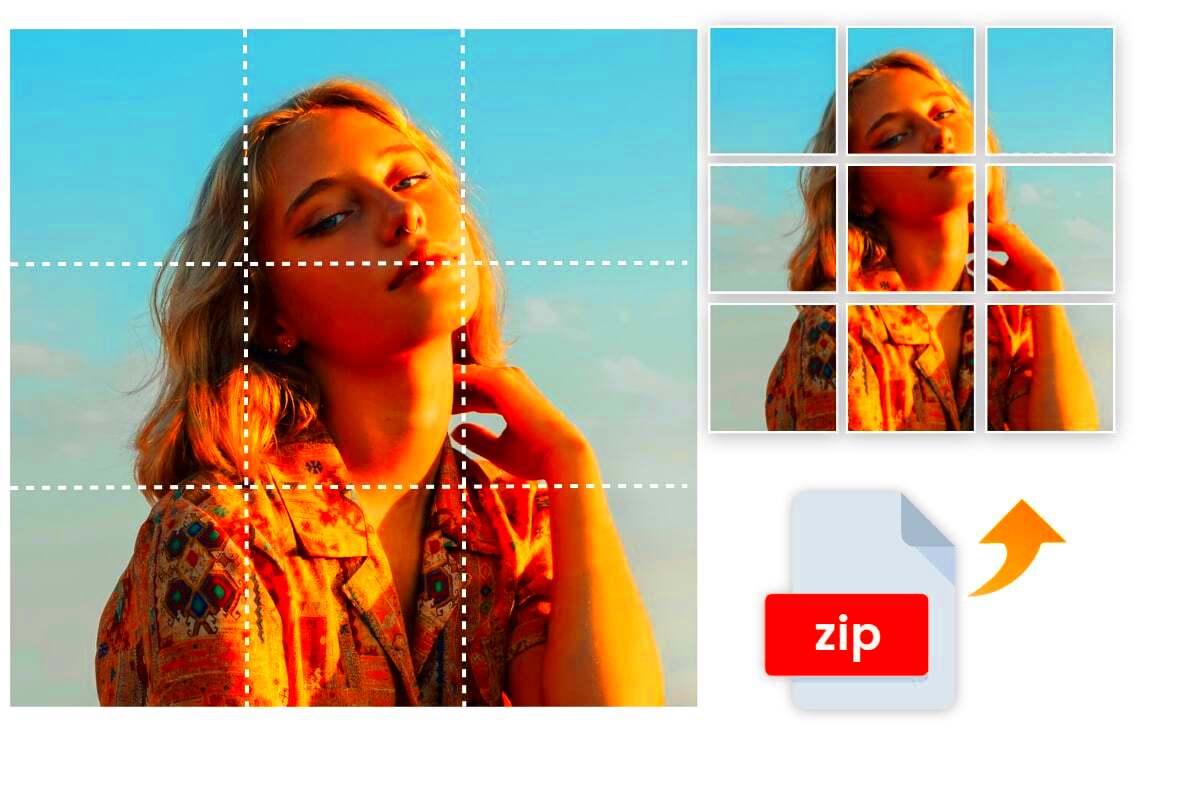
Splitting an image for printing is a useful technique when you need to print a large image that won't fit on a standard sheet of paper. By breaking the
Why Splitting an Image is Necessary for Large Prints

When dealing with large prints, the biggest challenge is the size limitations of standard printers. Most home or office printers are designed to handle smaller paper sizes, such as A4 or Letter. This means that if you want to print a large image, you will need to split it into smaller segments that fit within your printer's capacity.
Here are a few reasons why splitting an image is important for large prints:
- Print Quality: Printing on a large format without splitting can compromise the image's quality. By splitting the image, you ensure that each section maintains the correct resolution and details.
- Printer Limitations: Most standard printers can't handle prints larger than 11x17 inches. Dividing the image allows you to print each part separately.
- Cost-Effectiveness: Printing large images in parts can be more affordable than using professional printing services, especially for personal projects.
- Flexibility: Splitting an image gives you the flexibility to print on different types of paper and create custom-sized prints that fit your specific needs.
Also Read This: How to Sell Images on Getty Postcards for Unique Marketing Opportunities
Choosing the Right Image Editing Tool for Splitting

To split an image accurately, you'll need the right image editing software. The ideal tool should allow you to divide the
- Adobe Photoshop: Photoshop is one of the best tools for splitting an image. It offers advanced features, such as guides, layers, and the ability to export specific sections of an image in high resolution.
- GIMP: GIMP is a free, open-source alternative to Photoshop. It also offers many features for image splitting, such as guides and grid options, making it perfect for those on a budget.
- Paint.NET: Paint.NET is a simple, free tool that works well for basic image splitting tasks. It's easy to use and offers basic features like selection tools and image cropping.
- Online Tools: There are also online tools like PineTools and IMGonline that allow you to split images without needing to download or install anything. These tools are easy to use but might lack advanced features for precise editing.
When choosing an editing tool, consider factors such as ease of use, features, and whether the software supports the size and resolution you need for your print. For professional-quality prints, tools like Adobe Photoshop are ideal, but for simpler projects, free options like GIMP can work just as well.
Also Read This: Viewing Adobe Stock Photos in Illustrator
Step-by-Step Process of Splitting an Image
Splitting an image for printing can seem complicated, but it’s actually a straightforward process when you break it down into steps. Here’s a simple guide to help you split your image with ease:
- Step 1: Choose the Right Image – Start by selecting the image you want to print. Make sure it's high quality and in the correct resolution for printing, typically 300 DPI (dots per inch).
- Step 2: Open the Image Editing Software – Open your preferred image editing tool, like Adobe Photoshop, GIMP, or an online tool. Import the image you want to split.
- Step 3: Set the Print Dimensions – Determine the size of each printed section. For example, if your image is 36 inches wide and your printer can only handle 12-inch widths, you will need to split the image into three sections horizontally.
- Step 4: Use Guides and Grid Tools – In your editing software, use guides or grids to divide the image into equal sections. This will ensure each piece is aligned properly when printed. For Photoshop, you can use the "Ruler" and "Guides" feature to create a visual grid.
- Step 5: Slice the Image – Once your guides are in place, use the cropping tool or the slice tool (in Photoshop) to separate the image into smaller parts. You can crop it manually or use preset slices for a more automated process.
- Step 6: Save Each Section – After slicing, save each section as a new image file. Make sure to keep the file names organized (e.g., Image_1, Image_2, etc.) so they’re easy to print and assemble later.
- Step 7: Check the Resolution – Before printing, check the resolution of each split image to ensure they are still high enough for a quality print.
With these steps, you can efficiently split an image for printing, ensuring each section is precise and ready for output.
Also Read This: Mastering YouTube TV: Recording a Show in Progress Without Missing Key Moments
Adjusting Image Settings for Optimal Print Quality
Once you've split your image into sections, the next step is ensuring that each section maintains the best print quality possible. Here are a few tips to adjust your image settings for optimal results:
- Resolution: Make sure the resolution of each split image is at least 300 DPI. Lower resolutions may result in pixelated prints. Check the DPI settings in your image editing tool to ensure they’re set for high-quality printing.
- Color Mode: Use the CMYK color mode for printing. CMYK (Cyan, Magenta, Yellow, Key/Black) is the standard for print media, while RGB (Red, Green, Blue) is used for digital screens. Converting your image to CMYK will help it print with accurate colors.
- Adjust Brightness and Contrast: Sometimes printed images can look darker or lighter than what you see on screen. Adjust the brightness and contrast of the image to compensate for printing conditions.
- Check for Borders or Margins: Ensure there are no unwanted margins or borders around each split section unless you intend to have them. Some printers leave a small margin when printing, so make sure your image is aligned correctly with the printable area.
- File Format: Save each section in a file format that supports high-quality prints, such as TIFF or PNG. JPEG is fine for web use but may cause quality loss due to compression.
By adjusting these image settings, you ensure each split section looks sharp and vibrant when printed, resulting in a high-quality large print.
Also Read This: Proven Methods to Earn Money on Dailymotion Without Any Investments
Printing Each Split Image Section
Now that you’ve split the image and adjusted the settings, it’s time to print each section. Here’s how to do it properly to ensure everything aligns perfectly:
- Step 1: Load Your Printer – Make sure your printer is loaded with the appropriate paper size. For instance, if you're printing each section on 8.5x11-inch paper, load the printer with this paper size. If you're using larger paper for certain sections, ensure your printer supports it.
- Step 2: Print One Section at a Time – Print each section one by one, starting with the top-left section and continuing in order. This will make it easier to match the pieces when assembling them later.
- Step 3: Check Printer Settings – Before printing, check your printer settings. Set the print quality to 'Best' for the sharpest results. Make sure the paper type and size match the settings you’ve chosen.
- Step 4: Print a Test Section – Before printing all sections, it's a good idea to print one test section to make sure everything looks good. Check for any issues with color or alignment.
- Step 5: Print the Remaining Sections – Once the test print looks good, print the remaining sections. Ensure they are printed without any color or alignment issues.
- Step 6: Allow for Drying Time – After printing, let the prints dry completely before handling them to avoid smudging or blurring, especially if you're using inkjet printers.
By following these steps, you’ll be able to print each section accurately, ensuring a perfect assembly of the large image once all the pieces are printed.
Also Read This: Sales Safari: Exploring How to Find Profitable Items to Sell on eBay
Common Challenges When Splitting an Image for Printing
While splitting an image for printing can seem straightforward, there are a few challenges you may encounter. Being aware of these potential issues will help you avoid frustration and get the best results. Here are some common problems when splitting an image:
- Loss of Image Quality: If the resolution is too low or the image is resized incorrectly, you may end up with pixelated prints. Always ensure that the image resolution is set to at least 300 DPI before splitting.
- Misalignment Between Sections: If the sections of the image are not aligned correctly, the final result can look disjointed. Using guides and grids in your image editor can help with this, but it's essential to double-check the alignment when printing.
- Cutting off Important Parts: When splitting the image, make sure no critical parts of the image (like faces or key objects) are cut off at the edges. Adjust your cropping and slicing tools carefully to avoid this.
- Inconsistent Colors Across Sections: Colors may appear differently on paper compared to what you see on your screen. Always work in CMYK mode for print, and do a test print to ensure color consistency.
- Printer Limitations: Not all printers can handle large prints well, even when splitting the image. Ensure that your printer can handle the size and resolution of each section, and check the print settings for accuracy.
By being mindful of these common challenges and preparing accordingly, you can ensure that your split images print perfectly and come together seamlessly.
Also Read This: how to remove saved images on pinterest
FAQ about Splitting an Image for Printing
Here are some frequently asked questions to help clarify the process of splitting images for printing:
- Q: Do I need special software to split an image?
A: While you can use basic tools like Paint or online utilities, professional software like Adobe Photoshop or GIMP will give you more control and accuracy. - Q: What is the best resolution for printing?
A: For high-quality prints, each section should be at least 300 DPI (dots per inch). Lower resolutions may result in blurry or pixelated images. - Q: How do I ensure the sections align correctly when printed?
A: Using guides or grids in your image editor can help. Make sure each section is saved in the correct order and double-check alignment during the print test. - Q: Can I split a photo into uneven sections?
A: Yes, you can split an image into uneven sections, but it may require more manual adjustments. Most software allows for flexible cropping. - Q: Will the colors look the same when printed?
A: Colors can look different when printed, especially if your image is in RGB mode. Converting to CMYK mode ensures more accurate color representation in print. - Q: How do I avoid cutting off important parts of the image?
A: Be careful when selecting your split areas. Use the cropping tools to adjust the position of the sections so that critical parts of the image remain intact.
These FAQs should clear up any confusion and help guide you through the process of splitting an image for printing with confidence.
Conclusion and Final Thoughts on Image Splitting for Prints
Splitting an image for printing is a fantastic way to create large-format prints on smaller paper sizes. While there are some challenges along the way, such as maintaining image quality and ensuring proper alignment, these can be easily overcome with the right tools and techniques. By following a simple, step-by-step process and keeping key considerations in mind—such as resolution, color settings, and printer capabilities—you can achieve high-quality, large prints that look professional and polished.
Here’s a quick recap of the important points:
- Always work with high-resolution images (300 DPI or higher).
- Use image editing software with precise tools like grids and guides.
- Test print your sections to ensure color consistency and alignment.
- Be patient and take your time to avoid common mistakes like cutting off important details or misaligning the sections.
In the end, with a little planning and attention to detail, you can split an image for printing and create stunning, large-scale prints that are sure to impress!

 admin
admin


