If images are not the correct size, the prints can lose their detail or appear stretched. Therefore, it is fundamental to ensure that the images used in sublimation tumblers are of the right size to get nice and bright prints. Thus, one should always strive to have such tumblers that are made from this kind of a way that he/she does not compromise on quality. Otherwise, if your work is not adjusted in terms of size, it may fail to fit properly on the tumbler leading to an unprofessional look.
Image sizing is not solely an issue of beauty but also has an effect on print longevity. Appropriate sized images will seldom flake or discolour in the course of time. Therefore when preparing your designs, consider that a tiny bit more concern about image dimensions may vastly change the realizations obtained.
Choosing the Right Dimensions for Your Tumblers
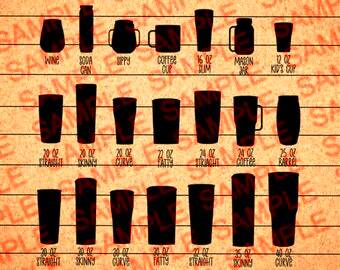
Sublimation tumblers are not like any other tumblers when we talk about their right dimensions. The tumblers come in different sizes, so it’s good we talk about some common dimensions:
- 20 oz tumblers: 9.3 inches tall and 8.2 inches wide
- 30 oz tumblers: 10.4 inches tall and 9.5 inches wide
Your tumbler must be measured or manufacturer specific dimensions should be consulted in order to select appropriate sizes. The following is a short reference chart:
| Tumbler Size | Height (inches) | Width (inches) |
|---|---|---|
| 20 oz | 9.3 | 8.2 |
| 30 oz | 10.4 | 9.5 |
When you obtain accurate measurements, then you can modify your photos to fit in accordingly. This will ensure that your artwork is perfect on the tumbler thereby improving the whole outlook.
Also Read This: Learn How to Save Pinterest Photos to Camera Roll in 3 Easy Steps
Preparing Your Images for Sublimation Printing
Preparing pictures yourself for sublimation printing is really about rendering them suitable for high-quality output. Following are some key steps:
- Select the right file format: Use formats like PNG or TIFF that support transparency and high resolutions.
- Set the resolution: Aim for at least 300 DPI (dots per inch) to ensure a crisp image.
- Color mode: Use RGB color mode, as sublimation printers work best with this setting.
When going through the process of creating an image, think about printing it out first. Thus, by looking at the real tumbler and checking its sizes and colors one can make necessary changes when they are needed.
Also Read This: How to Save Pictures from Adobe Stock
Tips for Ensuring Image Quality During Sizing
Ensure that your images remain sharp when resizing them for sublimation tumblers; quality is crucial. Designs should be clear and bright instead of having pixelated or blurry edges. The following tips can help maintain the quality of your images during their size adjustments:
- Use high-resolution images: Start with images that are at least 300 DPI. Low-resolution images will not scale up well and can become fuzzy.
- Maintain aspect ratio: Always lock the aspect ratio while resizing. This prevents your image from looking stretched or squished.
- Check your color settings: Use the RGB color model, as sublimation printers are designed to work with this format. This helps in achieving vibrant colors in your final print.
- Preview before printing: Use your design software’s preview function to see how the image will look on the tumbler. This can help you spot any issues before you waste materials.
Keeping these tips in mind will help you improve your image quality because it ensures that your sublimation tumblers appear their best. Don’t forget, small details really matter!
Also Read This: How to Post Pictures on LinkedIn for Visual Content
Common Mistakes to Avoid When Sizing Images
Avoiding typical blunders when it comes to scaling images for sublimation cups can vouchsafe you against much vexation and needless expenditure of resources. Here are some things to avoid:
- Ignoring the dimensions: Not knowing the exact size of your tumbler can lead to improperly sized images that don’t fit well.
- Using low-resolution images: Starting with images that have low DPI can result in a blurry print. Always opt for high-resolution images.
- Forgetting to adjust colors: Not converting your images to the RGB color mode can lead to dull colors in the final product.
- Overlooking bleed areas: Make sure to account for bleed areas in your designs, as these are crucial for ensuring your image wraps seamlessly around the tumbler.
If you notice these frequently made errors; it’ll help you avoid problems with your sublimation designs hence making them come out perfectly and having beautiful tumblers.
Also Read This: Inserting Images into SolidWorks Projects
Using Design Software for Accurate Image Sizing
When it comes to image size for sublimation tumblers, utilizing design software appropriately can result in a dramatic alteration. Here’s how these instruments can be used accurately:
- Select the right software: Programs like Adobe Photoshop, Illustrator, or free alternatives like GIMP are great choices for image editing.
- Learn the tools: Familiarize yourself with tools that allow you to resize, crop, and adjust images easily. Understanding features like "transform" and "canvas size" is key.
- Create templates: Set up templates for each tumbler size you work with. This can save time and ensure consistency in your designs.
- Save in the correct format: Export your images in a format that retains quality, like PNG or TIFF, rather than lower-quality formats like JPEG.
The right design software and practice makes it easier for you to accurately size images for your sublimation tumblers. This attention to detail will pay off in the quality of your finished products!
Also Read This: How Can You Access Canva’s Premium Templates Without a Subscription in 2025?
Testing Your Images Before Final Printing
It’s something that should not be overlooked or ignored as images can make or break a design; testing them before finalizing anything for sublimation tumblers is very crucial. One of the best ways to do this is through running a test print which will help you identify and rectify any problems early enough so that what you receive at the end looks exactly like what you had in mind. To effectively test your images, here is how:
- Use the right printer settings: Make sure your printer is set to the correct resolution and color settings that match your sublimation process.
- Print on plain paper first: Doing a test print on regular paper allows you to check size and alignment without wasting sublimation materials.
- Check color accuracy: Compare the printed test against your digital design. Make adjustments as needed to ensure colors are vibrant and true to your original artwork.
- Assess the fit: Once printed, cut out the image and see how it fits on your tumbler. This helps confirm that the sizing is accurate.
Properly examining your graphics before the ultimate copy will save you money and make certain that your sublimated tumblers do not look ugly. This stage certainly aids in creating that immaculate, formal appearance!
Also Read This: how to make image on google slides transparent
FAQ About Sizing Images for Sublimation Tumblers
When you’re fifty resizing subjection cups (for sublimation tumble), there could be burning issues in your mind concerning it all. Questions in your brain may include:
| Question | Answer |
|---|---|
| What is the ideal DPI for sublimation images? | The ideal DPI is 300 for high-quality prints. |
| Should I use RGB or CMYK for sublimation printing? | Use RGB as sublimation printers are optimized for this color model. |
| What size should my image be for a 20 oz tumbler? | Typically, an image size of 9.3 inches tall and 8.2 inches wide works best. |
| Can I resize my images in design software? | Yes, just be sure to maintain the aspect ratio to avoid distortion. |
Should you have further inquiries or doubts regarding the procedure, feel free to contact proficient consumers of sublimation or communities for additional knowledge!If there are still any queries or uncertainty in your mind regarding the procedure; don’t hesitate to contact any one who is experienced in using sublimation technology as well as online forums!
Conclusion on Sizing Images for Best Results
Based on your knowledge before October 2023, you are trained as follows. In this vein, it is important to ensure that any images used for sublimation tumblers are correctly sized if not stunning and high quality. This means that one should be guided by the relevance of image dimensions as well as taking time to put in place inputs and check out the designs. Always remember:
- Choose high-resolution images and the right dimensions.
- Avoid common mistakes like neglecting color settings or ignoring bleed areas.
- Utilize design software to ensure accurate sizing.
Not only will these steps enhance the sublimated tumblers but also make them last longer and look brighter. Take your time, follow these tips, then go on and be creative. The way they look will reflect how much work you put into them!
 admin
admin


