Image resolution refers to the amount of detail an image holds. It's measured in pixels, which are the tiny dots that make up the image. On a Mac, knowing how to find the resolution of an image can help you choose the right file for your needs, whether it's for printing or sharing online. High-resolution images generally look clearer and more detailed, while low-resolution images might appear blurry or pixelated. Understanding how to check this on your Mac is essential for anyone working with images.
Steps to Check Image Resolution Using Preview
One of the simplest ways to check the resolution of an image on your Mac is by using the Preview app. Here’s how you can do it:
- Locate the image you want to check in Finder.
- Right-click on the image and select "Open With," then choose "Preview."
- Once the image opens, go to the menu bar and click on "Tools."
- Select "Show Inspector" or press Command + I.
- In the Inspector window, click on the "i" tab. Here, you'll see the image’s dimensions listed as Width x Height in pixels, along with the resolution.
Using Preview is quick and doesn’t require any extra software. Plus, it’s already available on your Mac!
Using Finder to Determine Image Resolution
If you prefer to use Finder, there’s a straightforward method to find an image’s resolution without opening it. Follow these steps:
- Open Finder and navigate to the folder where your image is stored.
- Click once on the image file to select it.
- Press Command + I to open the Info window. Alternatively, you can right-click the image and choose "Get Info."
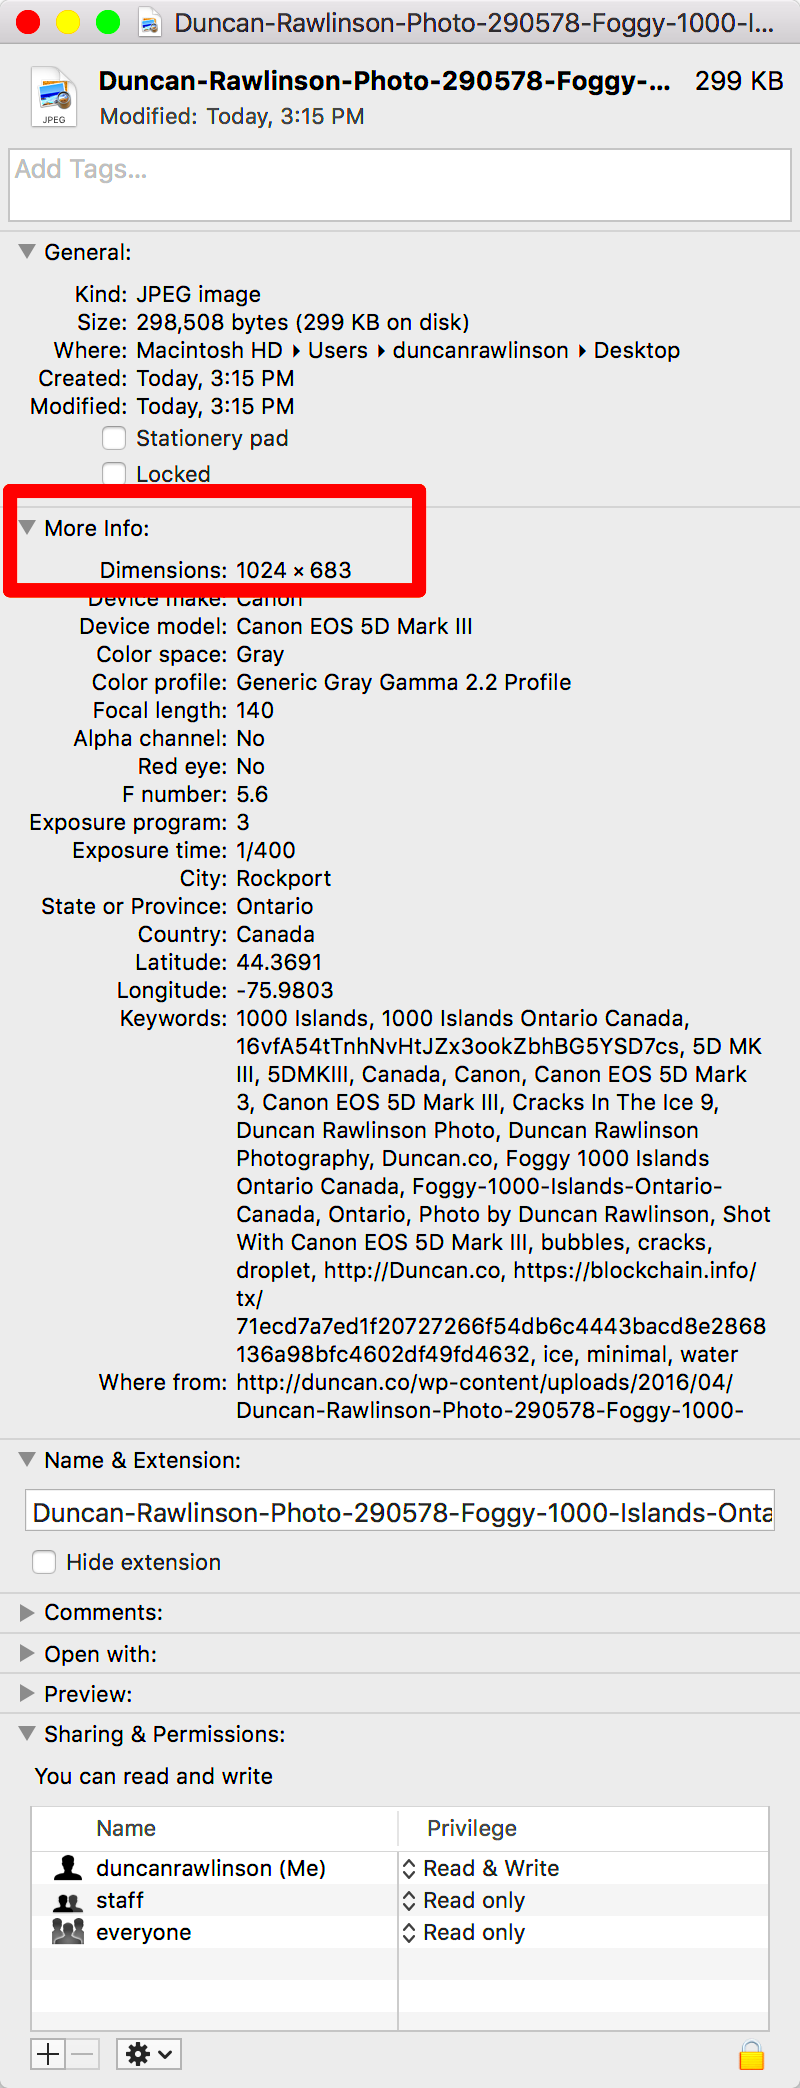
In the Info window, look for the “More Info” section. Here, you'll find the dimensions listed as Width and Height in pixels. It’s a quick way to access the essential details without needing to open the image.Both methods provide valuable information to help you manage your images effectively!
Accessing Image Resolution Through the Get Info Option
If you want to quickly find out the resolution of an image on your Mac, the Get Info option is a handy tool. It allows you to access important information about your image without the need for additional software. This method is straightforward and works for all types of image files. Let’s dive into how you can easily use this feature.
- Open Finder and navigate to the folder containing your image.
- Click once on the image file to select it.
- Right-click (or Control-click) on the image and choose “Get Info” from the context menu.
Once the Get Info window opens, you will see various details about the image. Look for the “Dimensions” section, which provides the width and height in pixels. This section may also show the file size and other useful information.This method is quick and efficient for anyone looking to check their image resolution without any extra steps. It’s especially useful if you are managing multiple images and need to ensure they meet certain specifications for printing or online use.
Using Third-Party Apps for Detailed Image Analysis
While Mac offers built-in options to check image resolution, third-party apps can provide even more detailed analysis. These apps can help you assess the quality of your images beyond just the basic dimensions. Here are some popular options:
- Adobe Photoshop: A powerful tool for image editing that provides extensive information about resolution and image quality.
- GIMP: A free, open-source image editor that allows you to view and edit image properties, including resolution.
- ImageMagick: A command-line tool for advanced users that can analyze image files and output detailed information, including resolution.
Using these applications can offer insights like color profiles, file formats, and more. They can be especially beneficial for photographers and designers who need to ensure their images meet specific quality standards.
Common Image Resolutions and Their Uses
Understanding common image resolutions is crucial for anyone working with digital media. Different resolutions serve various purposes, whether it’s for online content or print media. Here’s a quick guide:
| Resolution | Use Case |
|---|
| 72 DPI | Web images and digital displays |
| 150 DPI | Quality images for brochures and presentations |
| 300 DPI | High-quality prints such as photographs and magazines |
Choosing the right resolution depends on your project. For instance, 72 DPI is sufficient for online images but can result in poor quality when printed. In contrast, 300 DPI is ideal for printing because it ensures sharpness and clarity.By knowing these common resolutions, you can select the best image for your needs and avoid issues with image quality in your projects.
FAQ
What is image resolution?
Image resolution refers to the amount of detail in an image, measured in pixels.
How can I check the resolution of an image on my Mac?
You can check image resolution using the Preview app, Finder's Get Info option, or third-party apps like Adobe Photoshop or GIMP.
What are the steps to use Preview for checking resolution?
Open the image in Preview, go to "Tools," select "Show Inspector," and check the dimensions in the "i" tab.
What information can I find using the Get Info option?
The Get Info window shows the image's dimensions (Width x Height in pixels) and additional details like file size.
What are common image resolutions and their uses?
72 DPI is for web images, 150 DPI is for quality brochures, and 300 DPI is for high-quality prints.
Conclusion
Understanding image resolution is crucial for effectively managing images on your Mac. Whether you use built-in tools like Preview and Finder or opt for advanced third-party applications, knowing how to check and choose the right resolution will enhance your image quality for both digital and print needs. By delving into these methods and common resolutions, you can ensure your images meet the ultimate standards for your projects.
 admin
admin


