Google Slides is a popular tool for creating presentations online. It allows users to design visually appealing slides that can include images, text, and videos. Sometimes, you may want to save the images used in your slides for personal use or to enhance other projects. Understanding how to save images effectively from Google Slides can help you keep a handy collection of graphics for future reference.
Images in Google Slides can come from various sources, including free stock image sites and your uploads. It’s essential to know the best ways to save these images without losing quality. In the following sections, we'll explore different methods to make this task easier for you.
Exploring Different Methods to Save Images

There are several methods you can use to save images from Google Slides. Here’s a quick overview of some effective approaches:
- Using the Download Option: Directly download images from your slide.
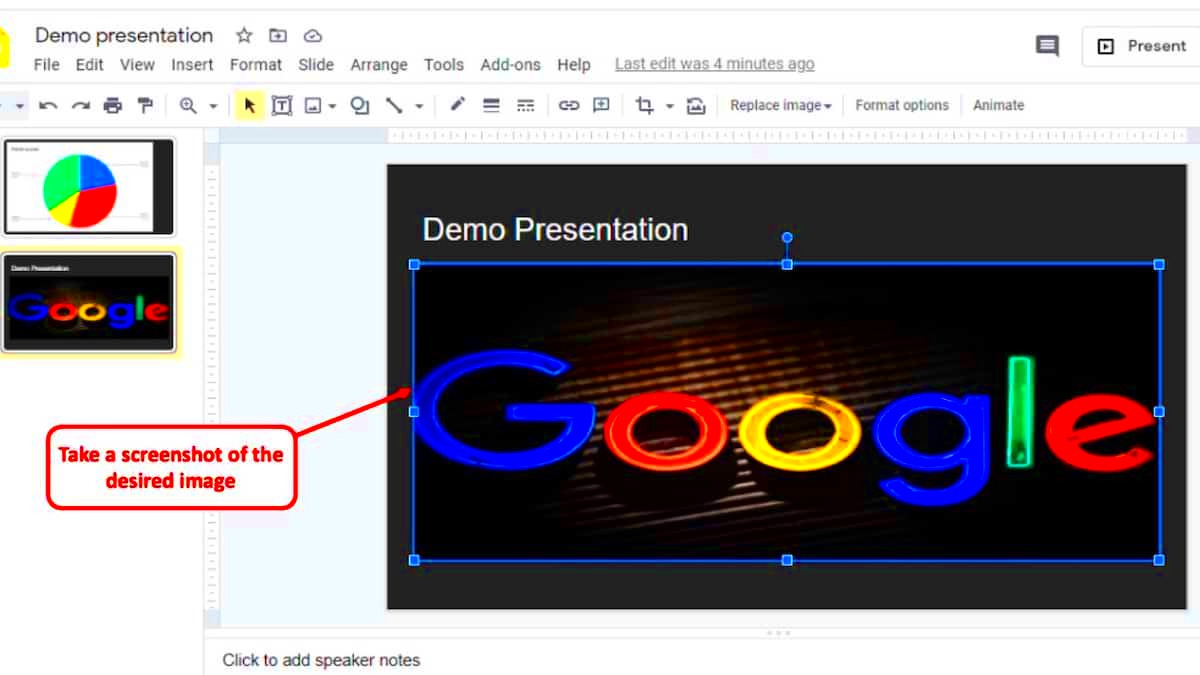
- Screenshots: Capture the image displayed on your screen.
- Add-ons: Use Google Slides add-ons to help extract images.
Each method has its advantages, and the choice often depends on what works best for your needs.
Also Read This: How to Download Adobe Stock Images in Different Formats
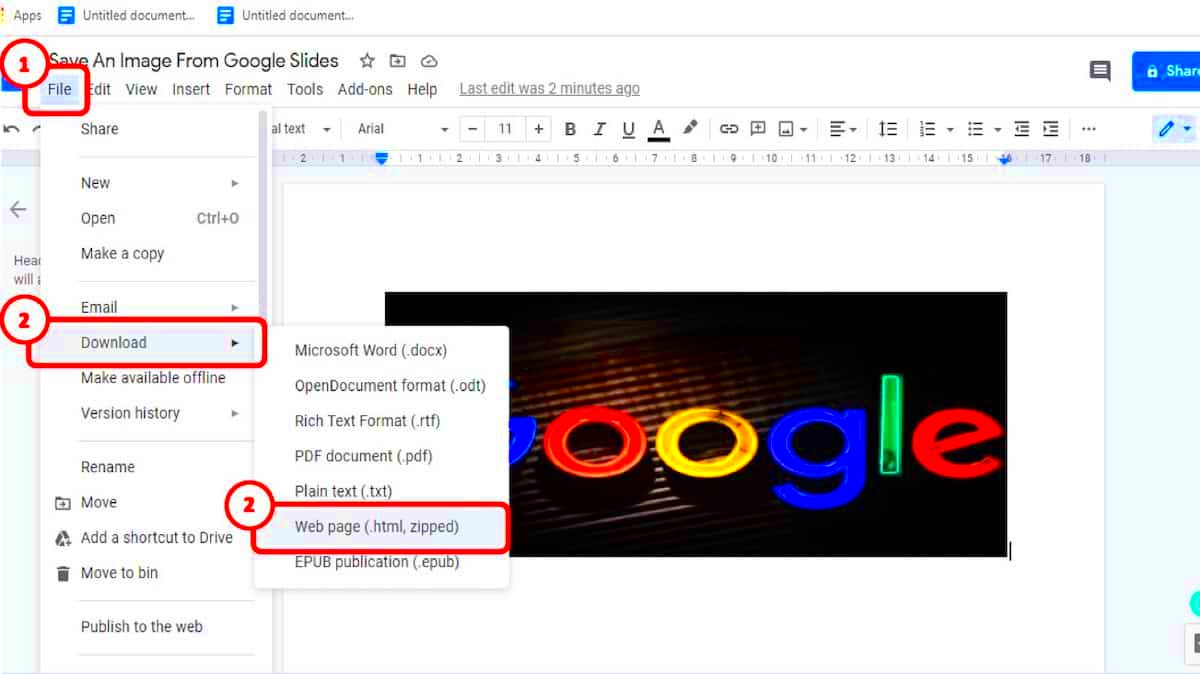
Using the Download Option in Google Slides

The simplest way to save images from Google Slides is by using the built-in download option. Here’s how you can do it:
- Open your Google Slides presentation.
- Click on the image you want to save.
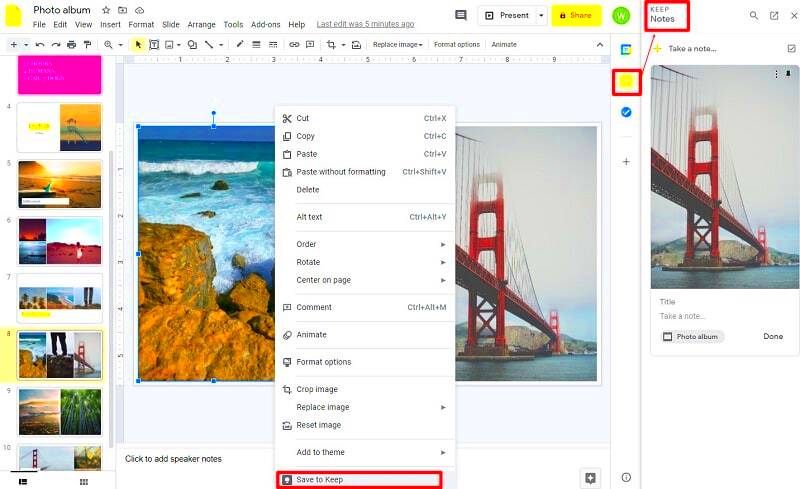
- Right-click on the image to open a menu.
- Select the option that says "Save to Keep." This will send the image to Google Keep.
- Open Google Keep and find the saved image.
- Right-click on the image in Google Keep and choose "Save image as..." to download it to your device.
This method is straightforward and keeps the image's quality intact, making it ideal for most users. Remember to check the image file format and resolution to ensure it meets your needs!
Also Read This: How to Rotate an Image in Snipping Tool
Taking Screenshots for Quick Saves

Sometimes, you might need to save images from Google Slides quickly and don’t have time to navigate through all the options. In such cases, taking a screenshot can be a fast and efficient way to grab what you need. This method is especially handy for images that are hard to download directly or when you just want a quick save. Let’s go over how to take screenshots on different devices.
Here’s a simple guide for various platforms:
- On Windows: Press PrtScn to capture the entire screen. If you want to capture just the active window, press Alt + PrtScn. You can paste the screenshot into an image editor or document.
- On Mac: Press Command + Shift + 4 to select a specific area to capture. The screenshot will automatically save to your desktop.
- On Mobile (iOS/Android): Use the button combination (usually Power + Volume Down) to take a screenshot. The image will save to your photos app.
Taking a screenshot is quick and allows you to capture the exact image you see on your screen. However, remember that the quality might vary depending on your device. Ensure you crop the image afterward if needed for better presentation!
Also Read This: Understanding Why My Adobe Stock Photos Are Pixelated in Photoshop
Utilizing Add-ons for Image Extraction
If you find yourself frequently needing to save images from Google Slides, using add-ons can streamline the process. Add-ons are tools you can integrate into Google Slides to enhance functionality. Some of them are specifically designed for image extraction, making your job easier.
Here are a few popular add-ons you might consider:
- Image Extractor: This add-on allows you to select multiple images from your slides and download them all at once.
- Save As Image: With this tool, you can convert entire slides or selected images into high-quality images.
- SlideShare: Ideal for saving entire slides as images, this add-on can be useful if you're presenting.
To install an add-on, go to the Google Slides menu, click on Extensions, then Add-ons, and search for your preferred tool. Once installed, follow the add-on’s instructions to extract images easily. These tools can save you a lot of time and keep your images organized!
Also Read This: How to Steal Images from Getty Understanding Copyright and Legal Consequences
Managing Image Quality During Saving
When saving images from Google Slides, it’s essential to consider the quality of the images you’re extracting. Sometimes, saving methods can reduce the resolution, making the images less usable for your projects. Here are a few tips to ensure you maintain high quality:
- Choose the Right Format: If you're using the download option, consider saving in formats like PNG or JPEG, which maintain good quality.
- Check the Resolution: Before saving, check the size of the image. A larger resolution means better quality for printing or detailed work.
- Avoid Compression: Some methods may compress images, which can reduce quality. Try to use methods that keep the image intact.
Additionally, when using screenshots, ensure you capture at the highest possible resolution. You can also resize images afterward using photo editing tools, but starting with a high-quality image is always best. Managing these aspects will ensure you have clear and professional-looking images for your use!
Also Read This: How to Remove Text from Shutterstock Images: A Comprehensive Guide
Common Issues and How to Solve Them
Even though saving images from Google Slides is generally straightforward, you might encounter a few bumps along the way. Understanding these common issues can help you troubleshoot effectively. Here are some frequent problems you might face and how to resolve them:
- Images Not Downloading: If you try to download an image but it doesn’t work, ensure that you have the necessary permissions. If the image is from another user's slide, you may need their permission to access it.
- Poor Image Quality: If the saved image looks blurry, check the resolution before saving. Always choose a high-resolution option when available.
- Screen Capture Limitations: Taking screenshots can sometimes miss out on details. Make sure you select the right area and use the highest resolution available on your device.
- Browser Compatibility Issues: Sometimes, the browser you’re using might not support certain features. Switching to a different browser like Chrome or Firefox can often resolve these issues.
If you run into any problems, try refreshing the page or restarting your device. Most issues are easily fixable with a little patience!
Also Read This: How to Get Signature Collection on iStock: Everything You Need to Know
FAQ About Saving Images from Google Slides
It’s common to have questions when saving images from Google Slides. Here are some frequently asked questions that might help clarify your doubts:
- Can I save images from someone else's presentation?
- Yes, but you’ll need permission from the owner to access and download those images.
- What formats can I save images in?
- You can typically save images in formats like JPEG, PNG, or even PDF if you download the entire slide.
- Will saving an image lower its quality?
- It can, especially if you use certain saving methods. Always choose high-resolution options for the best quality.
- How do I find images I’ve saved?
- Saved images usually go to your computer's Downloads folder or the location you specified during the saving process.
If you have more questions, feel free to look for online resources or forums where others share their experiences!
Conclusion and Final Thoughts
Saving images from Google Slides doesn’t have to be a complicated task. With the right methods and a bit of know-how, you can efficiently gather and maintain a library of images for your personal or professional projects. Whether you choose to download images directly, take screenshots, or use helpful add-ons, knowing your options will make the process smoother.
Always keep image quality in mind, and don’t hesitate to troubleshoot common issues as they arise. By following the tips outlined in this post, you’ll find that saving images is a breeze. Happy image saving, and enjoy creating with your new graphics!

 admin
admin


