Darkening images in Photoshop is a powerful technique that can dramatically enhance the look and feel of your photos. Whether you're aiming for a more dramatic effect, emphasizing certain elements, or improving the overall mood of the image, adjusting the darkness can make a significant difference. In Photoshop, there are various methods available to darken your images, from basic adjustments to more advanced techniques using layers and tools. In this guide, we will explore some of the best ways to darken your photos, giving you the tools to enhance your visuals and achieve the perfect look.
Why Darkening Images Is Important for Visual Appeal

Darkening an image isn't just about making it less bright; it’s about creating mood, focus, and visual depth. When you darken certain areas of an image, you can draw attention to specific elements while pushing other parts into the background. Here’s why darkening images is a valuable technique:
- Enhances Mood: Darker images tend to feel more intense or moody, which can be ideal for storytelling in visuals.
- Improves Focus: By darkening the background or less important areas, you can guide the viewer’s eye towards the main subject.
- Creates Depth: Adding darker tones can create contrast, making the image feel more dynamic and three-dimensional.
- Reduces Distractions: Darkening the background can help eliminate distracting elements, making the subject stand out more clearly.
In many cases, images that are too bright or flat can look less appealing. Darkening can help add complexity and interest, improving the overall composition of the photo. By mastering this skill, you can make your images more visually appealing and professional.
Step-by-Step Guide to Darkening Images in Photoshop

Darkening images in Photoshop is a straightforward process once you get the hang of it. Here’s a step-by-step guide to help you achieve the desired effect:
- Open the Image in Photoshop: Start by opening the image you want to darken in Photoshop.
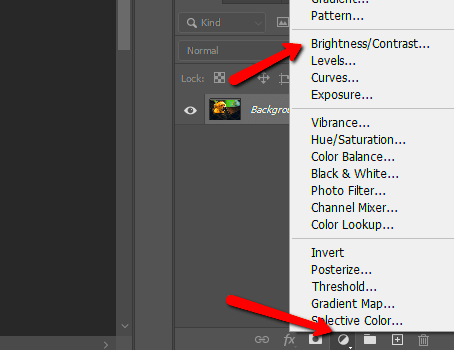
- Use the Curves or Levels Adjustment Layer: Go to the Layers panel and click on the “Create new fill or adjustment layer” icon. Select “Curves” or “Levels.” These tools will help you control the brightness and darkness of your image.
- Adjust the Curve or Levels: In the Curves or Levels window, drag the curve down or adjust the shadows slider to darken the image. You can also target specific tones like shadows or midtones for more precise control.
- Refine the Image Using the Mask: After darkening, add a mask to the adjustment layer. This allows you to selectively apply the darkness effect to certain areas of the image. Use a soft brush to paint black on the mask to erase the effect from unwanted areas.
- Check the Results: Zoom in and out of your image to make sure the darkening effect looks natural and balanced. You can always tweak the settings for a more refined look.
- Save Your Work: Once satisfied with the results, save the edited image in your desired format.
This simple process allows you to create beautiful, darkened images with just a few adjustments. Keep experimenting with different settings to see how small changes can dramatically improve the look of your photos.
Using Adjustment Layers to Darken Images
Adjustment layers are one of the most flexible ways to modify an image in Photoshop. They allow you to darken your images non-destructively, meaning you can always go back and make changes without permanently altering your original photo. By using adjustment layers, you can apply the darkening effect selectively or globally, depending on your needs. Let’s dive into how you can use these layers to adjust the darkness of your image:
- What is an Adjustment Layer? An adjustment layer is a layer that applies a change to the image beneath it, like adjusting brightness, contrast, or colors, without altering the actual pixels of the image.
- Why Use Adjustment Layers? They offer flexibility because you can adjust the settings at any time. If you don't like the result, you can simply tweak the adjustment or even delete it, keeping your original image intact.
- How to Apply an Adjustment Layer: To darken an image, go to the Layers panel and click the 'New Adjustment Layer' icon. From the drop-down, choose 'Brightness/Contrast' or 'Curves' for more detailed control.
- How Adjustment Layers Help: Once applied, you can adjust the slider to darken your image or use a mask to limit the effect to certain areas, giving you full control over where and how the darkness is applied.
Adjustment layers are great because they make the editing process more flexible, allowing you to experiment without fear of ruining your original image. They let you keep full creative control over the process of darkening your images.
How to Darken an Image Using Curves and Levels
Curves and Levels are two of the most powerful tools in Photoshop for adjusting image brightness and contrast. Both tools give you precise control over how light and dark areas of your image appear. Here’s how you can use each tool to darken your
- Curves Tool: The Curves tool allows you to adjust the tonal range of your image by manipulating the curve line. By dragging the curve downward, you can darken the image. Here's how to use it:
- Open the Curves adjustment layer and find the diagonal line in the graph.
- Click on the curve and drag it downwards to darken the entire image.
- If you want to target specific tonal ranges (shadows, midtones, highlights), click on the curve to adjust individual points for more control.
- Open the Levels adjustment layer and you’ll see three sliders (shadows, midtones, highlights) under the graph.
- Drag the shadow slider (on the left) toward the right to darken the image. You can also adjust the midtones slider for more precise control.
- Make sure to keep an eye on the image to ensure you don’t over-darken certain areas.
Both the Curves and Levels tools are excellent for darkening an image in Photoshop. The key is experimenting with the settings to find the perfect balance that works for your specific photo.
Using the Gradient Tool to Add Depth to Darkened Images
The Gradient Tool in Photoshop is another useful tool for darkening images, especially when you want to create a gradual darkening effect that adds depth and dimension. This technique is ideal for creating a smooth transition from light to dark, which can enhance the mood of the image. Here’s how to use the Gradient Tool for darkening:
- What is the Gradient Tool? The Gradient Tool lets you create a gradual blend of colors or tones. In the case of darkening an image, you’ll use it to apply a fade from lighter to darker areas.
- Steps to Apply the Gradient Tool: To begin, follow these steps:
- Select the Gradient Tool from the toolbar (or press G).
- In the top options bar, choose a gradient that goes from black to transparent, or create your own custom gradient.
- Click and drag across your image to apply the gradient. The longer you drag, the more gradual the transition will be between light and dark.
The Gradient Tool offers a simple yet effective way to add depth to your images. It allows you to darken photos in a smooth, controlled manner, which can make your compositions feel more dynamic and visually appealing.
How to Adjust Shadows and Highlights for a Balanced Effect
Adjusting shadows and highlights is an essential step in darkening an image to ensure it doesn’t look too harsh or uneven. The goal is to balance the bright and dark areas of your image, keeping details intact while enhancing contrast. In Photoshop, the Shadows/Highlights adjustment tool allows you to fine-tune these areas, creating a well-rounded and natural look. Here’s how to use it effectively:
- What Are Shadows and Highlights? Shadows refer to the darker areas in your image, while highlights are the lighter parts. Balancing both ensures your image has depth without losing detail in either area.
- Using the Shadows/Highlights Tool: To start, go to Image > Adjustments > Shadows/Highlights. This opens a panel with sliders for both shadows and highlights.
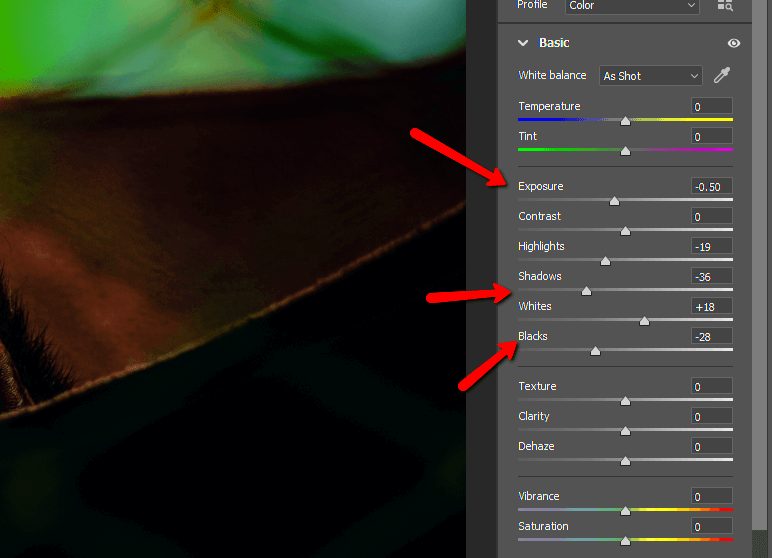
- Adjust the Shadows: Move the “Shadows” slider to the right to lighten the dark areas, or to the left to make them even darker. Be careful not to overdo it, as it can reduce contrast.
- Adjust the Highlights: Similarly, adjust the “Highlights” slider to lighten the bright areas or darken them for a more balanced effect.
Adjusting shadows and highlights not only adds depth to your images but also ensures that both dark and light areas contribute to the image's overall appeal, making your photos more balanced and professional.
Common Mistakes to Avoid When Darkening Images
When darkening an image, it’s easy to overdo it or make other common mistakes that can negatively affect the result. Whether you're a beginner or have some experience, it's essential to know what to avoid. Here are a few common mistakes and how to steer clear of them:
- Over-Darkening the Image: One of the most frequent mistakes is making the image too dark. While darkening can add drama and focus, going too far can make your image lose its details, especially in the shadows. Always check your image after adjusting the darkness to ensure you're not sacrificing important elements.
- Ignoring Contrast: Simply darkening an image without considering contrast can make it look flat. Contrast helps separate the subject from the background and adds depth. Balance darkening with contrast to avoid a dull, lifeless image.
- Not Using Adjustment Layers: Working directly on the image can be risky because it permanently changes the pixels. Using adjustment layers, however, lets you darken non-destructively and adjust things later without losing quality.
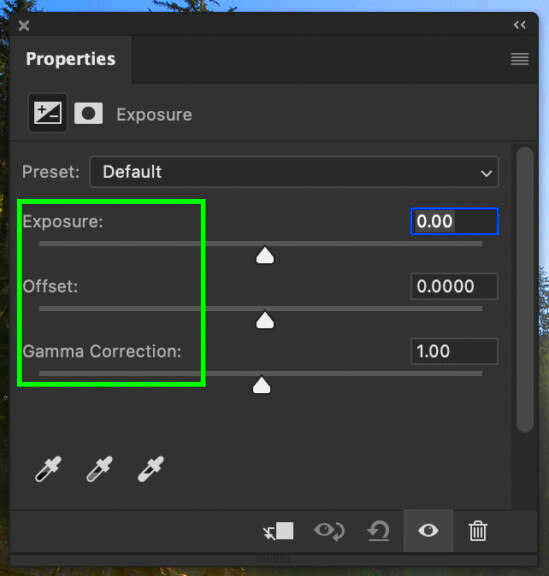
- Excessive Use of Filters: Relying too much on Photoshop filters for darkening can result in unnatural-looking effects. Instead, try adjusting the exposure or using more subtle techniques like Curves or Levels for smoother, more organic results.
- Ignoring the Subject: Sometimes, while darkening the image, we focus too much on the background and forget the main subject. Make sure to apply the darkening effect in a way that enhances, not distracts from, the focal point of the image.
- Too Much Use of Masks: While masks are powerful tools for selective editing, overusing them can lead to unnatural transitions. Use soft brush strokes and subtle gradients to ensure smooth transitions between adjusted and unadjusted areas.
Avoiding these mistakes ensures that your darkened images maintain their clarity, impact, and visual appeal. By focusing on subtlety and balance, you’ll improve your editing skills and create more professional-looking images.
FAQ
Q: How can I darken specific areas of an image?
A: You can use adjustment layers with masks to target specific areas. This allows you to darken just the background, for example, without affecting the main subject.
Q: Can I darken an image without losing details?
A: Yes! By adjusting shadows and highlights and using adjustment layers, you can preserve the details in both bright and dark areas while achieving the right balance.
Q: What’s the difference between using Curves and Levels to darken an image?
A: Both tools adjust brightness, but Curves offers more control over tonal ranges, allowing for more precise adjustments. Levels, on the other hand, is simpler and adjusts shadows, midtones, and highlights more directly.
Q: Why does my darkened image look unnatural?
A: If your darkened image looks off, it may be due to over-darkening or an unbalanced contrast. Always keep an eye on the overall look and ensure you're using subtle, non-destructive adjustments.
Q: How can I prevent over-darkening when using the Shadows/Highlights tool?
A: Always use the sliders sparingly. Adjust the “Midtone Contrast” and “Radius” sliders to add depth and preserve detail in both shadows and highlights. Don't go to extremes with any slider.
Conclusion
Darkening images in Photoshop is a valuable technique for improving the overall aesthetic of your photos. By adjusting the shadows, highlights, curves, and using various tools like the Gradient Tool and Adjustment Layers, you can enhance the mood, contrast, and depth of your images. It's important to strike a balance when darkening so you don’t lose important details or make the image look unnatural. By experimenting with these techniques and avoiding common mistakes, you can take your photos to the next level. Always remember to make non-destructive edits using layers and masks, giving you flexibility to tweak your changes. With practice, you'll master the art of darkening images and make your visuals stand out with professional-quality results.


