In the world of photography and graphic design, DPI (dots per inch) plays a key role in the overall quality of an image. If you’ve ever tried to print an image only to notice it looks pixelated or blurry, then you’ve encountered the importance of DPI. Increasing the DPI of an
What Does DPI Mean for Image Quality?

DPI stands for “dots per inch,” and it’s a measure of the resolution or detail in an image. In simple terms, DPI tells you how many individual dots of ink or pixels fit in one inch of space when an image is printed or displayed. The higher the DPI, the more detail you can see in the
- Low DPI (72-150 DPI): This is typically used for web images where the resolution doesn’t need to be as high. These images can appear pixelated when printed.
- Medium DPI (200-300 DPI): This is ideal for standard prints like photographs and brochures. It ensures clear, high-quality prints.
- High DPI (above 300 DPI): Used for professional printing, fine art, or detailed work that requires sharp resolution.
When an image has a high DPI, it contains more data and details, which means it looks crisp and sharp. For professional prints, a DPI of 300 or higher is generally recommended to avoid any pixelation or loss of detail.
Also Read This: Quick Way to Download Instagram Reels on PC With Free Tool
Why Increase DPI on an Image?

Increasing the DPI of an image is often necessary when preparing it for print. Here’s why you might need to increase DPI on an image:
- Improved Print Quality: When printing images, a higher DPI ensures the details remain sharp, preventing the image from becoming blurry or pixelated.
- Professional Projects: For professional prints like business cards, posters, or banners, increasing the DPI ensures the image looks clean and crisp at large sizes.
- Better Detailing: Higher DPI allows for more subtle details to show up in printed work, which can make a big difference in art prints or detailed photography.
- For Enlargements: When enlarging images for print, you need to increase DPI to maintain quality. A low DPI image will lose clarity as it is stretched.
In short, increasing the DPI is essential for any image that needs to be printed clearly, especially if it needs to maintain its high quality at larger sizes. Without increasing the DPI, the print may appear pixelated or blurry, even if the image looks fine on screen.
Also Read This: How to Obtain Ten More Free Stock Images from Adobe
How to Increase DPI Using Editing Software
Increasing DPI through editing software is one of the most reliable ways to improve the quality of your images. While it won’t add extra detail that wasn't captured in the original photo, it can make an image print-ready by adjusting its resolution. Let’s go through the process of how to increase DPI using popular software like Adobe Photoshop, GIMP, and others:
- Adobe Photoshop:
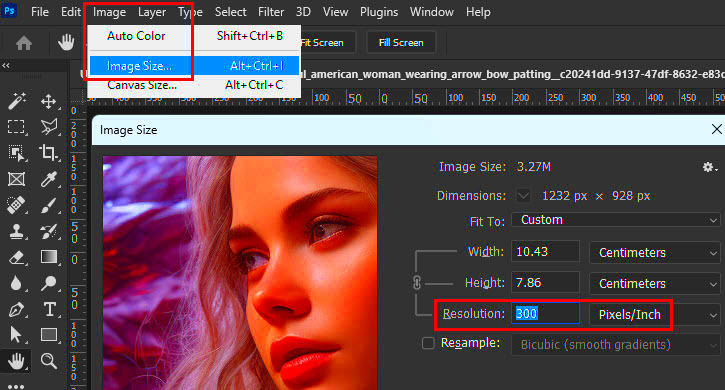
- Open your image in Photoshop.
- Go to “Image” in the top menu and select “Image Size.”
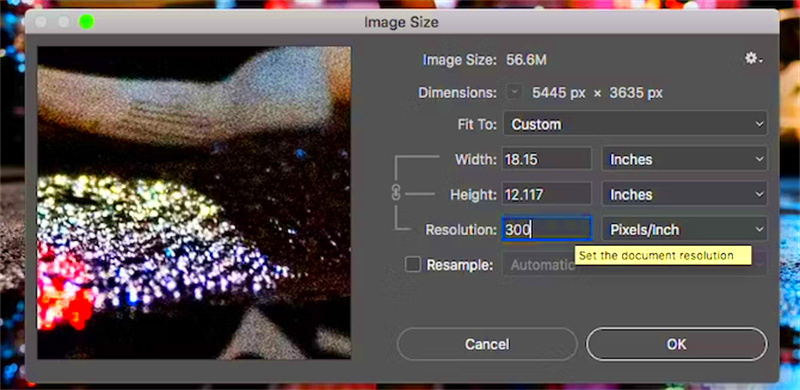
- In the Image Size window, uncheck the “Resample” box (this ensures that the quality remains intact). Then, change the DPI value to your desired number (e.g., 300 DPI for print).
- Click “OK” to apply the changes.
- GIMP (Free Software):
- Open your image in GIMP.
- Go to “Image” in the top menu, then select “Print Size.”
- Under Resolution, change the X and Y DPI values to your desired resolution.
- Click “OK” to confirm.
- Paint (Windows):
- Open your image in Paint.
- Select “Resize” from the Home tab and choose “Pixels.”
- Ensure you uncheck “Maintain aspect ratio” if you want to change the resolution without affecting the size.
- Change the horizontal and vertical DPI to match your needs, but be careful as Paint doesn’t provide the same detailed options as Photoshop or GIMP.
These steps will help you increase the DPI of your image, but remember, if the image’s original resolution is too low, increasing the DPI may result in a loss of sharpness. Always use the highest resolution image available for best results.
Also Read This: How to Create a YouTube Channel on Your iPad
Online Tools for Increasing DPI on an Image
If you don’t want to install software, online tools can be a convenient option to increase DPI. These tools allow you to adjust the resolution of your image directly from your browser without needing advanced skills or software. Here are a few popular ones:
- Pixlr: A free online image editor with a simple interface. You can open your image, adjust the resolution in the "Image Size" menu, and save the modified image.
- ResizeImage.net: This tool allows you to change DPI by uploading your image, entering your desired DPI (e.g., 300 DPI), and downloading the updated image.
- Fotor: Known for its ease of use, Fotor lets you increase DPI by adjusting the “Image Size” under the resize menu. It also has useful editing options for improving image quality.
- Photopea: A free, Photoshop-like tool that supports layers and advanced editing. You can open your image, change the DPI in the “Image” menu, and export the image in various formats.
Online tools are a great option for quick fixes, but they may not offer the same level of control as software like Photoshop. However, for general purposes, these tools can be more than enough to increase DPI on your images.
Also Read This: How to Get Your Images onto Getty with a Beginner’s Guide to Getting Featured
Things to Consider When Increasing DPI
Increasing the DPI of an image can improve its print quality, but there are several important things to keep in mind before making the change. Simply increasing DPI won’t always make the image look better if the original quality is low. Here are some factors to consider:
- Original Resolution: If the image starts with a low resolution (e.g., 72 DPI), increasing the DPI will not magically add details. The image may appear softer or pixelated when viewed closely, even if it’s enlarged.
- Quality Loss: Resampling an image to increase DPI can sometimes reduce quality. This is especially true if the original image doesn’t have enough pixels to support a higher DPI. Always check the image after resizing to ensure it still looks good.
- Printer Capabilities: Not all printers can handle extremely high DPI settings. For printing, it’s best to match the DPI of the image with the capabilities of your printer. Most home printers print well at 300 DPI.
- Image Format: When saving your image after increasing the DPI, choose a format that preserves quality. TIFF and PNG are excellent choices for preserving image clarity, while JPEG might compress the image and cause a loss in detail.
- File Size: Higher DPI increases file size. If you’re working with very large images, the file size can become quite large, which might cause issues when uploading or printing.
In conclusion, while increasing DPI can improve image quality for print, it’s important to consider the image’s original resolution, your printer’s capabilities, and the software you’re using. Always aim for a balanced approach to get the best results without sacrificing quality.
Also Read This: How to Earn Money from Adobe Stock Photos
Common Mistakes to Avoid When Changing DPI
When adjusting the DPI of an image, it’s easy to make a few common mistakes that can negatively affect the quality of your image. Knowing what to watch out for can help you achieve the best results. Here are some mistakes to avoid when increasing DPI:
- Not Using a High-Quality Source Image: Increasing the DPI on a low-resolution image doesn’t add more detail. If your image has a low pixel count to begin with, increasing the DPI will only make it look blurry or pixelated when printed. Always start with a high-quality image for the best results.
- Over-resampling the Image: While it may seem tempting to increase the DPI significantly, doing so can lead to unwanted effects like loss of sharpness or distortion. Resampling too much may degrade the quality, so always check the image after resizing to ensure it looks good.
- Not Checking Print Settings: It’s essential to understand the printing requirements for DPI. While 300 DPI is often the standard for print, some projects may require higher or lower settings based on the medium. Always check the print specifications to ensure your image is set up correctly.
- Forgetting to Resample When Changing DPI: In some software, simply changing the DPI value won’t automatically adjust the number of pixels in the image. Make sure to check the “Resample” box if you need to adjust both the DPI and the image’s dimensions at the same time.
- Saving in Low-Quality Formats: When saving images with higher DPI, always choose a high-quality file format like TIFF or PNG. Formats like JPEG can compress the image and cause a loss of quality, even if the DPI is increased.
Avoiding these mistakes will ensure that your images maintain their quality after adjusting the DPI, whether for professional print or online use.
Also Read This: how to choose card stock adobe reader
How to Save Images with Higher DPI for Best Results
After you’ve increased the DPI of your image, it’s important to save it properly to preserve its quality. Saving your image in the right format and with the right settings will ensure that the changes you made to the DPI are retained without compromising the image. Here’s how to do it:
- Choose the Right File Format: Different file formats offer different levels of quality. For higher DPI images, choose formats that support lossless compression or no compression at all. These include:
- TIFF: Offers high quality with no loss of detail, making it the best option for images with high DPI.
- PNG: Another great choice, especially for web images, since it preserves image quality and supports transparency.
- PSD (Photoshop): If you’re working in Photoshop, saving your image as a PSD will preserve all layers and image data for future editing.
- Avoid JPEG for High DPI: While JPEG is commonly used for images online, it compresses the image, which can lead to a loss of detail when using high DPI. It’s better to save your high DPI image in formats that do not use lossy compression.
- Check the Resolution Settings: Before saving, double-check the resolution settings to ensure that the image is set to the correct DPI. In Photoshop, for example, go to “Image Size” and verify the resolution is set to 300 DPI or whatever the print requirement is.
- Save for Print: If you’re preparing an image for print, ensure the color mode is set to CMYK (for printers) rather than RGB (for screens), as printers work better with CMYK color profiles.
- Test Print: Before finalizing your image for professional printing, it’s always a good idea to do a test print on your printer. This allows you to ensure the image appears sharp and clear at the desired DPI.
By following these steps, you’ll ensure your high DPI images are preserved in the best possible quality for printing or digital use.
Also Read This: A Comprehensive List of Image Processing Companies in the USA
FAQ about Increasing DPI on Images
Increasing the DPI of an image can raise many questions. Here are some common FAQs about DPI adjustments and how they impact image quality:
- What is the best DPI for print? The best DPI for print is typically 300 DPI. This ensures that the image remains sharp and clear when printed. For larger prints like posters, some printers may work well with 150 DPI, but 300 DPI is the gold standard for high-quality prints.
- Can I increase DPI on a low-resolution image? While you can increase the DPI, it won’t add any extra details to a low-resolution image. Increasing DPI on a low-quality image may result in a blurry or pixelated print. It’s best to start with a high-resolution image.
- Does increasing DPI affect image size? Yes, increasing the DPI usually results in a larger file size. This happens because the image has more data packed into it, which can increase the amount of information stored in the file. Be prepared for larger file sizes when working with high DPI images.
- Can I increase DPI for web images? For web images, a high DPI is not necessary, as screens typically display images at 72 DPI. However, if you're preparing images for both web and print, it’s important to set the correct DPI for each use case.
- Will increasing DPI improve image quality for digital use? Increasing DPI is mostly relevant for print. For digital use (e.g., websites), the screen resolution (usually 72 DPI or 96 DPI) is more important than the print resolution.
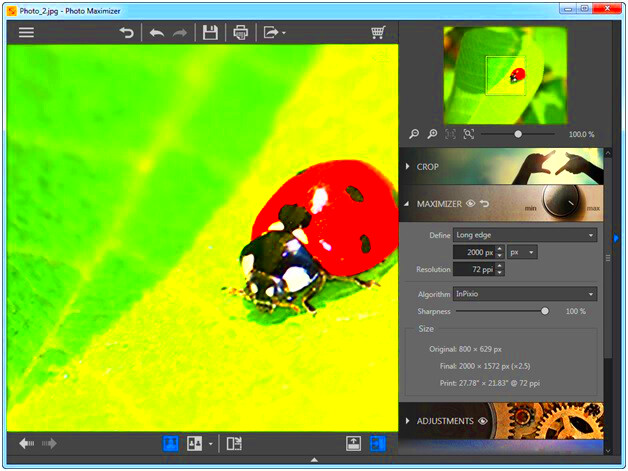
- What tools can I use to increase DPI? You can use software like Adobe Photoshop, GIMP, or online tools like Fotor, Pixlr, and Photopea to adjust the DPI of your images. These tools allow you to easily change the resolution for printing or other purposes.
Understanding these frequently asked questions can help you make informed decisions when adjusting the DPI of your images for various projects.
Conclusion: Improving Image Quality with Increased DPI
Increasing the DPI of an image is a simple yet effective way to improve its quality, especially when preparing it for print. While DPI may not add new details to an image, it plays a crucial role in ensuring that the image appears sharp, clear, and professional when printed. Whether you are working with photographs, graphic designs, or artwork, understanding how to adjust DPI correctly can make a big difference in the final outcome.
Remember that high DPI is essential for print but not necessary for digital use. For print projects, aim for at least 300 DPI for high-quality results, while online images typically only need 72 DPI. By using the right software or online tools to adjust DPI, and following best practices for saving and printing, you can ensure that your images are always ready to impress, whether on the web or in a print publication.
In summary, increasing DPI for better image quality is a valuable tool in image editing. Keep in mind the importance of the original resolution, the right tools for the job, and the specific requirements for your project. When done properly, increasing DPI can significantly enhance the quality of your images and lead to professional-looking results every time.

 admin
admin


