Benefits of Linking Shopify to eBay
Linking your Shopify store to
eBay can provide numerous benefits for your e-commerce business. By leveraging the power of both platforms, you can expand your reach, increase sales, and streamline your operations. Here are some of the key advantages of integrating Shopify with
eBay:
- Expanded customer base: eBay is one of the largest online marketplaces, with millions of active users. By connecting your Shopify store to eBay, you can tap into this vast customer pool and expose your products to a wider audience.
- Increase in sales: With increased visibility on eBay, you have the potential to boost your sales significantly. The platform's large user base and built-in trust factor can help attract more customers and drive more conversions.
- Improved inventory management: When you link your Shopify store to eBay, you can automatically sync your inventory between the two platforms. This prevents overselling and ensures accurate stock levels, saving you time and minimizing errors.
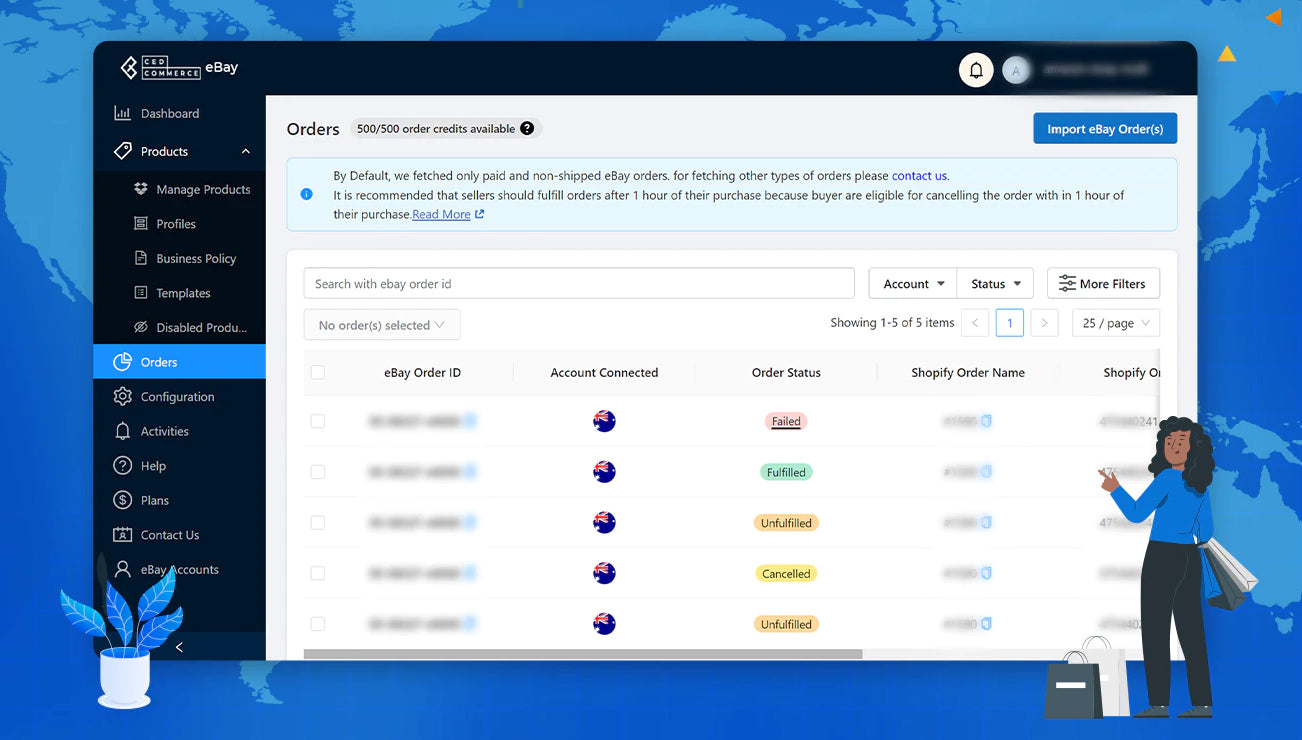
- Easy order management: Integrating Shopify with eBay allows for seamless order management. Orders received on eBay can be automatically imported into your Shopify store, eliminating the need for manual data entry and reducing the chances of order fulfillment mistakes.
- Efficient shipping and tracking: By linking Shopify to eBay, you can integrate your preferred shipping carriers and streamline the shipping process. This integration enables automatic tracking updates and provides customers with real-time information on their orders.
- Unified analytics and reporting: When you connect your Shopify store to eBay, you can access consolidated analytics and reporting. This allows you to gain valuable insights into your sales, inventory, and customer behavior across both platforms, facilitating better decision-making.
- Brand consistency: By linking your Shopify store to eBay, you can maintain brand consistency across both platforms. You can customize the eBay store design to match your Shopify store, ensuring a seamless and cohesive brand experience for your customers.
Comparison Shopify vs. eBay
| Feature |
Shopify |
eBay |
| Sales potential |
Dependent on marketing efforts |
Access to millions of active users |
| Inventory management |
Syncs with Shopify's inventory management system |
Syncs with Shopify or external inventory management systems |
| Order management |
Automated process, easy order fulfillment |
Manual data entry, potential for order fulfillment errors |
| Shipping and tracking |
Integration with preferred shipping carriers |
Integration with preferred shipping carriers |
| Analytics and reporting |
Consolidated analytics for Shopify and eBay |
Analytics specific to eBay |
| Brand consistency |
Customizable store design |
Customizable store design |
In conclusion, linking your Shopify store to
eBay can provide a range of benefits, including an expanded customer base, increased sales, improved inventory management, easy order fulfillment, efficient shipping and tracking, unified analytics and reporting, and brand consistency. By leveraging both platforms' strengths, you can accelerate the growth of your e-commerce business and enhance the overall customer experience.
How to Link Shopify to eBay
Linking your Shopify store with
eBay can greatly expand your reach and increase your sales. Here is a step-by-step guide on how to link Shopify to
eBay:
- Create an eBay account: If you don't have an eBay account yet, go to the eBay website and create one. Make sure to provide all the necessary information and set your preferences accordingly.
- Enable the eBay sales channel on Shopify: In your Shopify admin panel, go to the Sales Channels section and click on "Add sales channel". Find the eBay channel and click on "Add channel" to enable it.
- Connect your eBay account to Shopify: Once the eBay channel is enabled, click on it and then on "Connect account". You will be redirected to eBay, where you need to log into your eBay account and grant permissions for Shopify to access your eBay account.
- Configure your eBay settings: After connecting your eBay account, you will be taken back to Shopify. Here, you can customize your eBay settings, such as choosing the location from which you will be shipping your products and setting up eBay-specific shipping policies.
- Import products from Shopify to eBay: To start selling on eBay, you need to import your products from Shopify to eBay. In the eBay channel of your Shopify admin, click on "Products" and then on "Import products". You can either select individual products or import all your products at once.
- Set up your eBay listings: Once your products are imported, you can customize the eBay listings. You can edit the title, description, pricing, and other listing details to optimize them for eBay.
- Manage your eBay orders: As your products start selling on eBay, you will receive orders that you need to fulfill. Shopify will automatically sync the order details, and you can process them like any other Shopify order.
- Sync inventory and update listings: Whenever there is a change in inventory or a product is updated on Shopify, the eBay listings will automatically update to reflect those changes.
By linking your Shopify store to eBay, you can effectively manage and sell your products on both platforms, streamlining your operations and increasing your sales potential. It's a great way to reach a wider audience and tap into the vast customer base of eBay.
Step 1: Create an eBay Account
Creating an eBay account is the first step to start buying and selling on the platform. Follow the steps below to create your eBay account:
- Go to the eBay website by typing www.ebay.com in your web browser.
- Click on the "Register" button located at the top left corner of the homepage.
- You will be redirected to the registration page where you need to provide your personal information.
- Fill in your first name, last name, email address, and phone number in the respective fields. Make sure to use a valid and active email address as this will be used for communication with eBay.
- Choose a strong password for your account. It should be a combination of alphanumeric characters and special symbols to ensure security. Avoid using common words or personal information that could be easily guessed.
- Read and accept the User Agreement, User Privacy Notice, and eBay's policies by checking the corresponding boxes. It's essential to understand and agree to the terms and conditions before proceeding.
- Click on the "Create account" button to submit your registration.
- Next, eBay will send a confirmation email to the email address you provided during registration. Open the email and click on the verification link to activate your account.
- Once your account is activated, you can customize your profile by adding a profile picture, writing a short bio, and selecting your preferences.
- Now you are ready to use your eBay account for buying or selling items on the platform.
Having an eBay account allows you to participate in auctions, shop for products, and sell items to a global audience. It also gives you access to eBay's features and tools, such as saved searches, watchlist, and feedback system.
It is important to keep your eBay account information secure and regularly update your password to prevent unauthorized access. Be cautious when sharing personal or financial information, and always verify the legitimacy of buyers and sellers before engaging in transactions.
By following the steps above, you can create your eBay account and start enjoying the benefits of this popular online marketplace.
Setting Up Your Shopify Store
Once you have signed up for Shopify and have logged into your account, it is time to set up your online store. Here are the steps to follow:
1. Customize Your Store
The first thing you should do is customize your store's appearance to match your brand. Shopify provides a variety of themes that you can choose from. You can also customize the colors, fonts, and images to create a unique look for your store. Additionally, you can add your logo and customize the layout of your store's homepage.
2. Add Your Products
After customizing your store, it's time to start adding your products. To do this, go to the Products section in your Shopify admin panel. Here, you can manually add each product by entering its details, such as title, description, price, and images. If you have a large number of products, you can also import them using a CSV file.
It's important to provide detailed and accurate information about your products. Include high-quality images, product variations (such as different sizes or colors), and any additional specifications or details that may be relevant to your customers.
3. Set Up Payment and Shipping Options
Shopify provides a variety of payment gateways that you can choose from to accept payments from your customers. Some popular options are PayPal, Stripe, and Authorize.net. Set up the payment gateway(s) you prefer and ensure they are properly integrated with your store.
In addition to payment options, you also need to set up shipping options. Determine the shipping methods you will offer, such as free shipping, flat rate, or carrier-calculated rates. You can also set up shipping zones and customize shipping rates based on customer location.
4. Configure Tax Settings
It's important to correctly configure tax settings to comply with the tax regulations in your area. Shopfiy provides tools to automatically calculate taxes based on your store's location and the customer's shipping address. You can set up tax rates for specific regions or countries, and even apply different tax rates for different products. Consult with a tax professional if you are unsure about the tax requirements for your business.
5. Set Up Domain and SSL
Your domain name is the web address that customers will use to access your store. Shopify allows you to either use a subdomain on the shopify.com domain or connect your own custom domain. Choose a domain name that reflects your brand and is easy to remember.
Additionally, enable SSL (Secure Sockets Layer) to ensure that all data transmitted between your store and your customers is encrypted and secure. Shopify provides free SSL certificates for all stores.
6. Test and Launch Your Store
Before launching your store, thoroughly test its functionality to ensure that everything is working properly. Make test purchases, test different payment methods, and verify that shipping rates are applied correctly. Double-check your product listings and ensure that all information is accurate.
Once you are confident that your store is ready, it's time to launch! Promote your store through various marketing channels to drive traffic and start making sales.
Remember, setting up your Shopify store is just the first step in running a successful e-commerce business. Regularly update and promote your store, analyze sales data, and provide excellent customer service to continually improve and grow your business.
Step 3: Install the eBay App
Installing the eBay app on your device is easy and convenient. By downloading the app, you will have instant access to millions of items for sale on eBay.
Follow the steps below to install the eBay app:
- Open the App Store on your iOS device or Google Play Store on your Android device.
- In the search bar, type "eBay" and tap on the search button.
- From the search results, locate the eBay app and tap on it.
- Tap the "Install" button to begin the installation process.
- Depending on your device's settings, you may be asked to enter your Apple ID password or confirm the installation.
- Wait for the app to download and install on your device. The progress bar will indicate the download status.
- Once the installation is complete, you will see the eBay app icon on your home screen.
- Tap on the eBay app icon to open it.
- If you don't already have an eBay account, tap on "Register" to create a new account. If you have an existing account, tap on "Sign In" and enter your credentials to access your account.
It's important to note that the eBay app is free to download and use. However, there may be optional in-app purchases or additional features that require payment.
With the eBay app installed on your device, you can easily browse, search, and purchase items from various categories. You can also sell your own items, monitor auctions, and manage your account settings, all from the convenience of your mobile device.
eBay App Features
| Feature |
Description |
| Browsing and Searching |
Effortlessly browse and search through millions of items available for sale on eBay. |
| Buying and Tracking |
Purchase items directly from the app and track your orders for seamless shopping experience. |
| Selling and Listing |
List and sell your own items on eBay, manage your listings, and communicate with potential buyers. |
| Notifications |
Receive alerts and notifications about your saved searches, watched items, and auctions. |
| Account Management |
Access and manage your eBay account settings, view your purchase history, and leave feedback for sellers. |
By installing the eBay app, you can take advantage of these features and enhance your eBay shopping and selling experience.
Step 4: Link Your eBay Account to Shopify
One of the key steps in setting up your eCommerce business is linking your eBay account to Shopify. This will allow you to seamlessly import your eBay listings into your Shopify store, manage your inventory, and fulfill orders directly from Shopify.
Why link your eBay account to Shopify?
There are several benefits to linking your eBay account to Shopify:
- Centralized Inventory Management: By linking your eBay account to Shopify, you can manage your inventory in one place. This means that any changes made to your inventory in Shopify will automatically be reflected in your eBay listings.
- Efficient Order Fulfillment: Linking your eBay account to Shopify enables you to fulfill orders directly from Shopify. This streamlines your order management process and eliminates the need to manually update order statuses on both platforms.
- Seamless Integration: Shopify's integration with eBay ensures that your products, pricing, and inventory are synced accurately between the two platforms.
How to link your eBay account to Shopify:
Follow these steps to link your eBay account to Shopify:
- Log in to your Shopify admin dashboard.
- Click on the "Settings" tab in the lower-left corner of the screen.
- Select "Sales Channels" from the dropdown menu.
- Scroll down to the "eBay" section and click on the "Add sales channel" button.
- A pop-up window will appear. Click on the "Connect account" button next to eBay.
- You will be redirected to eBay's login page. Enter your eBay credentials and click on "Sign in."
- Review the permissions that Shopify requests to access your eBay account. Once you're satisfied, click on "Agree."
- Upon successful authorization, your eBay account will be linked to your Shopify store.
Managing your eBay listings in Shopify:
After linking your eBay account to Shopify, you can easily manage your eBay listings within the Shopify platform. This includes updating product details, availability, and pricing. Any changes made in Shopify will automatically sync with your eBay listings, ensuring consistency and accuracy across both platforms.
It's important to regularly monitor and update your eBay listings within Shopify to provide accurate information to your customers and avoid potential issues.
By following these steps, you can seamlessly link your eBay account to Shopify and take advantage of the powerful features and integrations offered by both platforms. Happy selling!
Step 5: Manage Your eBay Listings
Once you have successfully listed your products on eBay, it is important to learn how to effectively manage your listings to ensure a smooth selling experience. Here are some key steps to help you manage your eBay listings:
- Monitor your listings: Regularly check your eBay account to keep track of your active listings. It is essential to stay updated about any new bids, questions from potential buyers, or changes in the status of your listings.
- Respond to buyer inquiries promptly: When a potential buyer contacts you with a question or concern about your listing, make sure to respond rapidly and courteously. This helps build trust and encourages potential buyers to bid on or purchase your items.
- Review and revise your product descriptions: Periodically review your product descriptions to ensure accuracy and relevance. Update any outdated information or add additional details that might attract more potential buyers. Be sure to use clear and concise language to avoid any confusion.
- Monitor market trends: Stay informed about market trends and competitor prices. Regularly check if similar products are being listed at lower prices or if there are any changes in consumer demand for your items. This will help you adjust your prices and stay competitive.
- Manage inventory: As items sell or you add new stock, it is important to keep your inventory up to date. Regularly update your listings to indicate the availability of your products. If an item is out of stock, consider using the "out of stock" option or temporarily removing the listing to avoid disappointing customers.
- Optimize your listings: Continuously improve your listings to make them more attractive to potential buyers. Utilize eBay's listing optimization tools, such as item specifics, product photos, and keywords, to enhance the visibility of your listings in search results.
- Keep track of seller performance metrics: eBay uses various performance metrics to evaluate sellers. Regularly review your seller performance dashboard to monitor areas where you can improve, such as shipping times, customer satisfaction, and seller ratings.
- Handle customer feedback: Actively respond to customer feedback, both positive and negative. Address any negative feedback promptly and professionally, demonstrating your commitment to customer satisfaction. Positive feedback can be used to build trust and attract more buyers.
By following these steps, you can effectively manage your eBay listings and increase your chances of successful sales. Remember to continuously monitor and improve your listings to stay competitive in the dynamic online marketplace.
Benefits of Using Shopify Synthesis
- Optimized Performance: Shopify Synthesis offers an optimized performance that ensures your online store loads quickly and performs efficiently. This is crucial for providing a seamless shopping experience for your customers and improving your website's search engine optimization (SEO) rankings.
- Reliable Hosting: With Shopify Synthesis, you can benefit from reliable hosting services that ensure your website is up and running smoothly at all times. This eliminates the need to invest in costly third-party hosting solutions and simplifies the overall management of your online store.
- Scalability: Shopify Synthesis is designed to handle high levels of traffic and accommodate the growth of your business. Whether you have a small online store or a large e-commerce platform, Shopify Synthesis can scale seamlessly to meet your needs, ensuring a seamless shopping experience for your customers.
- Advanced Security: Shopify Synthesis maintains the highest security standards to protect your website and customer data. With features like SSL encryption and regular security updates, you can rest assured that your online store is safe from potential cyber threats.
- Easy Customization: Shopify Synthesis provides a user-friendly interface that allows you to easily customize your online store according to your brand's unique requirements. With a wide range of themes, templates, and customization options, you can create a visually appealing and engaging website that represents your business effectively.
- Mobile Responsiveness: Shopify Synthesis ensures that your online store is fully optimized for mobile devices. With a responsive design, your website will automatically adapt to different screen sizes, providing your mobile customers with a seamless shopping experience, which is essential in today's mobile-driven world.
- Integrated Marketing Tools: Shopify Synthesis offers a variety of integrated marketing tools that enable you to promote your products effectively. From customizable promotions and discounts to built-in SEO features and social media integration, you can easily drive traffic to your online store and increase your sales.
- 24/7 Customer Support: Shopify Synthesis provides round-the-clock customer support to assist you with any technical issues or queries you may have. Their team of experts is always available to ensure that your online store functions smoothly and address any concerns promptly.
Overall, Shopify Synthesis is a comprehensive e-commerce solution that offers numerous benefits for businesses of all sizes. With its optimized performance, reliable hosting, scalability, advanced security, easy customization, mobile responsiveness, integrated marketing tools, and 24/7 customer support, you can create and manage a successful online store with ease.
 admin
admin


