YouTube TV has become a popular choice for cord-cutters looking for a flexible and comprehensive streaming service. One of its standout features is the ability to record live TV shows, movies, and sports events for later viewing. In this post, we're diving into how to set up recordings on YouTube TV so you can enjoy automated watching at your own pace. With an easy-to-use interface and unlimited storage on the cloud,
Understanding the Benefits of Automated TV Viewing

Automated TV viewing is a game-changer for anyone who wants to enjoy their favorite shows without being tethered to a schedule. Let’s explore some of the key benefits:
- Flexibility: With automated recordings, you can watch content anytime that suits your schedule. No more rushing home to catch the latest episode!
- Unlimited Cloud DVR: YouTube TV offers unlimited cloud storage, allowing you to record as much content as you want. This means you never have to delete recordings to make space for new ones.
- Automatic Updates: If a show gets renewed for another season or a sports game is rescheduled, YouTube TV automatically records upcoming episodes, ensuring you don’t miss a thing.
- Search and Organize: The intuitive search feature lets you easily find your recorded content, and you can even categorize your recordings into libraries for easier access.
- Commercial Skips: In some cases, YouTube TV allows you to skip commercials during recorded shows, saving you time and enhancing your viewing experience.
In summary, automated TV viewing not only enhances convenience but also enriches your overall entertainment experience. It’s all about making your life easier and more enjoyable, so you can focus on what truly matters—enjoying your favorite shows!
Creating a YouTube TV Account

Alright, let’s get you set up! First things first, you need a YouTube TV account to start enjoying all those shows and movies right at your fingertips. The process is simple and straightforward. Here are the steps to create your account:
- Visit the Website: Start by heading over to the YouTube TV website. You can do this on your computer or mobile device.
- Click on 'Try it Free': YouTube TV often offers a free trial. Clicking on this option gets you started without immediately committing to a payment plan.
- Sign in or Create a Google Account: If you already have a Google account, simply log in. If not, you’ll need to create one. This is quick and just requires a few personal details.
- Input Your Zip Code: This step is crucial for determining which local channels you can access. Just enter your zip code to see the options.
- Choose Your Channels: YouTube TV offers an array of channels. Browse the list, and pick a package that suits your viewing habits. They often package popular channels with some niche ones, so you might find some surprising content!
- Complete Payment Information: Once you've finalized your channel selection, input your payment info. Remember, you can cancel anytime during the trial without getting charged!
And that's it! You’re officially signed up for YouTube TV. Now you can dive into a world of great content. Just remember to check out the recording settings so you don’t miss your favorite shows!
Navigating the YouTube TV Interface
Now that you're all set up, let’s explore the YouTube TV interface! It’s designed to be user-friendly, making it easy to find what you want to watch. Here’s a quick guide to help you get started:
- Home Screen: The home screen is your launchpad. You’ll see recommended shows based on your viewing history, trending content, and even live TV options. It’s a mix of curated and popular selections.
- Live Tab: Want to catch something happening right now? Click the 'Live' tab to see a list of channels currently airing. This is where you can jump into the action!
- Library Section: This is your go-to place for everything you’ve recorded. You’ll find past recordings, currently airing shows, and anything saved for later viewing. Quick access to your favorites!
- Search Functionality: At the top, you’ll notice a search bar. Whether you’re hunting for a movie, show, or channel, just type in the name and voilà! You’ll have relevant results in no time.
- Settings Gear Icon: Don’t forget to check out your account settings. Here, you can manage your subscription, set up your favorite channels, and adjust recording preferences.
Exploring the interface is part of the fun! Feel free to click around and familiarize yourself with every feature. YouTube TV's intuitive layout will make your viewing experience smooth and enjoyable, so let's get started on watching some awesome content!
How to Schedule Recordings for Shows and Movies
If you're excited about watching your favorite shows and movies on YouTube TV but don't want to miss them because of a busy schedule, then scheduling recordings is your best bet! It’s a breeze to set this up, and you can even automate your viewing experience.
Here’s how to schedule recordings on YouTube TV:
- Open YouTube TV: First, fire up the YouTube TV app on your device or visit the website.
- Search for the Show or Movie: Use the search bar to find the title you want to record. This can be a specific show, movie, or even a sports event.
- Select the Title: Click on the show or movie that you want to record, which will take you to its dedicated page.
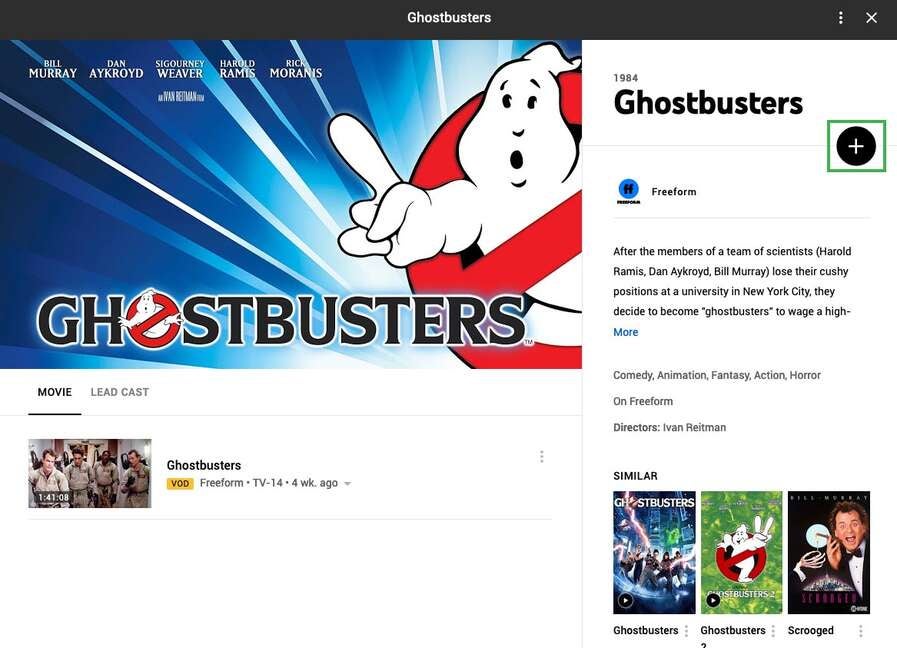
- Choose to Record: Look for the “+” icon, usually located near the show information, and click on it. This will allow you to add the program to your recording library.
- Set Your Preferences: You can choose to record single episodes or—better yet—entire seasons! Just tap on "Record All" if you want all episodes of a series.
And voila! You’re all set. With scheduled recordings, you can automatically watch new episodes as they air, making sure you never miss a moment of your favorite content.
Managing Your Recordings Library
Now that you've got recordings rolling in, you’ll want to stay organized with your recordings library on YouTube TV. Managing this library will help you keep track of what you’ve recorded and what you might want to delete or re-watch.
Here’s how to manage your recordings effectively:
- Access Recordings: Go to the ‘Library’ section of the YouTube TV app or website. Here you’ll find all your scheduled and past recordings neatly arranged.
- View Details: Click on any recording to see details like the air date, duration, and a brief description of the content.
- Delete Unwanted Recordings: If you find recordings that you no longer wish to keep, simply select them and look for the ‘Remove’ or ‘Delete’ option. It’s that easy!
Tip: Make sure to regularly check your library to avoid reaching the storage limit. YouTube TV allows unlimited recordings, but managing your library keeps it clutter-free!
Managing your recordings will enhance your overall YouTube TV experience and ensure you have easy access to all your must-see content!
7. Tips for Optimizing Your Recording Settings
When it comes to making the most out of your YouTube TV recording experience, optimizing your settings can go a long way. Here are some handy tips to ensure you capture everything you want without a hitch!
- Utilize Cloud DVR: YouTube TV offers unlimited Cloud DVR storage. This means you can record as many shows and movies as you like without worrying about running out of space. Just remember, recordings are available for nine months!
- Set to Record All Episodes: If you’ve found a show you adore, why not set it to record all episodes? This way, you'll never miss a single moment. You can choose to record just new episodes or all episodes in the settings.
- Manage Your Storage: Even with unlimited cloud DVR, keeping track of your recordings helps. Periodically go through your library and delete anything you no longer wish to watch. This keeps your recordings organized!
- Customize Recording Quality: YouTube TV allows you to select the recording quality, which could be particularly useful if your internet bandwidth is limited. Choose a lower quality setting for faster uploads if you’re tight on speed.
- Know Your Live Events: Sports events or live shows might have additional recording settings or limitations. Ensure you check ahead of time so you're prepared!
Optimizing your recording settings can enhance your viewing experience and make your automated watching life with YouTube TV a breeze!
8. Troubleshooting Recording Issues
Even with a system as robust as YouTube TV, sometimes recording issues pop up. Don’t fret! Here are common problems and how to tackle them.
- Check Your Internet Connection: A stable internet connection is crucial for recording. If your connection is slow or unstable, recordings may not save properly. Consider running a speed test to ensure your bandwidth is sufficient.
- Verify Recording Settings: Sometimes, the simplest fixes are the best. Double-check your settings to ensure everything is set correctly. Make sure you’ve actually scheduled the recording and it’s not just in your watchlist!
- Look for Conflicts: If you’re trying to record multiple shows airing simultaneously, there may be conflicts. YouTube TV only allows a limited number of simultaneous recordings. Check your schedule and adjust as necessary.
- Review Your Content Availability: Some content may not be available for recording due to licensing restrictions. If a show doesn’t record, it’s worth checking if it's one of those titles.
- Contact Support: If all else fails and recordings are still giving you trouble, don’t hesitate to reach out to YouTube TV support. They can provide insights and assistance tailored to your issue.
By keeping these troubleshooting steps in mind, you’ll ensure a smoother recording experience and an uninterrupted automated watching journey with YouTube TV!
Setting Up Recordings on YouTube TV for Automated Watching
YouTube TV has revolutionized the way we watch television, offering a seamless way to access live and on-demand content. One of its standout features is the ability to set up recordings automatically, allowing you to catch your favorite shows without the hassle of manual reminders. In this guide, we'll walk you through the step-by-step process to set up your recordings, ensuring you never miss an episode again.
Why Use YouTube TV for Recordings?
- Cloud DVR Storage: Enjoy unlimited cloud DVR storage for recordings with the ability to keep them for up to 9 months.
- User-Friendly Interface: YouTube TV's interface makes it easy to navigate and set up recordings.
- Access Anywhere: Watch your recorded content from any device with an internet connection.
How to Set Up Recordings
Follow these simple steps to set up your YouTube TV recordings:
- Log In: Sign into your YouTube TV account on the app or website.
- Find Your Show: Use the search bar to locate the show you want to record.
- Select the Show: Click on the title to view the show page.
- Record Series: Click the “+” button or “Add to Library” option to record the entire series.
- Adjust Settings: Customize your recording preferences, such as recording all episodes or just new episodes.
Recording Options
| Recording Type | Description |
|---|---|
| All Episodes | Records every episode of the show, whether new or old. |
| New Episodes Only | Records only newly aired episodes, saving storage. |
Once you have set up your recordings, sit back and enjoy automated watching with ease. YouTube TV’s recording feature truly enhances your viewing experience, keeping you updated with your favorite shows without any effort.
Conclusion and Final Thoughts
Setting up recordings on YouTube TV not only simplifies your viewing experience but also ensures that you never miss your favorite content. With its user-friendly interface and versatile recording options, YouTube TV is an excellent choice for modern viewers. Embrace the convenience of automated watching and reclaim your evenings!


