If you have a love for art and design, selling vector artwork on
Shutterstock can be a fulfilling way to monetize your creativity. I remember being blown away by the fact that my artistic talents could be seen by people all over the world when I first got started.
Shutterstock provides a space for you to display your vector designs and earn royalties.It’s not solely about the money; it’s also an opportunity to share your one of a kind creations with those who require them for various purposes ranging from websites to promotional materials. So if you’re eager to jump in and kick off your journey lets take a look at how you can make the most, of this chance.
Understanding Vector Art and Its Benefits

Vector art is a form of artwork that utilizes math to generate visuals. In contrast to raster graphics composed of pixels vectors can be resized to any dimension without compromising their clarity. This ensures that your creations appear crisp and vivid regardless of whether they are displayed on a small business card or a massive billboard.
Here’s why vector art stands out:
- Scalability: Vectors can be resized infinitely. This flexibility makes them ideal for a range of uses.
- Precision: Vectors are created using paths, which allows for crisp and clean lines and shapes.
- Easy Editing: Modifying vector graphics is straightforward because you can adjust individual elements without affecting the whole image.
Through my journey in art I have come to appreciate its versatility for various projects. In the beginning I crafted a mix of designs ranging from straightforward icons to intricate illustrations. It was truly rewarding to witness my creations being utilized in a wide array of contexts. By prioritizing the creation of adaptable designs you'll discover that your work is sought after on platforms, such as
Shutterstock.
Creating High-Quality Vector Art for Shutterstock

Crafting top notch vector artwork goes beyond simply sketching a visually appealing image. It demands meticulousness and a strong grasp of design concepts. Here are a few suggestions that I find helpful.
- Start with a Strong Concept: Before you dive into drawing, sketch out your ideas. A well-thought-out concept ensures your design will be both visually appealing and functional.
- Use Clean Lines: Crisp, clean lines are crucial. Avoid unnecessary details that can clutter your design.
- Employ a Balanced Color Scheme: Choose colors that complement each other. A harmonious color palette will make your vector art more attractive and versatile.
- Test Different Sizes: Check how your design looks at various sizes to ensure it maintains quality and readability.
Back in the day I discovered that spending time polishing my designs really paid off. I would frequently revisit a piece after a break and notice things that could be better. This cycle of refinement allowed me to create work that was neater and more polished. Keep in mind that quality is key and putting effort into fine tuning your vector art will yield rewards when you submit it to
Shutterstock.
How to Set Up Your Shutterstock Contributor Account

Creating your
Shutterstock Contributor account is the initial move in selling your vector artwork. I can still recall the thrill I experienced when I finished my registration and spotted my name added as a contributor. It’s an easy procedure yet every step holds significance to kick things off on a note.
Here’s a simple guide to get you started:
- Visit Shutterstock Contributor Portal: Go to the Shutterstock Contributor website. You’ll find a clear option to sign up or log in if you already have an account.
- Fill Out Your Details: You’ll need to provide basic information like your name, email address, and payment details. Make sure everything is accurate to avoid issues later.
- Agree to the Terms: Read and understand Shutterstock’s contributor agreement. It’s crucial to know your rights and obligations before you start uploading your work.
- Complete the Profile: Add a profile picture and write a brief bio. This helps potential buyers get to know you and your style better.
- Verification: You might need to verify your identity. Shutterstock may ask for additional documents to ensure your legitimacy.
While creating my account I made sure to double check all my information. It may seem like a step but it can prevent any issues or hiccups down the line. Once your account is good to go you can start showcasing your vector art and letting your creativity shine through.
Uploading Your Vector Art to Shutterstock

Sharing your artwork on
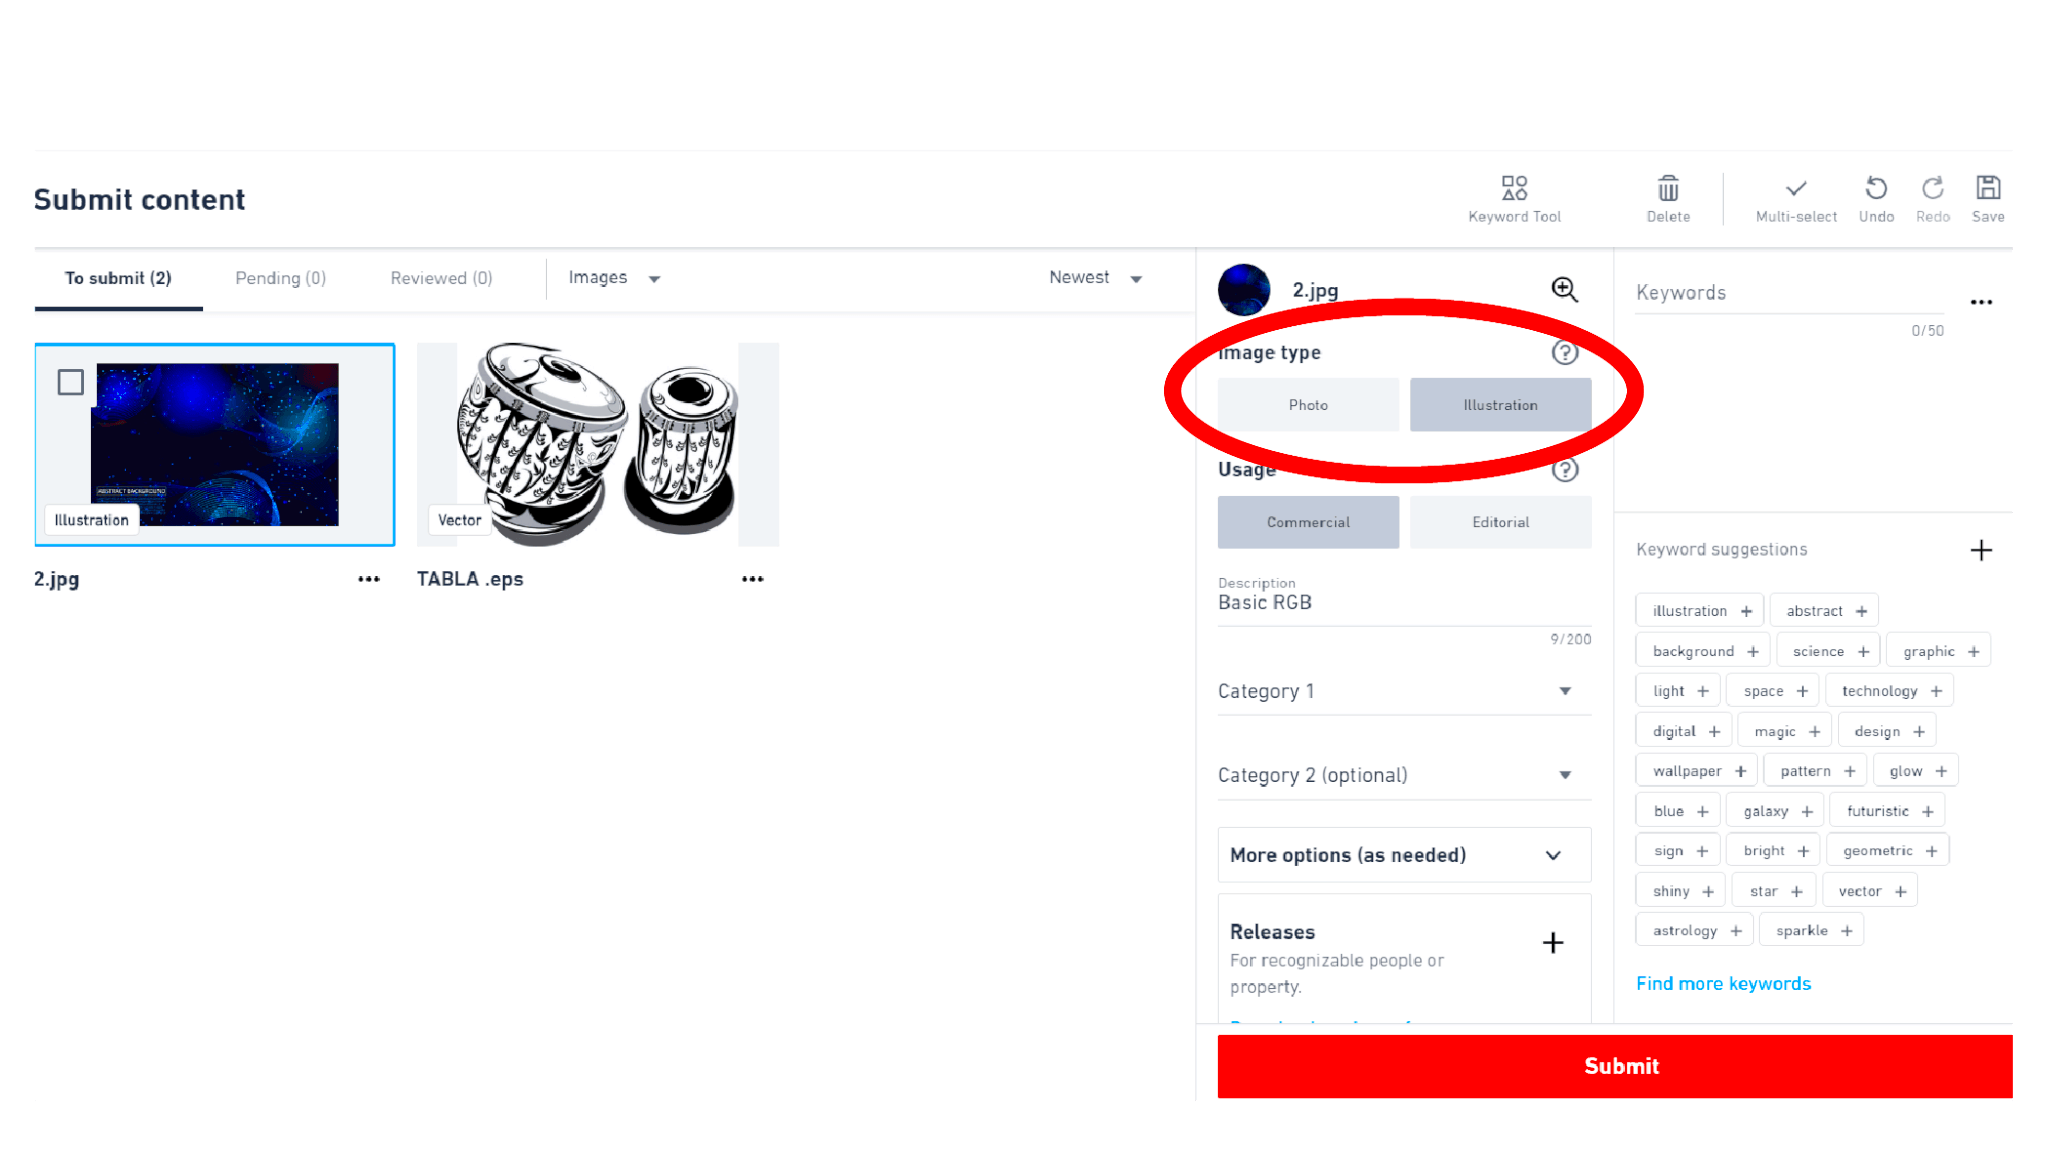
Shutterstock is an exhilarating moment that showcases your talent. I can still recall my initial submission feeling a blend of excitement and anxiety as I pressed the button. To assist you in navigating this journey here’s a guide:
- Log In to Your Account: Access your Shutterstock Contributor dashboard. You’ll find an option to upload new content.
- Choose Your Files: Select the vector files you want to upload. Ensure they are in the correct format, usually AI or EPS.
- Provide Metadata: Add titles, descriptions, and keywords. This helps buyers find your art. Use clear and descriptive terms to make your vector stand out.
- Upload and Review: After uploading, review your files to ensure everything looks right. Make any necessary adjustments before finalizing.
- Submit for Review: Once satisfied, submit your vector art for Shutterstock’s review. They will check your work for quality and compliance with their standards.
From what I've seen dedicating time to go through every file and including thorough metadata has really boosted my sales. It may appear overwhelming at first but with some practice it becomes second nature. Continuously improve your method and before you know it you'll find your artwork featured on Shutterstock!
Tagging and Categorizing Your Vector Art
Properly tagging and categorizing your vector art is crucial to ensure that your work stands out. When I first began I didn’t realize the significance of this process until I witnessed the impact it had on search results and sales. Here’s a guide on how to tag and categorize your vector art.
- Choose Relevant Tags: Tags are essential for search visibility. Think about what keywords potential buyers might use. Include both general and specific terms related to your design.
- Be Accurate: Avoid irrelevant or misleading tags. Accuracy helps buyers find exactly what they need and builds your reputation as a reliable contributor.
- Use Categories Wisely: Place your vector art in the right categories. Shutterstock provides several categories and subcategories – choose those that best describe your artwork.
- Consider Trends: Stay updated with current design trends. Tagging your art with trending keywords can help you attract more attention.
- Review and Update: Regularly review and update your tags and categories based on performance and feedback. This keeps your listings fresh and relevant.
Through my experiences, I’ve discovered that being strategic with tags and categories can really impact the visibility and sales of your vector art. It’s similar to creating an appealing storefront – the more attractive it is the more customers you draw in.
Tips for Maximizing Sales on Shutterstock
After your vector artwork goes up on Shutterstock it’s time to boost your sales. This stage is all about blending strategy with innovation. I recall when my first submissions didn’t gain much attention. It was an experience but with some adjustments and determination I began to notice improvements. Here’s what I discovered.
- Regular Uploads: Consistency is key. Keep adding new vector art to your portfolio. The more you upload, the more chances you have of being discovered. I found that regularly updating my portfolio helped keep my work fresh and engaging.
- Quality Over Quantity: Focus on creating high-quality designs rather than just uploading a lot. Ensure each piece is polished and professionally done. Quality artwork tends to attract more attention and can be priced higher.
- Understand Trends: Keep an eye on current design trends. If your art aligns with what’s popular, it’s more likely to sell. I’ve found that integrating trending themes into my designs helped me stay relevant.
- Optimize Your Metadata: Use effective keywords and descriptions. The right tags can make a significant difference in search visibility. Make sure your metadata accurately describes your artwork and includes terms buyers might use.
- Engage with the Community: Participate in Shutterstock forums and groups. Engaging with other contributors and buyers can provide valuable insights and networking opportunities.
- Promote Your Portfolio: Share your Shutterstock portfolio on social media and your personal website. The more visibility you create, the more potential buyers will see your work.
Implementing these tactics will set you on the path to establishing a thriving presence on Shutterstock. I discovered that with a careful strategy along with determination and perseverance you can transform your passion into a lucrative endeavor.
Common Mistakes to Avoid When Selling Vector Art
When I began my journey in selling art I stumbled upon a few blunders that were quite easily preventable. The lessons I've gained from these errors have proven to be priceless. Allow me to share some pitfalls and tips on how to avoid them:
- Ignoring Quality: It’s tempting to rush through uploads, but subpar quality can hurt your reputation. Ensure each vector is meticulously crafted and meets Shutterstock’s quality standards.
- Using Generic Tags: Generic tags might seem like a good idea, but they often get lost in a sea of similar content. Be specific and thoughtful with your tags to improve your searchability.
- Overlooking Licensing: Understand Shutterstock’s licensing terms and make sure your artwork complies. Avoid using copyrighted elements or violating any rules, as this could lead to rejection or legal issues.
- Neglecting Market Research: Not knowing what buyers are looking for can hinder your sales. Spend time researching popular trends and design preferences to tailor your work to market demands.
- Failing to Update: Your portfolio should evolve over time. Regularly review and refresh your work based on feedback and changing trends. Outdated or stagnant portfolios may see decreased engagement.
- Skipping Metadata Details: Inadequate or incorrect metadata can limit your artwork’s visibility. Take the time to craft detailed and accurate descriptions and tags.
Steering clear of these blunders can help you save time and enhance your achievements on Shutterstock. Keep in mind that each error is a chance to grow so embrace the journey and fine tune your strategy along the way.
FAQ
1. How long does it take for my vector art to be approved on Shutterstock?
The time it takes for approval can differ but generally Shutterstock takes a few days to review submissions. Youll get an email notification once your artwork has been reviewed and accepted or if any changes are required.
2. Can I sell the same vector art on other platforms?
Definitely, you can showcase your vector artwork across various platforms just be aware of the exclusivity agreements of each site. Shutterstock permits content so you have the freedom to promote your creations in other places too.
3. How do I get paid for my sales on Shutterstock?
Contributors to Shutterstock receive payments through bank transfer, PayPal or Skrill. To get started you must configure your payment options in your contributor account. Payments are processed on a basis after your earnings hit the minimum payout limit.
4. What file formats are accepted for vector art?
Shutterstock usually takes vector files in AI Adobe Illustrator and EPS formats. Make sure your files are suitable and correctly arranged before you upload them.
5. Can I edit my vector art after uploading it?
After your vector artwork goes online, you wont be able to make changes to the actual file. Nonetheless you can modify details such as titles, descriptions and tags to enhance its visibility and effectiveness.These frequently asked questions are here to address inquiries and enhance your journey with Shutterstock. If you require support dont hesitate to contact Shutterstock customer service for additional help.
Conclusion
Starting the journey of selling vector art on Shutterstock can be an exciting yet challenging experience. From setting up your account to mastering the nuances of uploading and tagging your creations every step presents a chance to showcase your creativity and connect with a diverse audience worldwide. I’ve discovered that perseverance, meticulousness and staying updated with trends are key factors for achieving success.As you implement these tips and techniques keep in mind that each artists journey is distinct. Continuously hone your skills draw lessons from your experiences and above all relish the joy of sharing your artwork with the world. Your commitment and enthusiasm will undoubtedly lead to success on Shutterstock.
 Vector art is a form of artwork that utilizes math to generate visuals. In contrast to raster graphics composed of pixels vectors can be resized to any dimension without compromising their clarity. This ensures that your creations appear crisp and vivid regardless of whether they are displayed on a small business card or a massive billboard.
 Crafting top notch vector artwork goes beyond simply sketching a visually appealing image. It demands meticulousness and a strong grasp of design concepts. Here are a few suggestions that I find helpful.
 Creating your Shutterstock Contributor account is the initial move in selling your vector artwork. I can still recall the thrill I experienced when I finished my registration and spotted my name added as a contributor. It’s an easy procedure yet every step holds significance to kick things off on a note.
 Sharing your artwork on Shutterstock is an exhilarating moment that showcases your talent. I can still recall my initial submission feeling a blend of excitement and anxiety as I pressed the button. To assist you in navigating this journey here’s a guide:
 admin
admin


