Google Docs is a powerful online word processor that allows users to create and edit documents collaboratively. One of the features that many people appreciate is the ability to incorporate
images directly into their documents. However, saving these
images can sometimes be tricky.
Accessing Images in Google Docs
To save
images from Google Docs, you first need to know how to access them. Here’s a simple guide to help you:
- Open your Google Docs document.
- Locate the image you want to save.
- Click on the image to select it.
Once you’ve selected the image, you’ll see a small menu above it. This menu provides quick options for manipulating the image. If you want to save the image, you have a few choices. Understanding these options will allow you to save
images effectively, whether they are your creations or sourced from the web.
Using the Download Option for Images
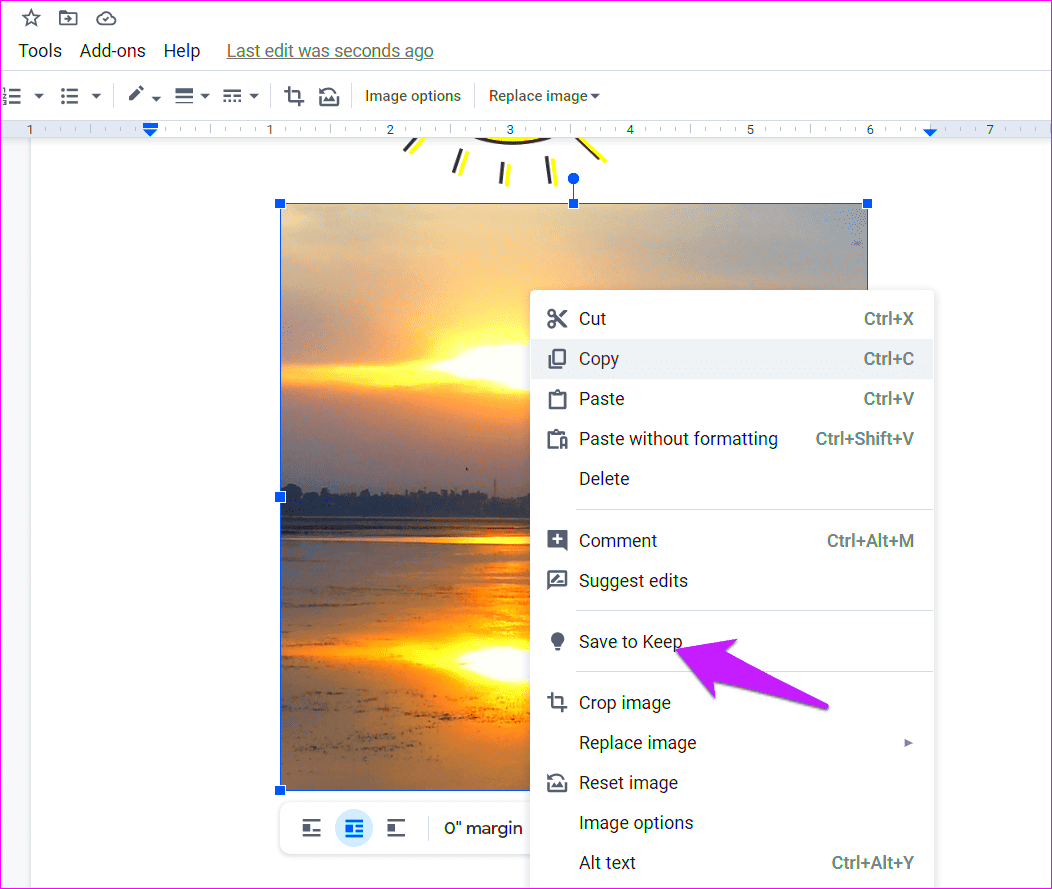
The most straightforward way to save an image from Google Docs is by using the download option. Here’s how you can do it:
- Select the image by clicking on it.
- Right-click (or control-click on a Mac) the image.
- Choose the “Save to Keep” option from the context menu. This saves the image to your Google Keep.
- Open Google Keep in a new tab, find the image, and right-click on it to download.
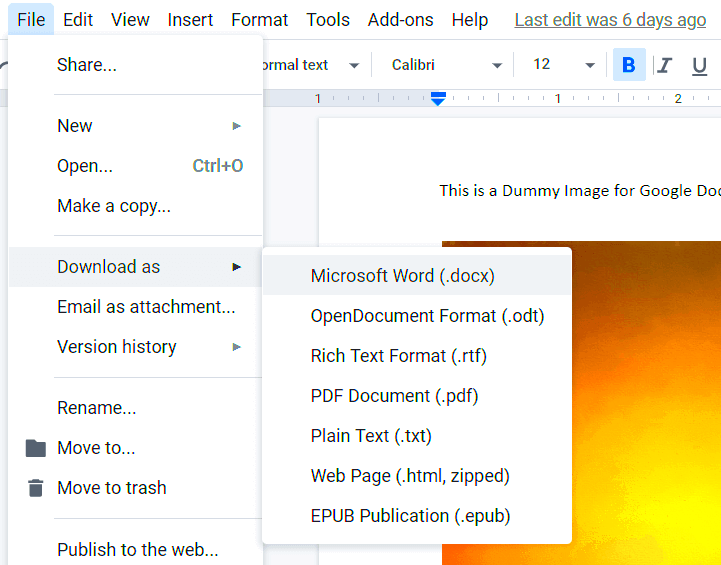
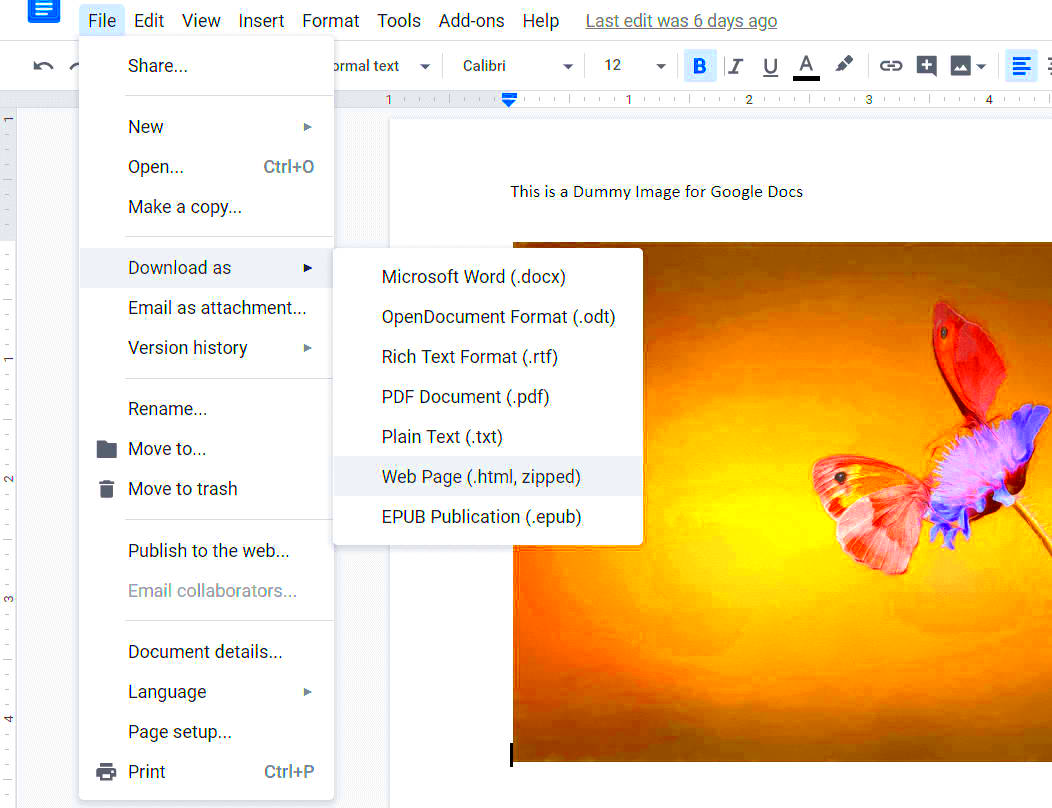
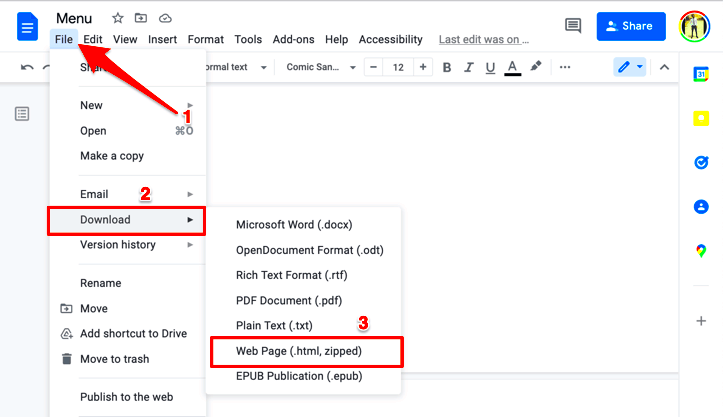
Alternatively, if you want to download the entire document as a file:
- Click on “File” in the top menu.
- Select “Download” and choose a format such as Microsoft Word or PDF.
- Open the downloaded file, and you can extract images from it.
Using these methods, you can easily save
images from Google Docs to your device. Remember, if the image is copyrighted, always ensure you have permission to use it!
Taking Screenshots as an Alternative
Sometimes, saving
images from Google Docs using traditional methods can be a hassle. That's where taking screenshots comes in handy! Screenshots allow you to capture whatever is displayed on your screen, making it a quick and effective solution. Whether you're on a Windows PC, Mac, or using a mobile device, taking a screenshot is generally straightforward. In this section, we’ll discuss how to capture
images using screenshots and some tips to ensure you get the best quality possible.Here’s a quick guide on how to take screenshots based on your device:
- Windows: Press the
PrtScn button to capture the entire screen. You can also use Alt + PrtScn to capture just the active window. The image can then be pasted into an image editing program. - Mac: Press
Command + Shift + 4 and drag your cursor to select the area you want to capture. The screenshot will automatically save to your desktop. - Mobile Devices: Most smartphones allow you to take a screenshot by pressing the
Power + Volume Down buttons simultaneously. Check your device manual for specific instructions.
After capturing your screenshot, you can crop and edit the image as needed. This method is particularly useful if you want to save multiple images quickly or capture a unique layout. Just remember that screenshots might not provide the highest quality, especially for large images or documents!
Saving Images to Your Device
Once you've accessed or created an image in Google Docs, saving it directly to your device is a crucial step. Whether you're using a PC, Mac, or mobile device, understanding how to save images properly ensures you can find and use them later. In this section, we’ll break down the steps for saving images across different platforms.
For Desktop Users
If you are using Google Docs on a desktop, here’s how to save images:
- Click on the image to select it.
- Right-click on the image and choose the option that says "Save image as..." or "Download image".
- Choose the destination folder on your device and click "Save".
For Mobile Users
For those accessing Google Docs on mobile, the process is slightly different:
- Tap and hold the image until a menu appears.
- Select "Download image" or "Save to device".
- The image will save to your phone’s gallery or downloads folder.
Regardless of the platform, keeping your images organized is essential. Create folders on your device to store images by project or category, making them easy to locate when you need them!
Using Google Drive for Image Management
Google Drive is an excellent tool for managing your images and other files. By saving images from Google Docs directly to your Google Drive, you can keep everything organized and easily accessible. In this section, we’ll explore how to save images to Google Drive and the benefits of using this platform.
Saving Images to Google Drive
Here’s a simple way to save images directly to your Google Drive:
- Select the image in Google Docs.
- Right-click on the image and choose "Save to Keep". This will save the image to Google Keep.
- Open Google Keep, find the image, and click on the three dots in the top right corner.
- Select "Send to Drive" to save the image to your Google Drive.
Benefits of Using Google Drive
Using Google Drive for image management has several advantages:
- Accessibility: You can access your images from any device with internet access.
- Collaboration: Easily share images with colleagues or friends without the hassle of email attachments.
- Organization: Create folders to keep your images sorted by topic or project.
- Backup: Your images are stored securely online, reducing the risk of losing them.
With these simple steps and tips, managing your images in Google Drive can streamline your workflow and keep your projects organized.
FAQ About Saving Images From Google Docs
When it comes to saving images from Google Docs, many users have questions. Here, we’ll address some common queries to help you navigate the process with ease.
What formats can I save images in?
Google Docs doesn’t allow you to directly choose a file format for images when saving. However, when you download the entire document, you can choose formats like PDF or Microsoft Word. For images, they typically save as PNG or JPG formats when using screenshots or saving through Google Keep.
Can I save images from Google Docs on my phone?
Yes, you can save images from Google Docs on your mobile device. Simply tap and hold the image until a menu appears, then select the option to download or save to your device.
What if I can’t save an image?
If you're unable to save an image, it may be due to copyright restrictions or the image being embedded in a way that prevents saving. In such cases, consider using screenshots as an alternative method.
Are there limitations to the images I can use in Google Docs?
Yes, be mindful of copyright. Always ensure you have permission to use images from the web or other sources. Using images labeled for reuse or your own images is best.
Can I edit images in Google Docs before saving?
Google Docs allows some basic editing of images, like resizing or cropping. You can make these adjustments before saving to ensure the image fits your needs.
How do I organize images saved on Google Drive?
Organizing images in Google Drive is simple. You can create folders for different projects or topics and easily move images into these folders for better management.
Conclusion on Saving Images Easily
Saving images from Google Docs doesn’t have to be a complicated task. With various methods available—like using the download option, taking screenshots, and managing images through Google Drive—you can effectively capture and organize your images. By following the tips and techniques outlined in this guide, you can streamline your workflow and ensure you have access to all the images you need for your projects.
 To save images from Google Docs, you first need to know how to access them. Here’s a simple guide to help you:
 The most straightforward way to save an image from Google Docs is by using the download option. Here’s how you can do it:
 Sometimes, saving images from Google Docs using traditional methods can be a hassle. That's where taking screenshots comes in handy! Screenshots allow you to capture whatever is displayed on your screen, making it a quick and effective solution. Whether you're on a Windows PC, Mac, or using a mobile device, taking a screenshot is generally straightforward. In this section, we’ll discuss how to capture images using screenshots and some tips to ensure you get the best quality possible.Here’s a quick guide on how to take screenshots based on your device:
 Once you've accessed or created an image in Google Docs, saving it directly to your device is a crucial step. Whether you're using a PC, Mac, or mobile device, understanding how to save images properly ensures you can find and use them later. In this section, we’ll break down the steps for saving images across different platforms.
 admin
admin


