Cricut Design Space is a popular platform for designing custom projects with your Cricut cutting machine. Whether you're creating greeting cards, custom T-shirts, or vinyl decals, you'll often need to save the images you work on. Saving images from Cricut Design Space allows you to access your creations later, share them, or use them in other projects. Understanding how to save your images correctly is important for getting the most out of your Cricut machine and ensuring your designs are preserved properly.
Why You Might Want to Save an Image from Cricut Design Space

Saving your images from Cricut Design Space offers a range of benefits, making it a key part of your creative process. Here are a few reasons why saving your designs can be useful:
- Access Later: You can come back to your saved designs whenever you need them without having to recreate them from scratch.
- Sharing with Others: Saved images can easily be shared with friends, family, or on social media.
- Use in Other Projects: Once saved, images can be imported into new projects, saving you time on future designs.
- Backup for Protection: Saving ensures that you don’t lose your work due to technical issues or accidental deletions.
- Working Offline: You can save images to your device, giving you the ability to work without needing an internet connection.
All these reasons make saving images an essential part of your Cricut workflow, ensuring your hard work is always available and secure.
Steps to Save an Image from Cricut Design Space

Saving an image in Cricut Design Space is a simple process. Whether you want to save a design for later use or share it with someone else, these steps will guide you through the process:
- Finish Your Design: Make sure you are happy with your design and have finished any edits.
- Click on the File Menu: In the top left corner of the screen, click the "File" menu.
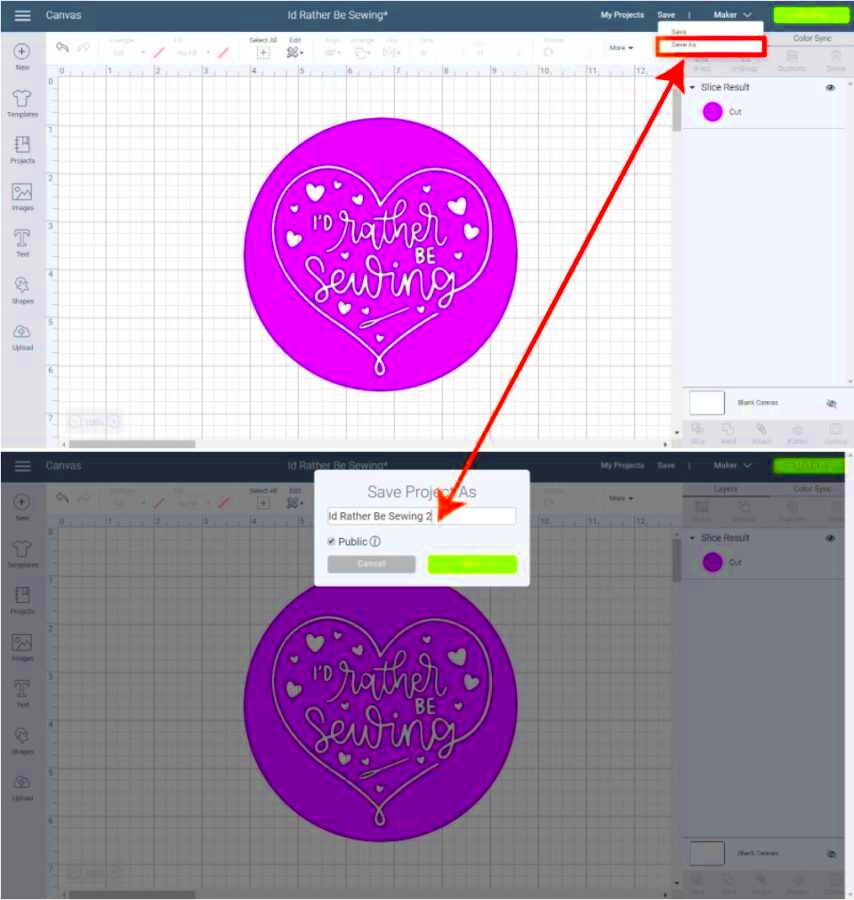
- Select Save As: From the dropdown menu, click "Save As" to choose the location where you want to store the image.
- Choose the File Format: Cricut Design Space allows you to save your image in various formats, such as SVG, PNG, or JPG. Select the format that works best for your needs. SVG is ideal for cutting files, while PNG or JPG is great for images you want to use elsewhere.
- Name Your File: Give your file a recognizable name so you can easily find it later.
- Click Save: Once you’ve selected the format and name, click the "Save" button to complete the process. Your image will be saved to your chosen location.
By following these easy steps, you’ll have your Cricut Design Space images saved and ready for future use. Whether you’re creating custom items for yourself or starting a new project, knowing how to save images efficiently is key to smooth workflow.
Understanding Different File Formats for Saving Images

When saving images from Cricut Design Space, you’ll encounter several file formats to choose from. Each format serves a different purpose, so understanding which one to use can help you get the most out of your saved images. Here’s a breakdown of the most common file formats and their uses:
| File Format | Use Case |
|---|---|
| SVG (Scalable Vector Graphics) | Best for cutting projects, as it preserves the design’s paths and shapes, ensuring precision when cutting with your Cricut machine. |
| PNG (Portable Network Graphics) | Ideal for images that require transparency. If you’re creating layered designs, PNG is the way to go. |
| JPG (JPEG) | Great for saving images with many colors and gradients. However, JPGs don’t support transparency and may lose some quality when resized. |
| DXF (Drawing Exchange Format) | Used for designs that need to be imported into other software for cutting or engraving. |
Choosing the right file format ensures that your design will appear exactly as intended in future projects. For cutting files, SVG is the most commonly used format. For simple image use or designs with transparent backgrounds, PNG works best. JPG is suitable for basic images, but be aware of its limitations. Consider your project needs and choose accordingly!
How to Save Your Image to Your Computer
Saving your image directly to your computer is one of the most common ways to preserve your Cricut Design Space creations. Whether you're working on a design you want to use later or need to store it for offline use, follow these steps to save your image to your computer:
- Finish Your Design: Ensure that your design is ready and finalized before saving. Make any last-minute adjustments to the layout or size.
- Click on File: In the top left corner of Cricut Design Space, click on the “File” option.
- Select Save As: From the dropdown menu, choose “Save As” to begin the process of saving your image.
- Choose Your File Format: Pick the format that works best for your needs (SVG, PNG, JPG, etc.). If you’re unsure, SVG is a safe bet for cutting designs.
- Name Your Image: Give your image a memorable name that will make it easy to find later.
- Select Your Save Location: Choose a folder or location on your computer where you want the image to be stored. This helps keep your files organized.
- Click Save: Once you’ve selected everything, click “Save,” and your image will be saved to your computer.
By following these steps, you’ll have a copy of your Cricut Design Space image saved to your computer for easy access and future use. Make sure to back up important designs regularly to avoid losing your work!
Saving Images to Cloud Storage from Cricut Design Space
Cloud storage is a convenient way to store your Cricut Design Space images, especially if you want to access them across multiple devices or back them up securely. Whether you use Google Drive, Dropbox, or another cloud service, saving images to the cloud is simple. Here’s how you can do it:
- Finish Your Design: Make sure your design is finalized before attempting to save it.
- Click on File: Open the "File" menu in the top left corner of the Cricut Design Space window.
- Select Save As: From the dropdown, click on “Save As” to start the process of saving your design.
- Choose the File Format: Pick the format you want to save (SVG, PNG, etc.). If you’re unsure, SVG is often the best choice for Cricut projects.
- Choose Cloud Storage: When prompted to select a save location, choose your preferred cloud storage option (Google Drive, Dropbox, etc.). You may need to connect your Cricut Design Space account to the cloud service for the first time.
- Save the File: Once everything is set, click the “Save” button. Your image will now be stored securely in the cloud and accessible from any device linked to your cloud account.
Cloud storage provides an easy way to back up your Cricut images and make sure you can access them from anywhere. This is especially useful for people who work on multiple devices or want to ensure their designs are safe in case of a computer issue.
Common Issues When Saving Images and How to Solve Them
When saving images from Cricut Design Space, you may encounter a few common issues that can disrupt your workflow. Thankfully, most of these problems are easy to fix with just a few simple steps. Here are some typical problems and how to solve them:
- File Not Saving: If your image isn’t saving, make sure that your internet connection is stable (for cloud saving). Also, check that you’ve selected the correct file format. If the issue persists, try restarting Cricut Design Space or your browser.
- File Format Issues: Sometimes Cricut Design Space might save your image in an unsupported format. Always double-check the file format before saving, especially if you’re working on a cutting project. SVG is the most commonly used format for Cricut designs.
- Saving to Wrong Location: If your image doesn’t show up where you expect, make sure you’ve selected the correct save location. Double-check your computer or cloud storage folders to ensure you’re looking in the right place.
- Image Quality Lost: If your saved image appears blurry or pixelated, it could be due to selecting a lower-quality file format, like JPG, instead of PNG or SVG. For high-quality images, choose PNG or SVG, which preserve the image’s integrity better.
- Design Not Showing Properly After Saving: Sometimes, images saved in Cricut Design Space might not display correctly in other software or when uploaded again. To avoid this, ensure you are saving the file with the right specifications (e.g., SVG for cutting, PNG for layered images with transparency).
By addressing these issues early, you can avoid unnecessary frustration and keep your Cricut projects running smoothly. Regularly saving and organizing your images also helps prevent problems down the road.
Frequently Asked Questions
If you have questions about saving images from Cricut Design Space, you’re not alone! Here are some of the most frequently asked questions (FAQs) to help clarify common concerns:
- Can I save a Cricut Design Space image to my phone? Yes! You can save images to your mobile device just like you would on a computer. However, make sure your mobile app is up to date to avoid compatibility issues.
- How can I save an image in SVG format? To save an image as an SVG, go to the “Save As” option in Cricut Design Space and choose SVG from the file type options. This format is perfect for cutting projects.
- Why isn’t my image saving in the format I selected? This issue can occur if there’s a bug or if Cricut Design Space is experiencing server issues. Try closing the program and reopening it, or clear your browser’s cache.
- Can I save multiple images at once? Cricut Design Space doesn’t allow batch saving, but you can save multiple images one at a time by following the steps for each design. Consider organizing your files into folders for easy access.
- What should I do if my design looks blurry after saving? This often happens when saving in JPG format. Try saving in PNG or SVG for higher quality. Avoid resizing your image after saving to preserve its quality.
If you have other questions, don’t hesitate to check Cricut’s support page or join community forums where Cricut users share tips and tricks.
Conclusion and Final Thoughts
Saving images from Cricut Design Space is an essential skill for any Cricut user. Whether you're working on a personal project, saving designs for later use, or sharing your creations with others, understanding how to save your images properly will streamline your workflow and ensure you don’t lose your hard work. By following the steps outlined in this guide, you can save images efficiently, avoid common pitfalls, and select the right file formats for your needs.
Remember to always check your internet connection, choose the correct file format, and save your images in an organized manner. Whether you're saving to your computer or cloud storage, regular backups are always a good practice to avoid potential issues. By taking these steps, you can enjoy a smoother Cricut experience and focus on creating beautiful projects!

 admin
admin


