Resizing images is a common task when working with photos, graphics, or illustrations. Whether you're preparing an image for social media, a website, or simply adjusting it for your personal use, Paint offers a quick and easy way to make those changes. Paint is a basic but handy tool on Windows that allows you to resize images without needing advanced software. In this guide, we'll walk you through how to resize an image using Paint, keeping things simple and straightforward so you can get the job done with ease.
Why You Might Need to Resize an Image

There are many reasons why you might want to resize an image. Some of the most common include:
- Changing image dimensions for social media: Different platforms require specific image sizes, so resizing can help your image fit properly without getting cropped.
- Optimizing file size: Large image files can take up too much storage or take too long to load on websites. Resizing can help reduce file size while maintaining acceptable quality.
- Fitting images to a design or layout: When designing graphics, resizing allows you to fit an image within a specific area or format without distorting it.
- Printing purposes: If you're printing an image, it might need to be resized to fit the dimensions of a page or to adjust the resolution for better print quality.
No matter the reason, resizing images with Paint is simple, and you don't need to be a professional graphic designer to do it successfully.
Also Read This: Google Photos vs Flickr – Learn How to Choose Between Google Photos and Flickr with This Powerful Method
How to Open an Image in Paint

Opening an image in Paint is straightforward. Follow these steps:
- Click on the Start Menu: Click on the Windows icon at the bottom-left corner of your screen.
- Search for Paint: Type "Paint" in the search bar and press Enter. Paint should appear in the search results.
- Open Paint: Click on the Paint app to open it.
- Load your image: Once Paint is open, go to the "File" menu at the top-left corner and select "Open." Browse to the location of your image and click "Open" to load it into Paint.
Now, your image is ready for resizing! You can see it displayed in the Paint window and start editing right away.
Also Read This: How Long Are YouTube Shorts in 2024
Steps to Resize Your Image in Paint
Resizing an image in Paint is easy and doesn't require any technical skills. Once you've opened your image in Paint, follow these simple steps:
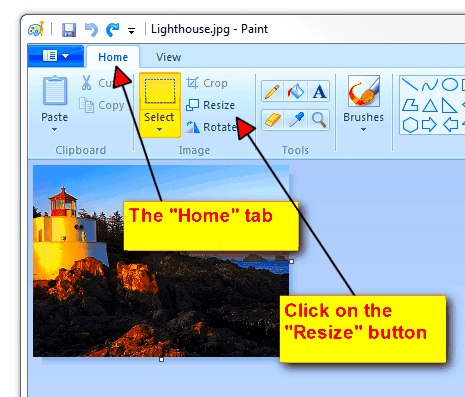
- Click on the Resize button: At the top of the Paint window, find and click the "Resize" button. It's located in the toolbar, under the "Home" tab.
- Choose the resizing option: You will see two options to resize your image: "Percentage" and "Pixels." Select the one that best suits your needs. If you're unsure, "Percentage" might be simpler for small adjustments.
- Adjust the values:
- Percentage: You can enter a percentage (like 50% for half the size) for both the horizontal and vertical axes. Make sure the "Maintain aspect ratio" box is checked if you want to keep the image's proportions the same.
- Pixels: If you need a specific size in pixels, choose "Pixels" and enter the exact number of horizontal and vertical pixels. Again, check "Maintain aspect ratio" to avoid distorting the image.
- Preview your changes: After entering your values, you’ll see a preview of the resized image. If you're happy with the size, click "OK." If not, adjust the numbers again until you get it right.
- Save your image: Once you're satisfied with the size, go to "File" > "Save" to keep your changes. If you want to save the resized image as a new file, select "Save as" and choose your file type (e.g., JPEG, PNG).
Also Read This: How to Block YouTube on Safari for Improved Productivity and Focus
Adjusting Image Size Using Percentage or Pixels
When resizing images in Paint, you can choose to adjust the size either by percentage or pixels. Each method has its own use case:
| Method | Best For | How It Works |
|---|---|---|
| Percentage | General resizing | This method allows you to shrink or enlarge an image by a percentage of its original size. For example, reducing it to 50% will make the image half its original size. |
| Pixels | Precise size adjustment | Use this method when you need to resize an image to exact pixel dimensions. For example, if you need an image to be 800 x 600 pixels, you can enter these values directly. |
Tip: When resizing by percentage, the aspect ratio (the relationship between width and height) is automatically maintained unless you uncheck the "Maintain aspect ratio" box. For precise pixel sizes, make sure to enter both horizontal and vertical pixel values for the best result.
Also Read This: how to resize image gmp
Maintaining Image Quality When Resizing
One common issue when resizing images is losing quality. Fortunately, there are ways to minimize the impact of resizing on your image's clarity and detail:
- Always use the "Maintain aspect ratio" option: This helps keep the proportions of your image intact, preventing it from getting stretched or squished.
- Avoid enlarging too much: When you enlarge an image beyond its original size, it can lose sharpness and become pixelated. It's best to only reduce image size rather than enlarge it drastically.
- Save in the correct file format: If you’re resizing for the web or social media, saving your image in formats like JPEG or PNG can help maintain quality while keeping file sizes small. Use PNG for images that require transparency or high detail.
- Don’t overdo compression: When saving your resized image, avoid using too much compression (especially with JPEGs), as it can lead to a loss of detail and introduce visible artifacts.
By following these simple tips, you can ensure that your resized images maintain their quality and look just as good as the original. Always remember that smaller images generally preserve quality better than enlarged ones, especially if the original image is low resolution.
Also Read This: Mastering Image Rounding in Google Slides
Saving the Resized Image in Paint
After you've resized your image in Paint, the next step is saving your work. Whether you want to overwrite the original file or save a new version, the process is quick and simple. Here's how to save your resized image:
- Click on "File": At the top-left corner of the Paint window, click the "File" menu to open the options.
- Choose "Save" or "Save as":
- "Save": If you’re happy with the resized image and want to overwrite the original file, just click "Save." This will replace the original image with your resized version.
- "Save as": If you want to keep both the original and resized versions, select "Save as" and choose a different file name or location. You can also change the file format (e.g., from BMP to PNG or JPEG) in the "Save as type" dropdown.
- Pick your file type: When using "Save as," you'll be asked to choose a file format. Depending on your needs, you can choose from various options such as PNG, JPEG, or BMP.
- PNG: Best for high-quality images and those that need transparency.
- JPEG: Ideal for photos and images where file size matters more than absolute quality.
- BMP: Standard uncompressed format, but file sizes can be large.
- Click "Save": Once you've selected the file format and location, click "Save" to store your resized image. You can now use it wherever you need!
That’s all! Saving your resized image in Paint is quick, and you have full control over how and where it gets stored. Whether for web use, printing, or sharing, your resized image is now ready to go.
Also Read This: Discover How to Use Transparent Vector Files from Shutterstock
FAQ
1. Can I resize an image in Paint without losing quality?
Yes, you can resize an image in Paint without losing too much quality, but be cautious when enlarging the image. Enlarging an image beyond its original size may result in pixelation. For the best results, avoid enlarging an image too much.
2. What file formats can I save my resized image in?
You can save your resized image in several formats, including PNG, JPEG, BMP, and GIF. Each format has its strengths, so choose based on your needs. PNG is great for quality and transparency, while JPEG is better for web use due to smaller file sizes.
3. How can I resize an image to specific pixel dimensions?
In Paint, go to the "Resize" option, select "Pixels," and then enter the specific width and height in pixels. Be sure to check the "Maintain aspect ratio" box if you want the proportions to stay the same.
4. Is there a way to keep my image sharp after resizing?
When resizing images, avoid enlarging them too much to prevent blurriness. For best results, reduce the size rather than increase it. If you need to resize for a specific dimension, use the "Pixels" option and avoid significant scaling.
5. Can I undo changes in Paint after resizing?
Yes! If you're not happy with the resizing, simply click the "Undo" button (or press Ctrl + Z) to revert back to the original image. This way, you can try different resizing options without worrying about mistakes.
Conclusion
Resizing images in Paint is a quick and easy process that can help you adjust images for various uses, from social media posts to professional presentations. By following the simple steps outlined above, you can resize your images without losing quality. Just remember to save your work in the correct file format and keep an eye on the size and proportions to maintain the best image quality possible.
Paint may not have the advanced features of other image editing software, but it’s a great tool for basic tasks like resizing. Whether you’re resizing an image for a website, email, or print, Paint gets the job done efficiently. With a little practice, you'll be resizing images like a pro in no time!

 admin
admin


