Resizing is crucial when it comes to sharing
images online or using them in projects. It helps manage the file size, ensuring your
images load quickly and look great. Whether you're uploading to a website or sending photos to friends, the right size makes all the difference. Let’s have a look at why resizing matter.
- Improved Load Times: Smaller images load faster, which is essential for web pages. Users are more likely to stay on a site that doesn’t keep them waiting.
- Better Fit: Images that are too large may not fit well on a webpage or in a document. Resizing helps maintain the layout.
- Quality Control: Properly resized images retain their quality and clarity, which is important for professional presentations.
- Reduced Storage Space: Smaller images take up less space on your device or cloud storage, helping you manage your files better.
Getting Started with Paint for Resizing Images

MS Paint is a handy application present in many computers. It is simple in design yet effective for minimal image alterations like resized pictures. You can start by following these steps:
- Open Paint: Click on the Start menu, type "Paint," and open the application.
- Import Your Image: Click on "File," then "Open," and select the image you want to resize.
- Familiarize Yourself with the Interface: Take a moment to look around. The toolbar has all the essential tools you'll need.
Let’s shift to the actual resizing process now that you have figured out how to open Paint.
Steps to Resize Images in Paint

The steps to resize an image in Paint are very easy. To be specific, do the following:
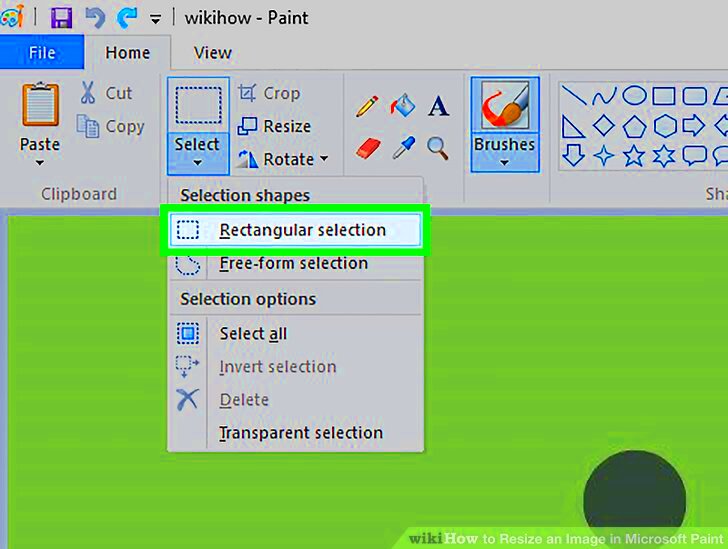
- Select the Image: Click on the image to ensure it's active.
- Open the Resize Menu: Go to the "Home" tab in the toolbar and find the "Resize" button.
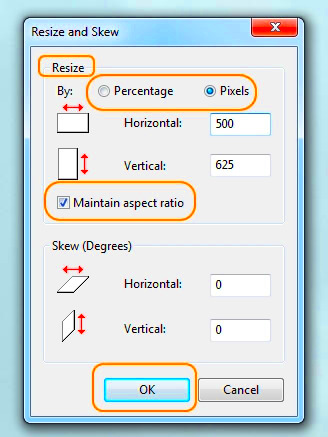
- Choose Resize Options: You can resize by percentage or pixels. If you want the image to be smaller, select a percentage less than 100 or input the desired pixel dimensions.
- Maintain Aspect Ratio: To keep the image from looking stretched, ensure the “Maintain aspect ratio” box is checked. This keeps the width and height in balance.
- Preview and Apply: Click "OK" to apply the changes. If it looks good, proceed to save it!
If you desire to meet your needs by adjusting the size of your image, then it is simple with Paint following these steps.
Common Issues When Resizing Images
There are a few common problems that you may face while resizing
images in Paint, even though it is typically an easy task. A good understanding of these problems can help you resolve them more effectively. Such issues include the following:
- Loss of Quality: If you resize an image too much, especially when enlarging it, you may notice it becomes pixelated or blurry. This happens when the software has to stretch the pixels beyond their original resolution.
- Aspect Ratio Distortion: Forgetting to check the "Maintain aspect ratio" box can lead to stretched or squished images. This distortion can make your photos look unprofessional.
- Saving in the Wrong Format: Saving an image in an inappropriate format can lead to a loss of quality or functionality. For instance, using JPEG for images with text can cause blurriness.
- Image Not Opening: Sometimes, you might find that your image won’t open properly after resizing. This can occur if the file was corrupted during the save process.
- Difficulty Finding Your File: If you don’t organize your saved images, it can be tough to locate them later. Always remember where you saved your resized files.
Time and frustration can be saved by knowing about the frequent problems. In Paint, you have to take the necessary measures for desirable resizing.
FAQs About Resizing Images in Paint
In Paint, it is common to have queries when resizing pictures respectively. There are several frequently asked questions which may help in clearing your confusion;
- Can I resize multiple images at once?
- No, Paint does not support batch resizing. You will need to resize each image individually.
- What is the best format to save resized images?
- JPEG is usually best for photos, while PNG is better for graphics or images with transparency.
- Will resizing change the file size?
- Yes, resizing can significantly reduce the file size, especially if you’re reducing the dimensions of the image.
- Is there a way to revert to the original image?
- If you haven't saved the changes, you can simply close the image without saving. Otherwise, you'll need to start with the original file.
- How do I know the optimal size for web images?
- Generally, aim for a width of 1200-2000 pixels for good quality, depending on your website's requirements.
The following commonly asked questions about resizing pictures in Paint should assist in addressing some worries. For any further inquiries, please don’t hesitate to delve deeper!
Conclusion on Resizing Images Effectively
Resizing
images accurately remains a vital ability, given the current digital landscape. You can quickly change your photographs using applications such as Microsoft Paint depending upon different requirements while ensuring that they do not lose their original quality. It is important to:
- Start with high-quality images for the best results.
- Choose the right resizing method, whether by percentage or pixels.
- Keep an eye on the aspect ratio to maintain image proportions.
- Save your images in the appropriate format to suit your purpose.
- Troubleshoot common issues to avoid frustration.
If you adhere to these principles, you will be confident of having your resized photos not only in the correct dimensions but they will also appear awesome. Enjoy your photo manipulation!
 MS Paint is a handy application present in many computers. It is simple in design yet effective for minimal image alterations like resized pictures. You can start by following these steps:
 The steps to resize an image in Paint are very easy. To be specific, do the following:
 admin
admin


