Resizing images is a simple yet essential skill, and Microsoft Paint is one of the easiest tools to do it. Whether you're looking to reduce the file size for uploading or adjust the image to fit specific dimensions, Paint offers an easy-to-use solution. In this guide, we will show you how to resize your images using Paint and explain why you might need to resize images in the first place. Let’s dive into the simple steps and explore some helpful tips along the way!
Why You May Need to Resize an Image

There are several reasons why resizing images might be necessary. Here are a few common situations where resizing can be useful:
- File size reduction: If you need to upload an image to a website or email, you might be restricted by file size limits. Resizing reduces the file size while maintaining the image's essential details.
- Fitting images to a specific space: When adding images to a document, website, or project, resizing ensures that the image fits neatly without distorting or overlapping other content.
- Improving performance: Large images can slow down the loading time of websites. Resizing them can speed up page loading and improve user experience.
- Better sharing and compatibility: Some social media platforms and printing services have specific image size requirements. Resizing ensures your image meets these specifications.
In short, resizing is a quick and easy way to make your images more versatile and accessible across various platforms and projects.
Also Read This: How to Check the Dimensions of an Image for Optimal Print or Web Display
Steps to Open and Prepare Your Image in Paint

Before resizing an image in Paint, you need to open it first. Here’s how you can do it:
- Open Paint: Click the Start menu, type "Paint," and open the app.
- Load Your Image: Once Paint is open, click on "File" in the top left corner, select "Open," and browse to the location of the image you want to resize. Double-click the image to open it in Paint.
Now that your image is open, it’s ready for resizing. You can zoom in or out as needed to see the image more clearly while you work.
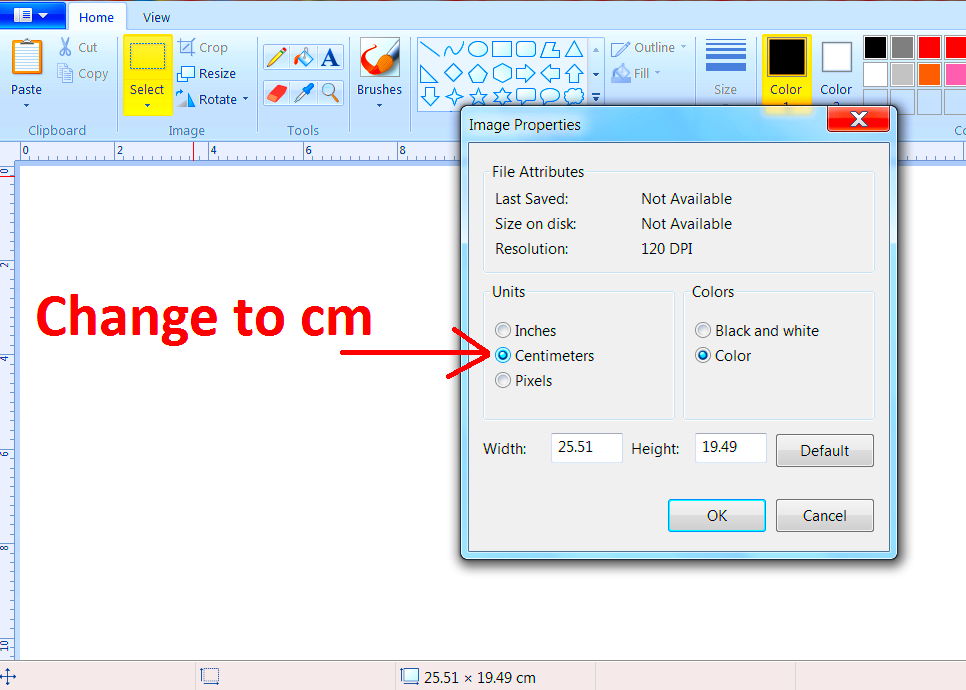
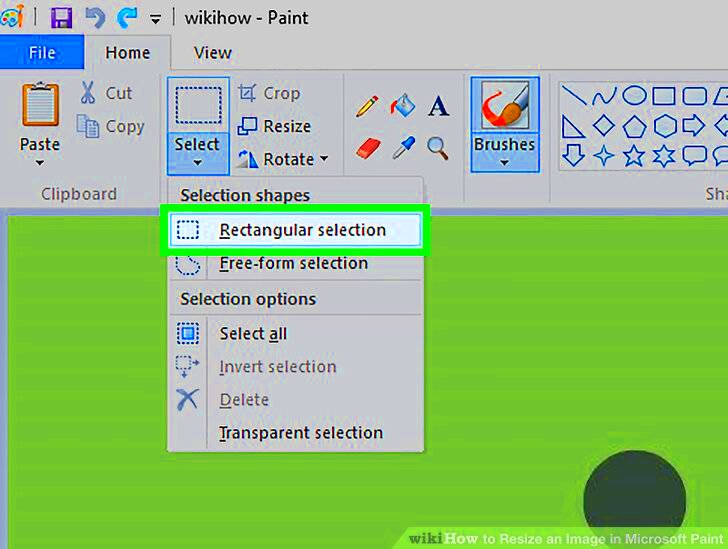
If you want to crop the image before resizing, you can use the "Select" tool to choose the area you want to keep. After selecting the area, click "Crop" to remove the unwanted portions.
Once your image is prepared, you are all set to begin resizing it using the next steps in this guide!
Also Read This: Capturing Audio from YouTube Videos: A Simple Guide
How to Resize an Image Using the Resize Tool

Resizing an image in Paint is straightforward once you know where to find the tools. Follow these simple steps to resize your image:
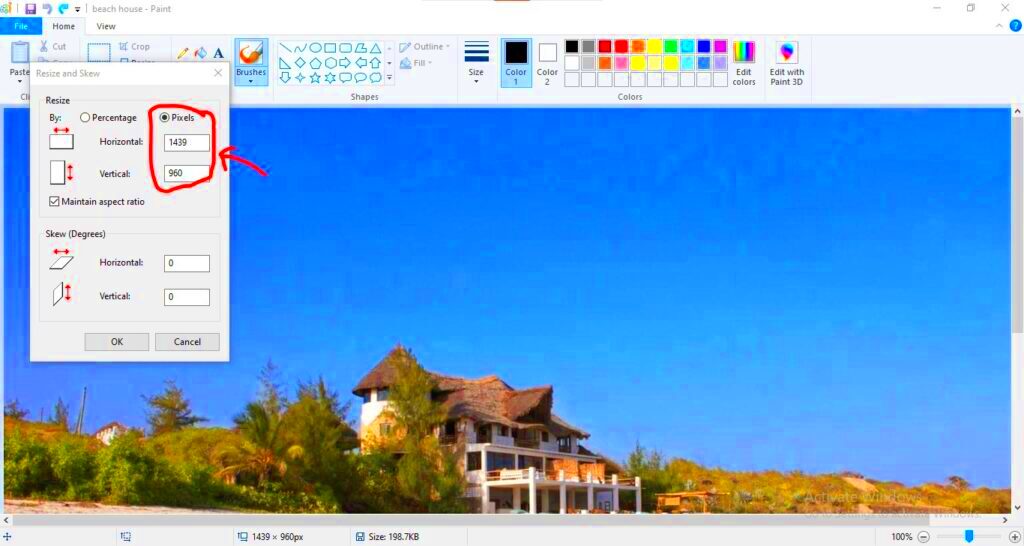
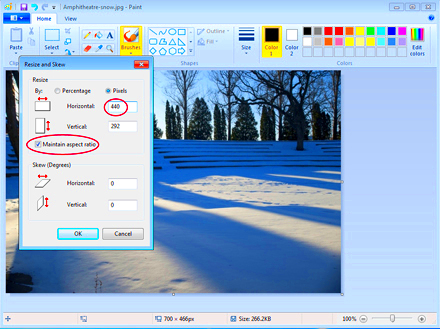
- Select the Resize Tool: In the Paint toolbar, find and click on the "Resize" button located in the Home tab. This opens the Resize and Skew window.
- Choose to Resize by Percentage or Pixels: You’ll see two options: "Percentage" and "Pixels."
- Percentage: Resize by a percentage of the original size. For example, 50% will shrink the image to half its original size.
- Pixels: Resize by specifying the exact width and height in pixels. This is ideal for setting a specific dimension.
- Adjust Width and Height: If you’re resizing by percentage, adjust the horizontal and vertical percentages. If you’re using pixels, input the desired width and height. Be sure to check the "Maintain aspect ratio" box if you want to keep the image’s proportions intact.
- Click OK: Once you’ve set the desired size, click "OK" to apply the changes. Your image will now be resized according to your specifications.
That’s all there is to it! With just a few clicks, you can resize your image to fit your needs.
Also Read This: Download the Best ShareChat Status Videos with This Method
Maintaining Image Quality While Resizing
While resizing an image, it’s important to maintain its quality as much as possible. Resizing can cause the image to lose sharpness or become pixelated, especially if you enlarge it too much. Here are some tips to help you maintain quality:
- Resize Gradually: If you need to increase the size of an image, do so gradually. Enlarging the image in small steps helps prevent significant loss of quality.
- Avoid Over-Enlarging: Enlarging an image too much can make it blurry. If you need a larger image, it’s better to find a higher-resolution version instead of enlarging a smaller one.
- Use "Maintain Aspect Ratio": Keeping the aspect ratio locked ensures that the image doesn’t stretch or distort. This helps preserve the original proportions, which keeps the image looking natural.
- Sharpen After Resizing: If the image looks a bit blurry after resizing, try using Paint's "Sharpness" tool under the "Adjust" section to enhance its clarity.
By following these tips, you can resize your images while maintaining their quality as much as possible, giving you great results every time.
Also Read This: How to Create Professional Proposals with 123RF
Common Issues When Resizing Images in Paint
While Paint is a great tool for basic image resizing, there are some common issues that users may encounter. Here are a few challenges you might face and how to deal with them:
- Pixelation: When you resize an image too much, especially when enlarging, you may notice the image becoming pixelated or blurry. This happens because Paint cannot add new details when enlarging, resulting in a lower-quality image. To avoid pixelation, try to resize gradually or use a higher resolution image.
- Distortion: If you don’t maintain the aspect ratio when resizing, the image may become stretched or compressed. To fix this, always check the "Maintain aspect ratio" box when resizing to ensure the proportions stay intact.
- File Size Issues: Sometimes, resizing an image doesn’t reduce its file size as much as expected. This can happen if the image contains a lot of detail or high resolution. To reduce file size further, you can try compressing the image using an online tool after resizing it in Paint.
- Unable to Resize Larger than Original: If you're trying to enlarge an image beyond its original size, it might become blurry. Paint doesn’t add new detail when enlarging, which can cause quality loss. The best approach is to use a higher resolution image to avoid this problem.
Understanding these issues and knowing how to troubleshoot them can help you get the best results when resizing images in Paint. Just remember, resizing works best for small adjustments and maintaining the original quality as much as possible.
Also Read This: Enhance the Size and Visibility of Your Vimeo Video on Behance
Alternatives to Paint for Resizing Images
While Paint is a convenient tool for basic image resizing, there are several alternatives that offer more advanced features or a smoother experience. Whether you need additional tools for editing or better image quality during resizing, here are some options you can consider:
- Adobe Photoshop: Photoshop is the industry standard for image editing and resizing. It offers a high level of control over the resizing process, allowing you to maintain image quality with advanced options like resampling. It’s perfect for professionals, but it does require a subscription.
- GIMP: GIMP is a free, open-source alternative to Photoshop. It offers a wide range of editing tools, including resizing, and is known for being highly customizable. GIMP is a great choice if you need a more advanced tool without paying for Photoshop.
- Online Tools (e.g., Canva, Pixlr): For quick and easy resizing, online tools like Canva or Pixlr are excellent options. They offer free versions with basic features and are very user-friendly. You can resize images by uploading them directly on their websites, and they often include additional design features.
- Preview (Mac): If you’re a Mac user, the Preview app is a simple and effective tool for resizing images. You can resize images by percentage or by entering specific dimensions, and the app also allows you to crop and edit images easily.
- IrfanView: IrfanView is a lightweight, free tool for resizing and editing images on Windows. It’s easy to use and can handle batch resizing, which is ideal if you need to resize multiple images at once.
Each of these alternatives has its strengths, depending on your needs and level of expertise. If you need basic resizing, Paint works fine, but if you require more advanced features, one of these alternatives might be the better choice.
Also Read This: Time Capsule Access: How to Access Old Photobucket
Frequently Asked Questions
Here are some common questions people ask when resizing images in Paint and other tools:
- Can I resize an image without losing quality? Resizing an image without losing quality is challenging, especially when enlarging. To maintain quality, it’s best to use the "Maintain aspect ratio" option and avoid enlarging images too much. If you need to enlarge an image significantly, consider using a higher-resolution version.
- How do I resize multiple images at once? In Paint, you can only resize one image at a time. If you need to resize multiple images, tools like IrfanView or online services like Bulk Resize Photos allow you to resize images in batches, saving you time.
- What is the best format to save resized images? The format you choose depends on how you plan to use the image. JPEG is a good choice for smaller file sizes and web use, while PNG is better for images with transparency or when maintaining high quality is important.
- Can I resize an image for printing? Yes! When resizing for printing, ensure you set the image resolution to 300 DPI (dots per inch) for the best print quality. This can be done in more advanced tools like Photoshop or GIMP.
- Why does my image look blurry after resizing? Blurriness often occurs when enlarging an image. Paint does not add extra detail when enlarging, leading to pixelation. For higher-quality results, try using a higher-resolution image to start with, or use advanced editing tools.
Conclusion
Resizing images in Paint is a simple and effective way to adjust your images for different uses, from website uploads to printing. While Paint is perfect for basic resizing, other tools like Photoshop, GIMP, and online editors provide additional features that may better suit your needs, especially for high-quality image resizing. Remember to consider the quality of the image as you resize, and avoid enlarging images too much to prevent pixelation.
Whether you’re a beginner or looking for a more advanced solution, knowing how to resize images effectively is a valuable skill. Keep experimenting with different tools to find the one that best suits your image editing needs.

 admin
admin


