Resize Images in GIMP: A Simple Skill You Should Master if You Work Closely with Visuals - especially for professionals. GIMP (GNU Image Manipulation Program) is a free and robust image editing software that allows multiple options including resizing. No matter the reason behind changing the size of an image – website display, social media use or printing; GIMP got you covered. This tutorial includes straightforward techniques on how to alter dimensions of images on GIMP while maintaining its quality so as to suit your requirements.
Understanding the Basics of Image Resizing in GIMP

To start resizing, it’s a great idea to have some knowledge of resizing and how GIMP deals with resizing, We’re talking about pixel dimension changes on images when we say that GIMP resizes. Let’s consider some other definitions:
- Resolution: The number of pixels in an image, typically measured in pixels per inch (PPI).
- Aspect Ratio: The ratio of an image’s width to its height, which determines its shape. Keeping the aspect ratio consistent is essential to avoid stretching.
- Interpolation: The method GIMP uses to calculate pixel values when resizing. Options include Cubic, Bilinear, and Nearest Neighbor, with each affecting image quality differently.
It is important to choose the right interpolation method when resizing an image. Gimp’s default option, Cubic, is suitable for a majority of photos and it offers a compromise between speed and quality. Knowledge of these terms will help you run some good decisions on resizing the images in Gimp.
Also Read This: how to mirror an image in preview
Why Resizing Matters for Different Image Purposes

Changing the size of images is not just about making them smaller or fitting them on a screen; it has a great effect on their usability and quality for various platforms. The importance of resizing in different contexts can be summarized as follows:
| Purpose | Reason for Resizing |
|---|---|
| Websites | Reduces load time, optimizes for different screens, and ensures better SEO performance. |
| Social Media | Ensures images display correctly on feeds and profiles and enhances engagement with the right dimensions. |
| Requires high-resolution images to maintain clarity and detail, typically at 300 DPI for print quality. | |
| Presentations | Optimizes image size for faster loading in slides, keeping visual quality while ensuring smooth presentations. |
Taking photo dimensions and resolution into consideration, you may get an idea of what the image is meant for. So that your picture meets high-standards irrespective of whether it is presented on the web, printed out or displayed on a gigantic screen.
Also Read This: how to print a large image on multiple pages
Step-by-Step Guide to Resize Images in GIMP
Changing the size of the image with GIMP is such an easy task that anyone can do it in few minutes. The following are simple instructions for achieving optimum results:
- Open Your Image: Start by launching GIMP and opening the image you want to resize. You can do this by selecting File > Open and locating your image file.
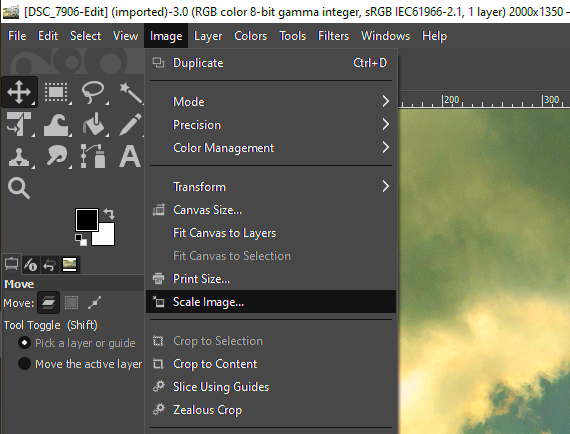
- Go to Image Size: Once your image is open, go to the Image menu at the top and select Scale Image.
- Set New Dimensions: In the Scale Image window, you’ll see fields for width and height. Enter the new dimensions for your image. Be sure the “chain” icon is linked to maintain the aspect ratio.
- Select Interpolation: For better quality, select Cubic or NoHalo from the interpolation options. These methods offer smoother results for resized images.
- Apply and Save: Click Scale to resize the image. Finally, go to File > Export As to save your resized image in the desired format and location.
This is all! Now you will have an image of modified size which has retained its quality and has been adjusted according to your requirements.
Also Read This: The Perfect Size for Your YouTube Banner Design Tips and Recommendations
Best Practices for Resizing Without Losing Quality
When re-sizing one should give priority to maintain the quality of images particularly in cases of high resolution ones. This entails following certain measures so that the clarity and sharpness of the visuals remain intact:
- Choose High-Quality Images: Starting with a high-resolution image helps avoid pixelation when resizing. Always aim for the best original quality possible.
- Use the Right Interpolation: In GIMP, using Cubic or NoHalo interpolation reduces the chances of blurring, especially when downsizing.
- Avoid Excessive Scaling: Try to keep resizing to within 50% to 200% of the original size. Scaling too small or too large can impact quality significantly.
- Adjust Sharpness Post-Resizing: If your image appears slightly blurry after resizing, apply a mild sharpening filter. In GIMP, go to Filters > Enhance > Sharpen to restore clarity.
- Save in the Right Format: For web use, formats like JPEG and PNG work well. For print, consider TIFF or other high-quality formats that preserve details better.
With this tips, one can resize their photos without losing quality making them look additional professional online or on papers.
Also Read This: How to Sell Videos on iStock Everything You Need to Know
Common Mistakes to Avoid When Resizing in GIMP
Resizing photos could appear easygoing, yet there are several typical mistakes that may ruin its quality or even change how it looks. Thus, watch out for these unending shortcomings:
- Not Keeping the Aspect Ratio: Forgetting to maintain the aspect ratio can lead to stretched or squished images. Always check the chain icon to lock aspect ratios in GIMP’s Scale Image window.
- Using Low-Quality Images: Starting with a low-resolution image makes it difficult to maintain quality when enlarging. Opt for high-quality images to start with for the best results.
- Over-Resizing: Scaling an image too large (over 200%) often results in pixelation or blurriness. Resize within reasonable limits to retain quality.
- Choosing the Wrong Interpolation: Different interpolation methods in GIMP affect image clarity. Using “None” or “Linear” can lead to blocky edges. Stick to Cubic or NoHalo for smoother results.
- Ignoring File Format: Saving resized images in the wrong format can degrade quality. For example, multiple JPEG saves can lose quality over time; use PNG for sharper web images and TIFF for print.
Ultimately, staying away from such errors will guarantee that your resized photos are sharp and appropriate for their purpose, leading to the most desirable outcomes with GIMP.
Also Read This: Creating Welcome Charts for Classrooms with Dailymotion Assistance
Frequently Asked Questions about Resizing Images in GIMP
When it comes to resizing images in GIMP there are usually some automatic inquiries adjacent especially within people who have just begun using it. Here’s a compilation of common questions and answers that may assist you better handle GIMP:
1. Does resizing an image in GIMP reduce its quality?
Resizing can affect quality, especially when enlarging images. Using high-quality originals and the right interpolation, like Cubic or NoHalo, helps preserve quality. Avoid resizing images excessively to keep details clear.
2. How can I resize an image without changing the aspect ratio?
To maintain the aspect ratio in GIMP, make sure the “chain” icon next to the width and height fields in the Scale Image window is linked. This will lock the proportions, so the image doesn’t get stretched or distorted.
3. What interpolation method should I use for best results?
For most images, Cubic or NoHalo works well to keep sharpness during resizing. Avoid None or Linear interpolation for large adjustments, as they can cause blocky or blurred results.
4. Can I resize multiple images at once in GIMP?
GIMP doesn’t have a built-in batch resizing option, but you can use scripts or plug-ins like BIMP (Batch Image Manipulation Plugin) to resize multiple images at once, saving time on repetitive tasks.
5. What’s the best format to save resized images?
For web, JPEG or PNG are great for maintaining quality with a small file size. For print, TIFF is ideal, as it preserves details. Choose based on the intended use of your image.
It doesn’t matter if you want to resize only one image or a whole series of pictures; these frequently asked questions will help you with some basic advice for better GIMP size adjustments.
Conclusion on Resizing Images Easily in GIMP
Resizing images in GIMP can be done efficiently while maintaining quality by following the right steps and using proper settings. With tools like Scale Image and various interpolation options, you can resize images for any purpose, from web use to high-quality prints. Avoiding common mistakes and following best practices will ensure your images stay sharp and look professional, no matter their size.

 admin
admin


