GIMP, which stands for GNU Image Manipulation Program, is a powerful open-source software used for photo editing and graphic design. Whether you're a beginner or a seasoned professional, GIMP offers a wide range of tools to help you manipulate images easily. It’s available for various operating systems, making it accessible to many users. With its user-friendly interface and extensive features, you can create stunning visuals for personal or professional use.
Here are some key features of GIMP:
- Layer management
- Photo enhancement tools
- Support for various file formats
- Customizable interface
Understanding these basics will help you make the most out of GIMP's capabilities.
Preparing Your Image for Resizing

Before you resize an image in GIMP, it’s essential to prepare it properly. Proper preparation helps ensure that the quality remains high and the final output meets your expectations. Here’s how you can get started:
- Open the Image: Launch GIMP and open the image you want to resize. You can do this by clicking on File > Open.
- Check the Image Dimensions: Go to Image > Scale Image to view the current dimensions of your image. This step is crucial to understand how much you need to resize.
- Consider the Purpose: Think about where you will use the image. For instance, a smaller size is ideal for web use, while a larger size may be better for printing.
Preparing your image adequately sets a solid foundation for the resizing process.
Also Read This: Using Edited iStock Pictures for Advertising Legal and Creative Guidelines
Resizing Images Using GIMP Tools
Now that your image is prepared, it’s time to resize it using GIMP. Here’s a step-by-step guide to help you through the process:
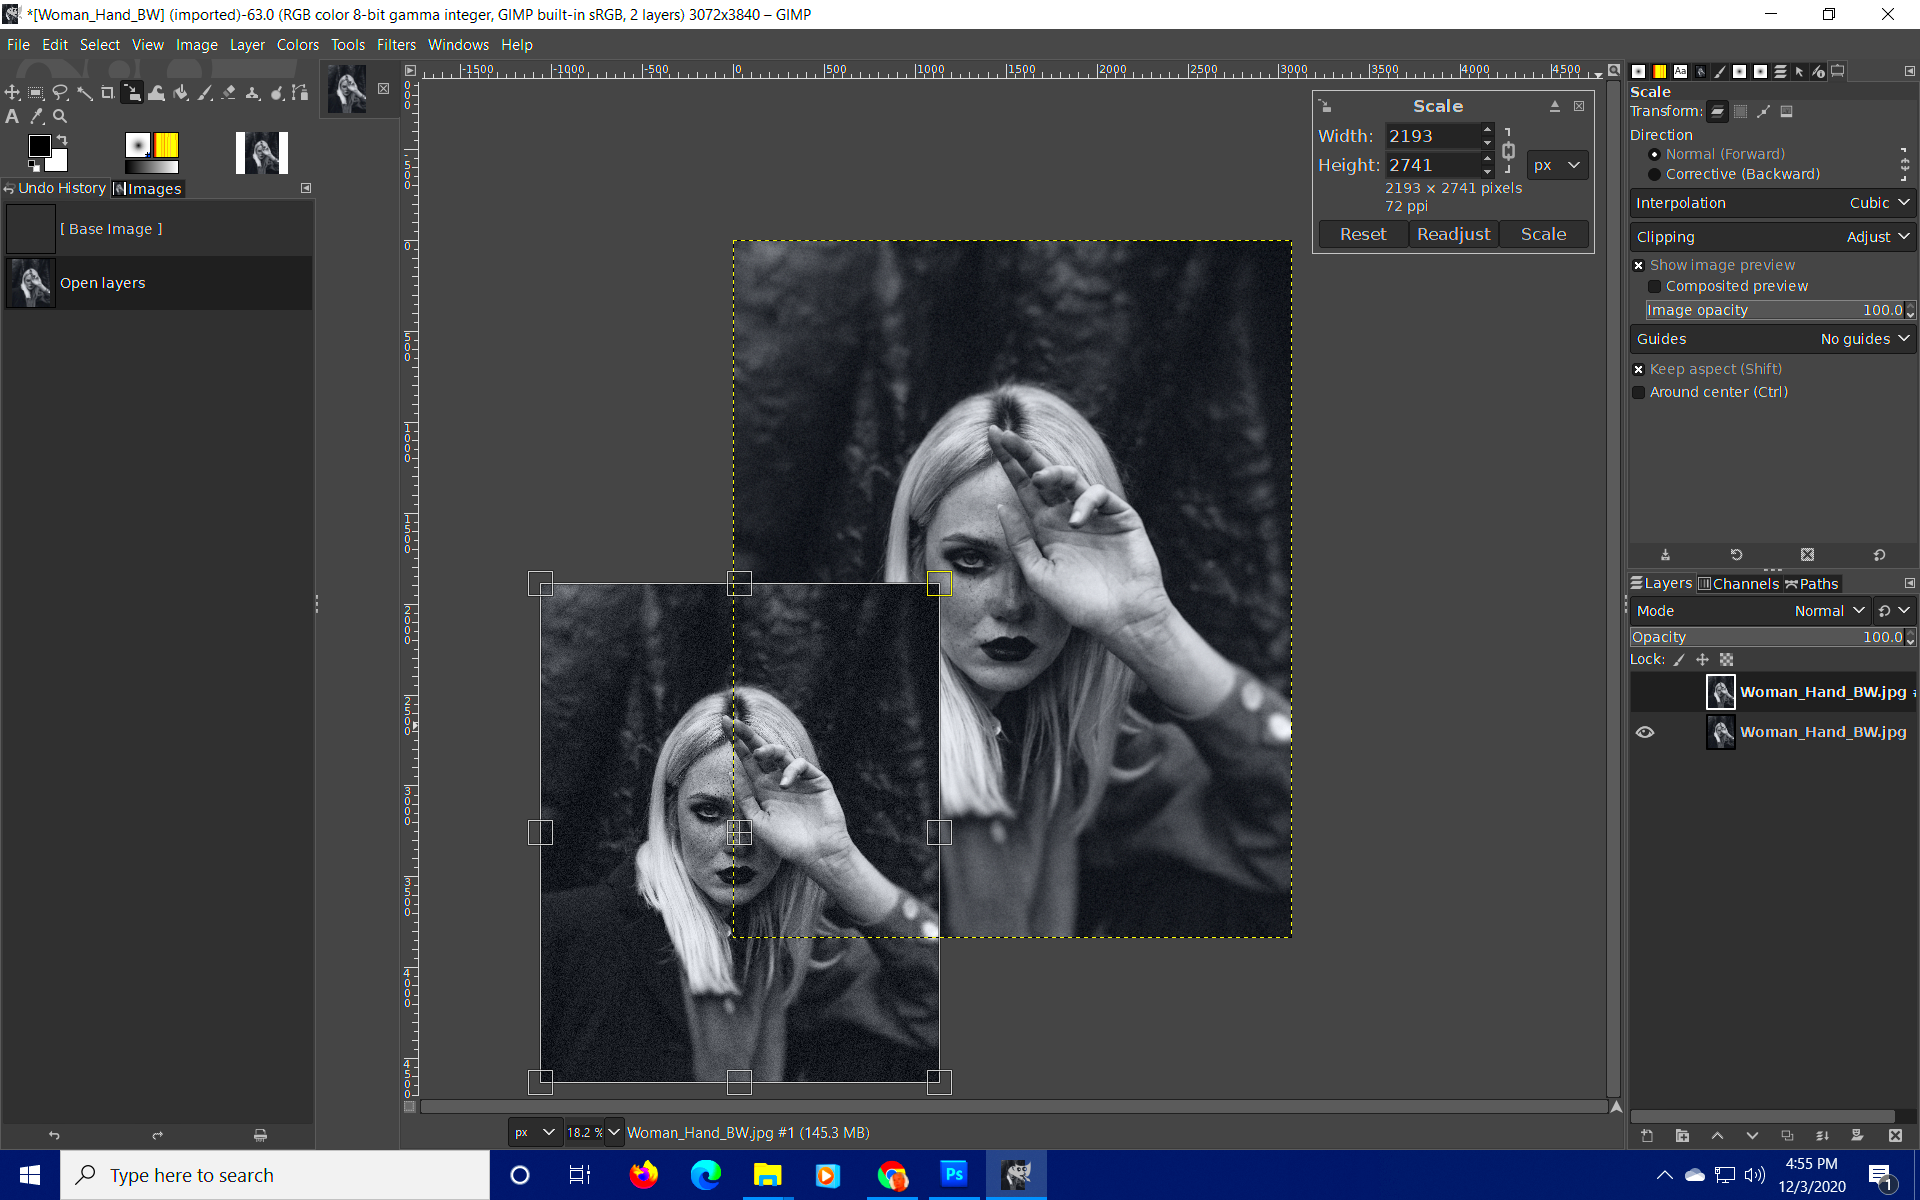
- Open Scale Image Tool: Click on Image > Scale Image. A dialog box will appear.
- Adjust the Width and Height: Enter your desired width and height in the respective fields. If you want to maintain the aspect ratio, click the chain icon to link the dimensions.
- Select the Quality: In the same dialog box, you’ll see an option for Interpolation. Choose Automatic or Cubic for better quality when resizing.
- Click Scale: Once you’ve set your dimensions and quality settings, click on the Scale button to apply the changes.
After resizing, it’s a good idea to review the image for quality. You can zoom in to check for any distortions or blurriness. If necessary, you can always undo the changes by pressing Ctrl + Z.
Also Read This: Tips for Fast Uploading Videos to Dailymotion Without Errors
Maintaining Image Quality While Resizing
When resizing images, one of the biggest concerns is maintaining quality. It’s easy for an image to lose sharpness and detail, especially when you’re scaling down or up significantly. Thankfully, GIMP has features that help you keep your images looking great even after resizing. Let’s explore some effective strategies to maintain image quality.
Here are some tips:
- Use High-Quality Originals: Always start with the highest quality version of your image. The better the original, the better the resized version will be.
- Maintain Aspect Ratio: When resizing, ensure you keep the aspect ratio intact. This prevents distortion and keeps the image looking natural.
- Choose the Right Interpolation Method: GIMP offers several interpolation options when scaling images. For best results, use Cubic or NoHalo for enlargements, as these methods help preserve detail.
- Sharpen After Resizing: Sometimes, resizing can make images appear softer. Applying a slight sharpening effect after resizing can enhance the overall clarity.
By following these strategies, you can significantly improve the quality of your resized images, ensuring they look their best no matter where you use them.
Also Read This: Exploring the Creepy Side of YouTubers Through Reddit Discussions
Using GIMP for Batch Resizing
Batch resizing is a lifesaver when you have multiple images to adjust at once. Whether it’s for a project or a website, doing this manually can be tedious. Fortunately, GIMP makes it easy to resize several images simultaneously. Let’s walk through the steps of batch resizing.
Follow these steps to batch resize your images:
- Install the BIMP Plugin: First, you need to install the Batch Image Manipulation Plugin (BIMP) for GIMP. This tool allows for batch processing of images.
- Open BIMP: After installing, open GIMP, and go to File > Batch Image Manipulation... to launch the plugin.
- Add Images: Click Add Images and select all the images you want to resize. You can select multiple files at once.
- Set Resize Options: In the BIMP window, click on Add under the Resize section. Enter your desired dimensions and choose to maintain aspect ratio if needed.
- Start the Process: Once everything is set, click Apply. The plugin will process your images, resizing them according to your specifications.
Batch resizing saves you time and effort, especially when working with large projects. Plus, you can still maintain quality by following the earlier tips!
Also Read This: Storing YouTube Videos on Your iPad for Offline Access
Common Resizing Issues and Solutions
Even with the best practices in place, you might still encounter some common issues while resizing images in GIMP. Knowing how to tackle these problems can help you achieve the best results. Let’s take a look at some frequent resizing issues and their solutions.
Here are a few common problems and how to solve them:
| Issue | Solution |
|---|---|
| Image Looks Blurry | Try using a higher-quality interpolation method, like Cubic or NoHalo. |
| Distorted Images | Ensure you are maintaining the aspect ratio while resizing to prevent distortion. |
| Excessive File Size | Consider saving the resized image in a different format (like JPEG) to reduce file size. |
| Unwanted Cropping | Check your dimensions and adjust them carefully to ensure no important parts are cut off. |
By being aware of these common issues and their solutions, you can streamline your image resizing process in GIMP and produce high-quality results every time.
Also Read This: How Do You Annotate an Image for Detailed Explanations and Notes
Tips for Effective Image Resizing
Resizing images can be a straightforward task, but a few tips can help you get the most out of the process. Whether you’re creating images for a website, social media, or print, these practical tips will ensure your resized images maintain quality and serve their purpose effectively.
Here are some useful tips to consider:
- Understand Your Needs: Before resizing, think about where you will use the image. Different platforms have different requirements. For example, images for web use should be smaller, while print images need higher resolutions.
- Use Layers Wisely: If you plan to make multiple adjustments, consider using layers. This allows you to keep your original image intact while making various edits.
- Preview Changes: Always preview your resized images before finalizing. Zoom in to check for any quality issues or distortions.
- Keep a Backup: Before making any changes, save a backup of your original image. This way, you can revert back if needed.
- Experiment with Different Formats: Different formats can affect quality and file size. Experiment with formats like PNG, JPEG, and TIFF to see which works best for your needs.
By keeping these tips in mind, you can make the resizing process smoother and ensure your images look great no matter where you use them.
Also Read This: Can You Edit LinkedIn Posts and Messages?
FAQs About Resizing Images in GIMP
When it comes to resizing images in GIMP, questions often arise. Let’s address some frequently asked questions to clarify any confusion and help you navigate the resizing process with ease.
| Question | Answer |
|---|---|
| Can I resize an image without losing quality? | Yes, by using high-quality original images and selecting the right interpolation method, you can minimize quality loss. |
| What is the best size for images on social media? | It varies by platform. For instance, a common size for Instagram posts is 1080 x 1080 pixels. |
| How do I maintain aspect ratio when resizing? | In the Scale Image dialog, click the chain icon next to the width and height fields to lock the ratio. |
| Can I batch resize images in GIMP? | Yes, by using the BIMP plugin, you can easily batch resize multiple images at once. |
These FAQs should help clear up any uncertainties you may have about resizing images in GIMP, making the process much smoother for you.
Conclusion on Resizing Images in GIMP
Resizing images in GIMP is a valuable skill for anyone involved in digital content creation. With its powerful tools and features, GIMP allows you to resize images while maintaining quality, making it a fantastic choice for beginners and professionals alike.
Throughout this guide, we’ve explored:
- The importance of maintaining image quality while resizing.
- How to batch resize images to save time.
- Common issues you might encounter and their solutions.
- Practical tips for effective image resizing.
By applying these techniques and keeping the tips in mind, you can ensure that your resized images look stunning, whether for personal use or professional projects. Don’t hesitate to experiment with different features in GIMP and make the most out of this powerful tool!

 admin
admin


