Resizing an image in Paint is a quick and easy task that can be done in just a few steps. Whether you're preparing an image for a website, social media, or reducing its file size for storage, Paint offers a straightforward way to make these changes without the need for advanced software. This guide will walk you through the process of resizing images in Paint, ensuring that even beginners can follow along and achieve professional-looking results.
Why Resizing an Image is Important

Resizing an image plays a crucial role in various situations. Here are a few reasons why resizing an image can be beneficial:
- Optimizing for Web: Large images can slow down website load times, so reducing the size without losing quality is important.
- Adjusting for Social Media: Social platforms often have specific image size requirements. Resizing ensures your images fit perfectly and display well.
- Reducing File Size: If you need to store multiple images, reducing file size helps conserve storage space.
- Printing in the Right Dimensions: If you plan to print an image, resizing ensures it fits properly on the paper without distortion.
Knowing how to resize images gives you control over how they are displayed, shared, and stored. It’s a simple yet powerful tool that’s available to everyone with access to Paint or similar software.
Also Read This: How to Transfer Google Photos to Computer
Steps to Resize an Image in Paint

Resizing an image in Paint is a simple process. Follow these steps to resize your image:
- Open Paint: Start by opening Paint on your computer. You can find it in the Start menu or search for it in the search bar.
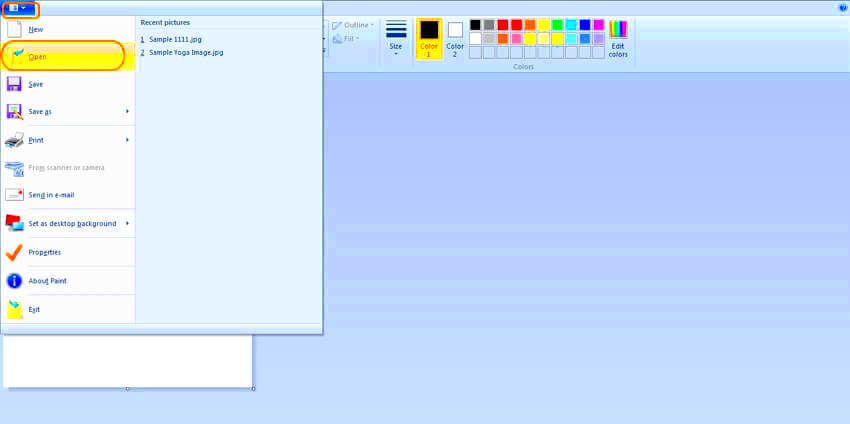
- Open the Image: Click on “File” in the top-left corner, then select “Open” to choose the image you want to resize.
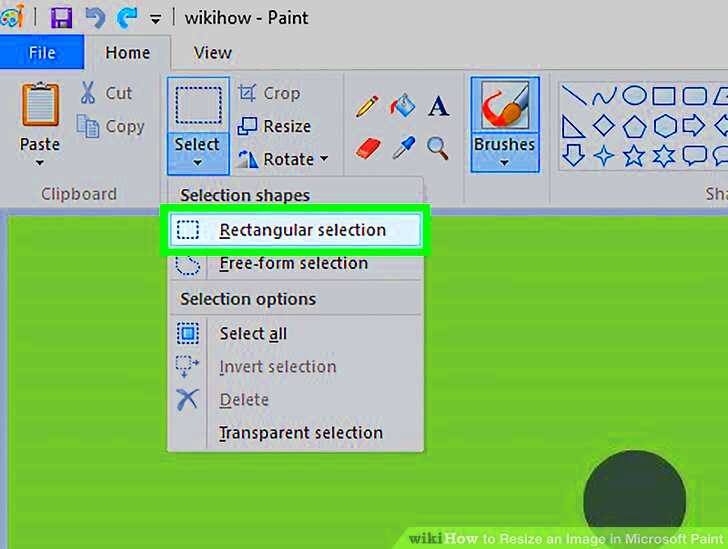
- Select the Resize Option: Once your image is open, click on the “Resize” button located in the toolbar under the “Home” tab.
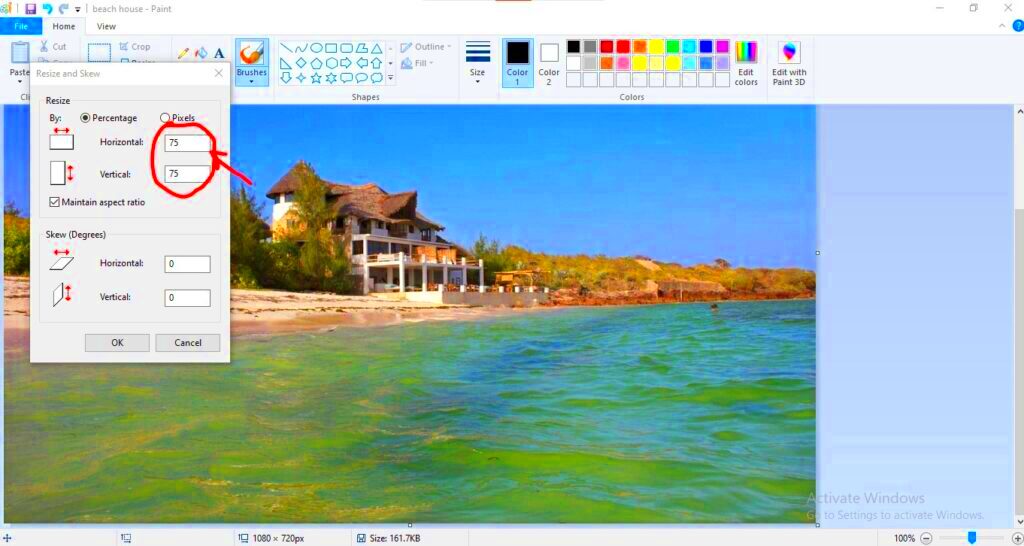
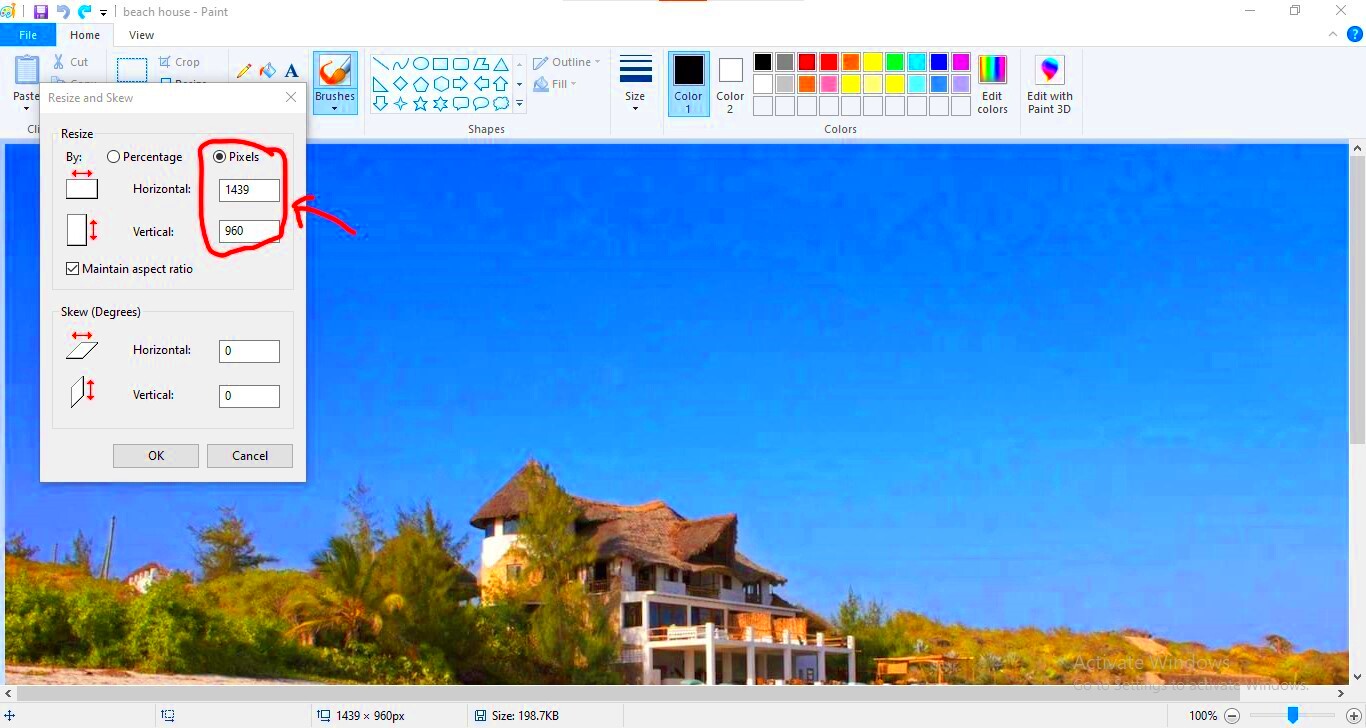
- Choose Resize Method: You can resize your image by percentage or pixels. Select the method that works best for you.
- Adjust the Size: If you’re using the percentage method, simply adjust the horizontal and vertical percentages. For pixel resizing, enter the new width and height in pixels.
- Maintain Aspect Ratio: Make sure to check the box that says "Maintain aspect ratio" to keep the image from getting distorted. This will automatically adjust the height when you change the width or vice versa.
- Click OK: After adjusting the size, click "OK" to apply the changes.
- Save the Image: Finally, save the resized image by clicking “File” and selecting “Save As.” Choose the file type and name, and then click "Save."
By following these easy steps, you can resize your images quickly in Paint, making them perfect for sharing, printing, or uploading online.
Also Read This: How to View Your Favorites on Adobe Stock
Understanding the Resize Options in Paint

When resizing an image in Paint, it’s important to understand the different options available to you. These options allow you to control the size and quality of your image, making sure it fits your needs. In Paint, you can resize an
- Percentage: This option lets you resize the image by a certain percentage of its original size. For example, if you reduce the percentage to 50%, your image will be half the size of the original. This is a great option if you want to keep the proportions of the image but just reduce the overall size.
- Pixels: Resizing by pixels gives you more precise control over the image dimensions. You can enter specific width and height values in pixels, which is useful when you need to meet exact size requirements, such as for web or social media posts.
In both options, Paint allows you to resize the image either horizontally, vertically, or both. When you adjust the width, the height will adjust automatically (if you’ve selected the option to maintain aspect ratio), ensuring that your image doesn't become distorted.
Also Read This: How to Find Your Stock Images on Adobe Stock
How to Maintain the Aspect Ratio When Resizing
Maintaining the aspect ratio is crucial when resizing an image, especially to avoid distortion. The aspect ratio is the proportional relationship between the width and height of an image. If you change the width without adjusting the height (or vice versa), it can stretch or squash the image, making it look unnatural.
Here’s how to maintain the aspect ratio when resizing in Paint:
- When you open the “Resize and Skew” window, you’ll see a checkbox labeled “Maintain aspect ratio.” Make sure this box is checked.
- If you adjust the width, the height will automatically adjust to maintain the image's original proportions. Likewise, changing the height will adjust the width accordingly.
By keeping the aspect ratio intact, you ensure that your image remains true to its original shape, whether you’re resizing for web use, printing, or other purposes. This simple step helps to avoid the image becoming stretched, squished, or pixelated.
Also Read This: Can You Use a Lumix G Camera to Upload Photos to Alamy
Tips for Resizing Images Without Losing Quality
One common challenge when resizing images is ensuring that the quality doesn’t degrade. Fortunately, there are several techniques you can use to resize your images while keeping them looking sharp and clear:
- Resize Gradually: Instead of making a drastic size change all at once, try resizing your image in small steps. This helps prevent the image from becoming blurry or pixelated.
- Use High-Resolution Images: Start with a high-resolution image if possible. Higher-quality images tend to handle resizing better without losing too much sharpness or detail.
- Choose the Right Format: The format of your image can affect its quality after resizing. JPEGs may lose quality with multiple resizes, while PNGs or TIFFs typically preserve better quality. Consider using PNG for images with text or sharp lines.
- Check the Image After Resizing: After resizing, take a close look at the image. Zoom in to ensure there’s no pixelation or loss of detail. If the image looks blurry, try resizing it in smaller increments or adjusting the dimensions less drastically.
- Avoid Resizing Larger Than the Original: Enlarging an image often leads to quality loss because Paint has to “stretch” the pixels. It’s best to only resize downwards to maintain the quality.
By following these tips, you can resize your images in Paint while preserving their quality and ensuring that they look as sharp and clear as possible, no matter the size.
Also Read This: Overlaying Images Perfectly on Top of Each Other
Common Issues You May Face While Resizing Images
When resizing images in Paint, there are a few common issues that you may encounter. These problems can sometimes be frustrating, but understanding them can help you avoid them in the future. Here are some of the most frequent issues people face when resizing images:
- Loss of Image Quality: Resizing an image, especially enlarging it, can result in a loss of quality. The image may appear pixelated or blurry, making it look less professional. This happens because the software has to stretch the pixels, which can lead to visible distortion.
- Aspect Ratio Distortion: If the aspect ratio is not maintained, resizing can cause the image to look stretched or squished. For example, if you change the width without adjusting the height proportionally, the image will become distorted.
- Incorrect Image Dimensions: Sometimes, you may enter the wrong values for width and height, causing the image to be too large or too small. Double-checking the dimensions before clicking "OK" is important to avoid resizing errors.
- File Size Issues: While resizing reduces the image's dimensions, it doesn't always reduce the file size significantly. If you're trying to upload or send an image, you may still encounter file size restrictions despite resizing the image.
- Loss of Transparency: If you're working with an image that has transparency (like a PNG), resizing can sometimes cause the transparency to be lost or altered. Be cautious when resizing transparent images to ensure the background remains transparent.
Being aware of these issues can help you navigate the resizing process smoothly. Always check the image after resizing to ensure it's up to your standards.
Also Read This: adobe stock how many images
Alternative Tools for Resizing Images
While Paint is a simple and accessible tool for resizing images, it may not offer all the features you need for advanced image editing. Fortunately, there are many alternative tools available that can provide more options and flexibility. Here are some popular alternatives for resizing images:
- Adobe Photoshop: Photoshop is a professional tool that offers precise control over image resizing. It allows you to adjust resolution, maintain aspect ratio, and use advanced algorithms for resizing, ensuring the best quality.
- GIMP: GIMP is a free and open-source image editor that offers similar features to Photoshop. It provides various resizing options, including resizing by percentage or pixels, and includes advanced tools to maintain image quality.
- Online Image Resizers (e.g., PicResize, ResizeImage.net): If you need a quick solution, online tools like PicResize or ResizeImage.net are easy to use. Simply upload your image, set the new dimensions, and download the resized version.
- Preview (Mac Users): If you're using a Mac, the built-in Preview app allows you to resize images with ease. It also offers the option to adjust the resolution and quality while resizing.
- IrfanView: IrfanView is a lightweight image viewer and editor that includes resizing tools. It supports batch processing, which is useful if you need to resize multiple images at once.
These tools provide a variety of options for resizing images and can often help you get better results than Paint, especially when you need more control or higher quality.
Also Read This: How to Access Adobe Stock Images
FAQ
Q1: Can I resize an image without losing quality?
A1: While resizing an image, especially when enlarging, some loss of quality is inevitable. However, using high-resolution images and resizing in small increments can help reduce the impact. Make sure to maintain the aspect ratio to prevent distortion.
Q2: Why does my image look blurry after resizing?
A2: Blurry images usually result from enlarging an image too much or resizing it in a way that stretches the pixels. Always try to resize downwards rather than upwards to avoid blurriness, and check the resolution settings if available.
Q3: How can I reduce the file size of an image after resizing?
A3: After resizing, you can reduce the file size by saving the image in a more compressed format, such as JPEG, or by adjusting the image quality settings in the save options. Online tools or advanced software can also help compress images without losing too much detail.
Q4: Can I resize an image in Paint without distorting it?
A4: Yes! Just make sure to check the “Maintain aspect ratio” box when resizing the image. This ensures that the width and height adjust proportionally, so the image doesn't get distorted.
Q5: How do I resize images for social media?
A5: Social media platforms often have specific image size requirements. You can use Paint or an online image resizer to adjust the image dimensions to fit the platform's specifications. For example, Instagram prefers square images (1080x1080 pixels), while Facebook cover photos should be 820x312 pixels.
Conclusion
Resizing images is a valuable skill that can help you manage the size, appearance, and quality of your pictures. Whether you need to adjust an image for social media, websites, or print, understanding the resizing process in Paint can save you time and effort. By knowing how to properly resize and maintain aspect ratios, you can ensure that your images always look their best without distortion or loss of quality.
While Paint offers a simple and user-friendly option for resizing, there are other tools available if you need more advanced features or greater control over the resizing process. By exploring these alternatives, you can find the right tool that meets your specific needs, whether you're looking for speed, quality, or customization.
In the end, resizing images is about finding the balance between file size and quality, ensuring that your images are optimized for their intended purpose. With the tips and steps provided, you should be able to resize your images with confidence and achieve great results every time.

 admin
admin


