If you're new to YouTube TV and eager to capture your favorite shows, you've come to the right place! YouTube TV offers a seamless recording feature that allows you to save programs for later viewing. This is especially handy for busy schedules or when you can’t catch a live broadcast. Let’s dive into what makes
YouTube TV provides users with an impressive unlimited cloud DVR storage option. This means you can record as many shows as you want without worrying about running out of space. All recorded content is stored for up to nine months, ensuring you have plenty of time to watch that episode you missed. Plus, there are no storage fees or complicated settings involved.
Another great feature is the ability to record entire seasons of a show with just a few clicks. Rather than setting individual recordings, you can simply select the "Record Series" option, and YouTube TV will automatically save every new episode as it airs. This is perfect for binge-watchers or those who want to keep up with ongoing series.
Additionally, users can easily pause, rewind, or fast-forward through recorded content, making it easier to skip commercials or catch up on specific moments. With a user-friendly interface, finding your recordings is straightforward, and you can access them from any device connected to your YouTube TV account.
Overall, whether you're a casual viewer or a devoted fan, understanding YouTube TV's recording features can significantly enhance your viewing experience. Now, let’s take a closer look at setting up your YouTube TV account so you can get started with recording your favorite shows!
Setting Up Your YouTube TV Account
Getting started with YouTube TV is a breeze! In just a few simple steps, you can set up your account and dive into the vast array of content available for streaming and recording. Here’s a step-by-step guide to help you through the process.
First things first, you will need a Google account. If you don’t have one, it’s easy to create. Just head to the Google account signup page, fill out the required information, and follow the prompts. A Google account will serve as your login for YouTube TV.
Now, let’s move on to signing up for YouTube TV:
-
Visit the YouTube TV Website:
Go to tv.youtube.com in your web browser or download the YouTube TV app on your smart device.
-
Click on 'Try it Free':
You'll likely find a free trial offer if you’re a first-time user. Click this option to begin the signup process.
-
Sign in with Your Google Account:
Enter your Google account credentials to log in. If you created a new account, use that information to sign in.
-
Choose Your Plan:
YouTube TV usually offers a base subscription, but keep an eye out for any add-ons you might want, such as premium channels or add-on packages.
-
Enter Your Payment Information:
You’ll need to provide a valid payment method to complete the subscription. Don't worry; you won’t be charged until your free trial period ends.
Once you’ve completed these steps, your YouTube TV account is ready to go! You’ll have access to an extensive library of channels, on-demand content, and the coveted recording features we talked about.
A few things to keep in mind:
- Your subscription allows access on up to three devices simultaneously.
- Be sure to check if your favorite channels are available in your area during the signup process.
- You can manage your subscription and settings through the “Settings” section on the YouTube TV app.
Now that you have your account set up, you’re all set to explore the awesome world of YouTube TV and start recording your favorite programs in no time! Happy watching!
Also Read This: How Vice Grip Garage Makes Money on YouTube: A Revenue Analysis
Navigating the YouTube TV Interface
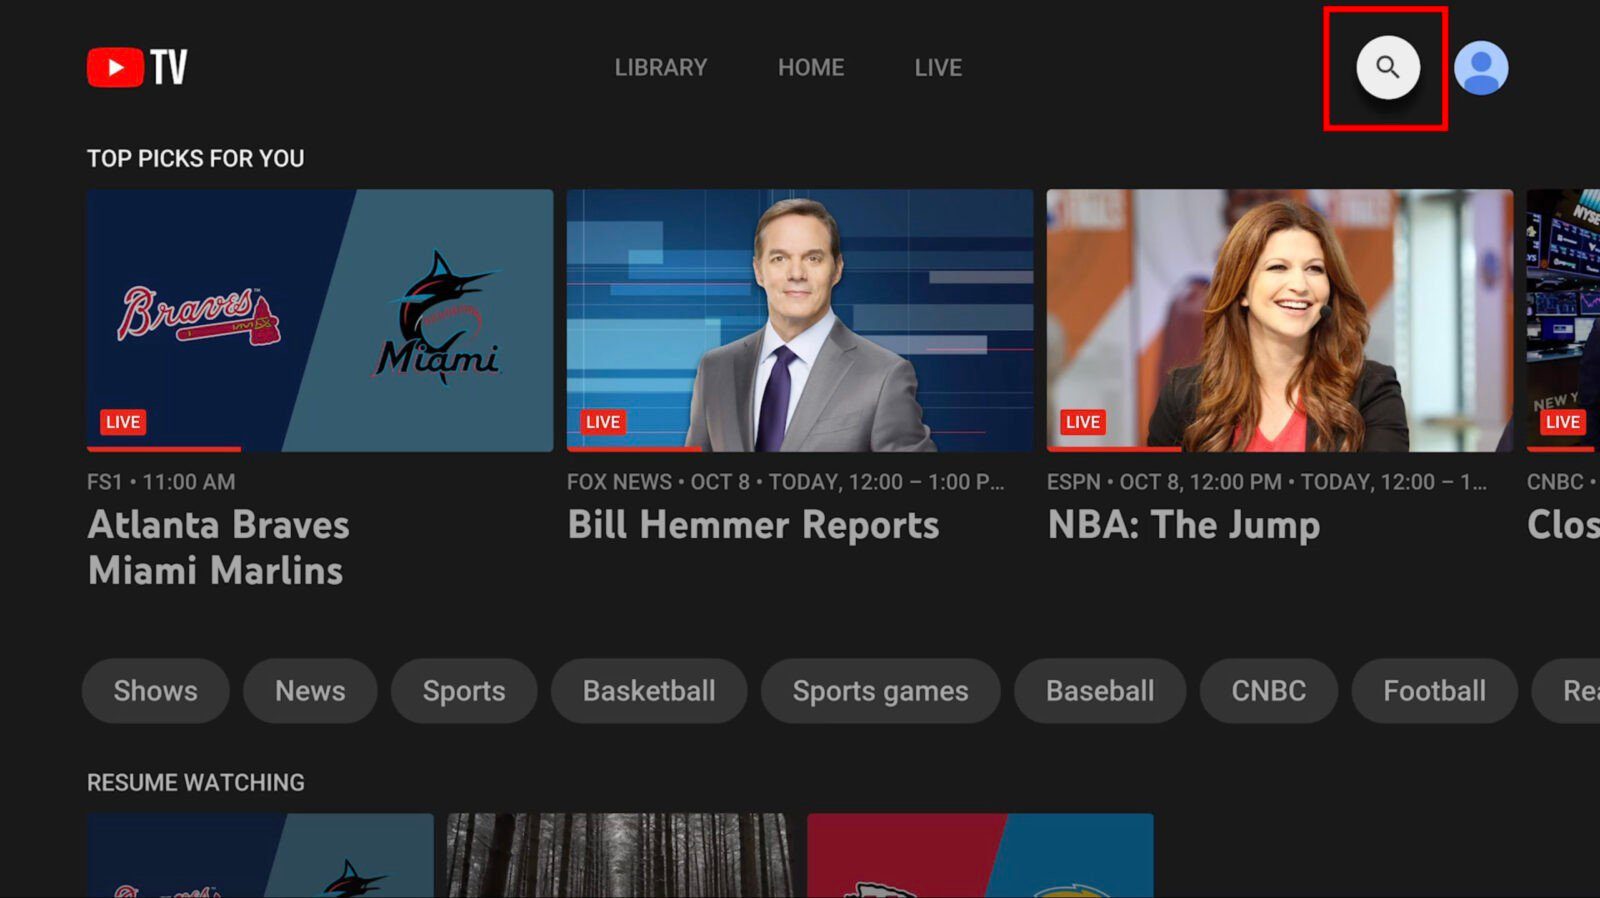
Getting comfortable with the YouTube TV interface is the first step to mastering your recording experience. When you first log in, you’ll be greeted by a clean and user-friendly layout. Here are some key elements to familiarize yourself with:
- Home Tab: This is your launchpad for everything YouTube TV has to offer. Here, you'll find recommendations tailored specifically for you, trending shows, and upcoming live broadcasts.
- Library: Your library is where all your recorded content is stored. Think of it as your personal collection—everything you decided to save can easily be accessed here.
- Live Tab: Use this section to see what’s currently airing. It’s a great way to catch live events or shows on the spur of the moment.
- Search Function: Usually located at the top, this is your best friend when looking for specific shows or episodes to record. You can search by title, genre, or even actor.
As you navigate through the interface, you’ll notice that it operates smoothly even on devices like smart TVs, mobile phones, and web browsers. Don’t shy away from clicking around! The interface is designed to help you discover content easily.
Tip: If you’re using a TV remote, navigating might take some getting used to. Use the directional buttons to move through options—select shows or channels by pressing 'OK' or 'Enter'. On mobile devices, swiping and tapping will get you where you need to go in no time.
Also Read This: How to Sign Out of YouTube TV on All Devices: A Complete Method
How to Find and Select Programs to Record
Now that you’ve got the hang of navigating the interface, let’s dive into how you can find and select programs to record. The process is straightforward, but it helps to know a few tricks to make it easier.
To begin, use the Search function effectively:
- By title: If you know the exact name of the program you want to record, type it into the search bar. You'll get direct results that pinpoint your desired show.
- By genre: If you’re in the mood for something particular—be it comedy, drama, or sports—you can browse shows by category. This is especially useful for discovering new favorites!
Once you find a program you want to record, simply click on it to view more details. This brings up information like the show’s synopsis, episode guide, and airing times. Keep an eye out for the red record button; it’s usually easy to spot.
When you’ve selected the episode or series you want:
- Click on the Record button. If you want to record a single episode, you can choose "Record Episode". For ongoing series, select "Record Series" to capture all upcoming episodes automatically.
- You’ll often have the option to set additional recording preferences, like preserving recordings for a specific duration or choosing only new episodes to record.
As a final tip, don’t forget to check your Library after setting up your recordings. This is where all your saved content will appear, organized for your viewing pleasure. If you ever decide you want to remove a recording, it’s just as easy to delete it from your Library.
With these steps, you’ll be well on your way to enjoying your favorite shows whenever you want. So go ahead, start exploring, and happy recording!
Also Read This: How to Extract Music from YouTube: Downloading Music Tracks from YouTube Videos
5. Steps to Set Up Recording for a Program
Recording programs on YouTube TV is a straightforward process that opens up a world of flexibility in when and how you watch your favorite shows. Whether you're a fan of binge-watching or you simply want to catch up on episodes you missed, setting up your recordings is a breeze. Let’s walk through the steps to ensure you never miss an episode again!
Step 1: Navigate to YouTube TV
First things first! Open the YouTube TV app on your device, or head to the YouTube TV website. Make sure you’re logged in to your account with an active subscription. If you don't have an account yet, you'll need to sign up before you can start recording.
Step 2: Find Your Program
You can either search directly for a specific show or browse through the available channels. Use the search bar at the top of the screen or explore various categories like "Popular," "Movies," or "Sports" to find what you want to record.
Step 3: Selecting the Program
Once you’ve found the program you’d like to record, click on it. This will take you to the show’s page where you can see all the available episodes and options.
Step 4: Hit the Record Button
Look for the “+” icon or the option that says “Add to Library.” When you click this, you’ll be given the option to record the entire series or just a single episode. Choose according to your viewing preferences!
Step 5: Adjust Recording Settings (if needed)
YouTube TV allows you to modify your recording settings to suit your needs. Here are some options to consider:
- Auto-Record: Automatically add new episodes to your recordings.
- Recording Quality: High, medium, or low quality depending on your internet speed.
- Notifications: Get alerts when a new episode is available.
Once you've adjusted your settings to your liking, just confirm the recording, and you’re all set! Now, you can sit back and relax, knowing that your favorite shows are being captured for you to enjoy later.
Also Read This: Can You Rewind Live TV on YouTube TV? Features Explained
6. Managing Your Recorded Programs
Now that you know how to record programs on YouTube TV, let’s talk about managing those recordings! Keeping your recordings organized and accessible is essential for an enjoyable viewing experience. Here are some tips on how to manage your recorded programs effectively.
Accessing Your Recordings
To find your recorded programs, head over to the “Library” section on the YouTube TV interface. Here’s how to get started:
- Open YouTube TV.
- Click on the “Library” tab in the menu.
- Navigate to “Recorded” to view all your recorded shows and episodes.
Organizing Your Recorded Programs
YouTube TV automatically organizes your recordings by series and episode. This makes it easy to find the content you want to watch. However, it’s good to periodically check your recordings and manage them. You can:
- Delete Unwanted Recordings: If there are shows you’ve already watched or just didn’t enjoy, you can delete them to free up space. Just click the program and select the option to remove it from your library.
- Rearrange Order: Although you can't manually rearrange shows, they will typically display the latest recorded episodes first—important for keeping track of what’s new!
Checking Storage Limits
YouTube TV offers unlimited cloud DVR storage, but it’s good to keep an eye on your recordings. If your recordings exceed nine months (that's the expiration date for many recorded shows), they will automatically delete. So check your library periodically to keep everything up to date!
Staying Informed
You can also set notifications to remind you when new episodes of your favorite shows are available, which can be really handy! To do this, go to settings and adjust your notification preferences.
With these simple steps, you'll have complete control over your recorded content on YouTube TV. Enjoy your shows, and happy watching!
Also Read This: Popular YouTubers in Florida: Who They Are and What They Create
7. Troubleshooting Common Recording Issues
Even the best technology can sometimes be a bit temperamental, and YouTube TV is no exception! It's not unusual to run into some recording hiccups now and then. But don't worry—most issues can be solved with a few simple troubleshooting steps. Here are some common problems you might encounter and how to resolve them:
- Recording Failed: If a recording fails, check your internet connection. A stable connection is crucial for recording. Reboot your router if necessary.
- Recordings Not Saving: Ensure you still have available storage space. While YouTube TV offers unlimited cloud DVR, you might need to manage old recordings or check for any accidental deletions.
- Missing Scheduled Recordings: Double-check your schedule settings. Events might have been rescheduled, or conflicts could prevent recording. Checking your “DVR” section will show you if anything was missed.
- Quality Issues: Sometimes, recordings can be in lower quality due to bandwidth limitations. Make sure you’re not streaming on multiple devices at the same time.
- Series Recordings Not Working: Ensure the series you're trying to record is set up correctly. You might need to adjust your settings to record all episodes, especially if you only selected the latest episode.
If you run into a problem you can't solve, turn to YouTube TV's support resources. Their extensive FAQs and user community can provide tailored advice for your specific issue. Remember, technology can be finicky, but with a little patience and troubleshooting skills, you'll have those recordings up and running in no time!
Also Read This: How Much Do YouTubers Make for 1 Million Views? Earnings Breakdown
8. Tips for Optimizing Your Recording Experience
Once you've got the hang of recording on YouTube TV, you'll want to make the most out of that feature! Here are some handy tips to ensure a smooth and enjoyable recording experience:
- Schedule Ahead of Time: Whenever you can, set your recordings in advance. This practice not only saves time but also prevents any last-minute issues.
- Utilize the Search Feature: Use the search bar to find specific shows or movies that you want to record. The easier you find your content, the better!
- Regularly Check Your DVR Library: Make it a habit to review your recorded shows. This helps you keep track of what you've watched and can remind you of any upcoming new episodes that you want to capture.
- Tip on Storage: Even though YouTube TV provides unlimited storage, if you're recording multiple shows, check that your older recordings are no longer needed and delete them as necessary to keep things organized.
- Stay Updated: YouTube TV frequently updates its features. Make sure your app is updated to enjoy new functions, improved user interface, and any fixes to known bugs.
With these tips, you'll maximize your recording efficiency and ensure you never miss out on your favorite shows again! Enjoy binge-watching all the best content YouTube TV has to offer, hassle-free!
Conclusion and Next Steps
In conclusion, recording programs on YouTube TV is a straightforward process that enhances your viewing experience by allowing you to watch your favorite shows at your convenience. With the unlimited cloud DVR feature, you can save as many programs as you like without worrying about storage limitations.
To recap, here are the key steps to get started:
- Sign in to your YouTube TV account.
- Browse through the available channels and content.
- Click on the program you'd like to record.
- Select the “+” icon to add it to your DVR.
- Manage your recordings from the Library section.
As you begin exploring the recording options, consider the following next steps:
- Experiment with recording live events to fully appreciate the convenience of DVR.
- Utilize the "Record Series" feature to automatically record all episodes of a show.
- Regularly check your Library to manage your recorded content efficiently.
With these tips in hand, you're now well-equipped to record programs on YouTube TV seamlessly. Enjoy your newfound flexibility in watching your favorite shows!
 admin
admin


