If you've ever wanted to capture your favorite audio from YouTube videos, you're not alone. Many people love recording audio for podcasts, personal projects, or just for fun. One of the best tools you can use for this task is Audacity. It’s a powerful, free, and user-friendly audio editing software. In this guide, we’ll explore how to record audio from YouTube using Audacity, so you can easily start your audio journey!
What You Need to Get Started
Before diving into the recording process, let's ensure you're equipped with everything you need. Here’s a quick checklist of the essentials:
- Computer: A PC or Mac with enough processing power to run Audacity smoothly.
- Internet Connection: A stable connection to access YouTube videos without interruptions.
- Audacity Software: Download and install it from the official website.
- Audio Driver/Audio Interface: Depending on your system, you might need a Virtual Audio Driver or an audio interface to capture computer audio.
- Speakers/Headphones: For monitoring the audio during recording. While it's not strictly necessary, it can help ensure the quality before saving your final audio file.
Now, let’s break it down a bit further:
1. Computer
Your computer needs to meet basic requirements to run Audacity effectively. Most modern computers will handle Audacity just fine, but if you're working with heavy audio processing, more RAM and a faster processor could be beneficial.
2. Internet Connection
A reliable internet connection is crucial. You don’t want your video to buffer while you’re trying to record audio! Ideally, connect through a wired connection for the best and most stable performance.
3. Audacity Software
Downloading Audacity is a straightforward process. Just head to the official Audacity website, select your operating system, and follow the installation instructions. It’s completely free, and you'll get access to a wide range of features that can help you manipulate and edit your audio as needed.
4. Audio Driver/Audio Interface
To record audio directly from your computer’s sound, consider using a virtual audio driver like VB-Audio Virtual Cable (for Windows) or Soundflower (for Mac). These drivers allow Audacity to capture the audio playing on your computer without the need for external microphones. Setting this up might take a little tinkering, but it’s well worth the effort!
5. Speakers/Headphones
While Audacity can record audio, listening back to it through quality speakers or headphones can significantly enhance your ability to edit and refine your recordings. You can catch any background noise or quality issues more easily this way.
Once you've got your checklist ticked off, you'll be ready to move on to recording your audio from YouTube. Trust me, it’s an incredibly fulfilling process, and with Audacity, you’ll have all the control you need to create something great!
Also Read This: A Little Life Audiobook on YouTube: Where to Listen to This Emotional Novel
3. Installing Audacity
Alright, let’s get started on installing Audacity! This free, open-source audio editing software is a fantastic choice for anyone looking to record audio from YouTube. The installation process is straightforward, so you’ll be up and running in no time. Here’s how to do it:
- Visit the Audacity Website: Head over to the official Audacity download page. Make sure you're on the official site to avoid any unwanted software.
- Select Your Operating System: Audacity is available for Windows, macOS, and Linux. Click on the version that matches your operating system.
- Download the Installer: Once you've chosen your OS, click the download link. You might see different versions – the latest stable release is usually the best option.
- Run the Installer: Once the download is complete, locate the installer in your downloads folder and double-click on it. Follow the prompts on the screen. You can usually just go with the default settings.
- Finish Installation: When the installation is complete, you can select to launch Audacity right away or just finish the setup.
And voila! Now you have Audacity installed on your computer. Before you jump into recording, there are a few more setup steps you need to take. So let’s move on to how to prepare your computer for recording!
Also Read This: How to Get the Longhorn Network on YouTube TV: A Step-by-Step Guide
4. Setting Up Your Computer for Recording

Now that you have Audacity installed, it’s time to ensure your computer is ready to record audio effectively. There are a few settings to tweak and checks to make for an optimal recording experience. Let’s break it down:
- Check Your Audio Input Settings: Make sure your computer's audio input settings are correctly configured. Go to your sound settings and look for the 'Input' section. If you’re recording audio through your microphone or another source, select the appropriate device.
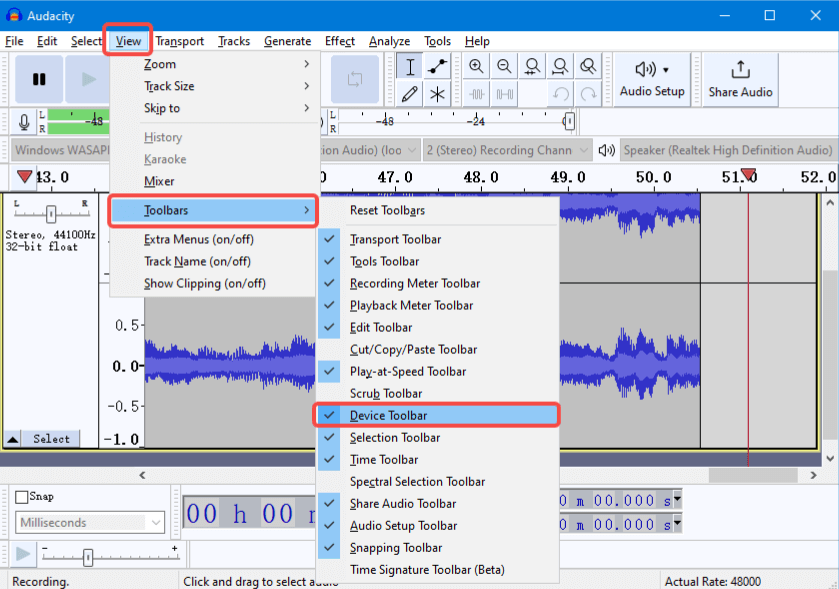
- Configure Audacity Preferences: Open Audacity, then navigate to Edit > Preferences. Here, you can set up the audio host. If you're on Windows, try using Windows WASAPI for the best recording quality. On macOS, Core Audio should automatically be selected.
- Set the Recording Device: In the same Preferences menu, go to the 'Devices' section. Here, choose your recording device from the dropdown menu. If you’re planning to capture audio directly from YouTube, you may want to select your system audio or loopback option.
- Adjust the Output Settings: Still under 'Devices,' ensure your output is set to your speakers or headphones. This way, you can hear your recordings as you work.
- Check Volume Levels: It’s crucial to ensure your input levels aren’t too high or too low to avoid distortion. Check your microphone input by clicking the record button briefly and watching the meter levels. They should peak around -12dB to -6dB for optimal quality.
Once you’ve taken these steps, you’ll be all set to begin your recording journey! Your computer is now ready to capture audio directly from YouTube, and Audacity is primed for editing. Don’t worry if everything feels a bit complex – take your time to familiarize yourself with the interface and options, and you’ll be a pro in no time!
Also Read This: How to Log Out of YouTube on Roku: A Step-by-Step Guide
5. Finding the YouTube Video You Want to Record
Before diving into recording audio, the first step is to find the YouTube video that you want to capture. With millions of videos available at our fingertips, it might seem overwhelming, but don’t worry! I’ll guide you through this process.
Here are some tips to help you find the right video:
- Use Specific Search Keywords: If you know the title or the content theme, type relevant keywords in the YouTube search bar. For instance, if you're looking for a podcast episode, include the host's name or the episode number.
- Check Playlists: Often, content creators organize their videos into playlists. This can help you find a series of related content all in one place, saving you time.
- Explore Related Videos: Once you find a video that interests you, check the section for related videos on the right side. That way, you might discover even more valuable content!
Once you locate the video, be sure it’s public and not private; otherwise, you may not be able to access it for recording. A good rule of thumb is to look for videos with the highest views and the best ratings to ensure quality content.
Lastly, take note of the video's URL. You’ll need it during your recording session, as it can help if you need to revisit for any adjustments or captures.
Also Read This: Does YouTube Music Pay Artists? Understanding YouTube’s Music Revenue Model
6. Configuring Audacity for Optimal Recording
Now that you’ve found your YouTube video, it’s time to set up Audacity for high-quality recording. Whether you’re a pro or just starting, a few adjustments can dramatically improve your recording experience.
Follow these steps to configure Audacity effectively:
- Launching Audacity: Open Audacity on your computer. If you haven’t installed it yet, you can download it for free from the official website.
- Selecting the Right Input Device:
- Go to the dropdown menu at the top of the Audacity window where it says "Microphone." Click on it and choose the audio input you want to use. If you’re recording system audio, select “Windows WASAPI” for Windows users or “Built-in Input” for Mac.
- Adjusting Input Volume: Check the input level meter (the green bar). Start by playing a portion of your YouTube video and adjust the input volume slider until you see levels reaching around -6 dB to -12 dB. This ensures you won’t clip the audio while recording.
- Setting Project Rate: In the lower left corner, make sure the project rate is set to either 44100 Hz or 48000 Hz. This rate provides a good balance between quality and file size.
- Choosing Recording Format: Before you hit record, go to “Edit” > “Preferences” > “Import/Export.” Select your desired file format for exported audio (WAV is recommended for quality).
- Enabling Direct Monitoring: If you're using an external microphone, you might want to enable direct monitoring. This allows you to hear yourself as you’re recording, which can be helpful for adjustments on the fly.
- Testing Your Setup: Do a test recording! Record a few seconds, then play it back to ensure everything sounds good. This quick step can save you lots of headaches later.
Once you've configured Audacity, you're all set for recording your desired audio. Remember, practice makes perfect, so don't hesitate to play around with settings until you find the most comfortable setup for you!
Also Read This: Where to Watch ‘A Miser Brothers’ Christmas’ Full Movie on YouTube
7. Recording Audio from YouTube
So, you want to record audio from YouTube, huh? It might sound complicated, but with Audacity, it's pretty straightforward. Let’s break it down step by step!
First things first, make sure you have Audacity installed on your computer. If you don’t have it yet, you can easily download it from the official website. It's free and works on Windows, macOS, and Linux!
Now, here’s how to set everything up for recording:
- Open Sound Settings: Right-click on the sound icon in the system tray (the bottom-right corner of your screen) and choose "Sounds." Then, head over to the "Recording" tab.
- Select Your Input Source: Here, you’ll want to find a device that allows you to capture audio from your computer. Depending on your system, this could be something like "Stereo Mix" or "What U Hear." If you're not seeing these options, make sure to enable disabled devices by right-clicking in the window and checking "Show Disabled Devices."
- Open Audacity: Launch Audacity, and from the drop-down menu, select the input source you just enabled. It might be listed as "Stereo Mix" or similar.
- Set Up for Recording: Make sure everything is ready! You can adjust the recording volume by tweaking the input level in Audacity. It’s good to keep it around 70-80% to avoid distortion.
Now that we've set up Audacity, it’s time to hit play on that YouTube video you want to record. Before you start recording:
- Find the section of the video you want to capture.
- Position the video so that you can easily pause it once you start recording.
When you're ready, simply click the big red record button in Audacity. Then, play your YouTube video. You’ll see the audio waveform appearing in real-time. This means you’re capturing the audio!
Once you’ve recorded the portion you want, press the stop button in Audacity. Congratulations! You’ve just recorded audio from YouTube. Review your recording and if everything sounds good, you’re ready to edit.
Also Read This: How to Upload YouTube Videos to Instagram: A Comprehensive Guide
8. Editing Your Recorded Audio
Now that you’ve successfully recorded the audio, it’s time to polish it up! Editing in Audacity is quite user-friendly, even for beginners.
Here are some key steps to enhance your audio:
- Listen to Your Recording: Before diving into edits, take a moment to listen to the entire recording. This helps you identify areas that need improvement, such as unwanted sections or noise.
- Cropping Unwanted Sections: If there are long pauses or parts where you don’t want the audio, use the selection tool to highlight that section and hit the delete key. It’s as easy as that!
- Noise Reduction: If you notice any background noise or hissing sounds, Audacity has a fantastic noise reduction feature. Highlight a section of silence or noise, go to Effect > Noise Reduction, and follow the prompts to remove it.
- Volume Leveling: If some parts of your audio are significantly quieter or louder than others, you can level them out. Select the entire track, then navigate to Effect > Normalize, and set the desired volume levels.
- Equalization: This can help enhance the audio quality further. Navigate to Effect > Equalization and adjust the frequencies to make your audio sound clearer and more professional.
Finally, don’t forget to save your edits! You can export your finished audio file by going to File > Export and choosing your preferred format, such as MP3 or WAV.
And there you go! With these steps, you can easily record and edit audio from YouTube using Audacity like a pro. Happy editing!
Also Read This: Why Are Comments Disabled on YouTube? Common Reasons Explained
9. Saving and Exporting Your Audio Files
Once you've recorded your audio with Audacity, the next step is to save and export your files. This is where you transform your project into a format that you can easily share or use on various platforms. Let's dive into how you can do that efficiently.
First things first, after completing your audio editing—whether you've trimmed some silence, adjusted levels, or added effects—it's crucial to save your project. This way, you won't lose any of your hard work. To save your project, simply go to the top menu and click on File > Save Project. This will save your work as an Audacity project file (.aup), which you can reopen and continue editing later.
Now, if you're looking to use the final audio elsewhere, you'll need to export it. Audacity allows you to export your audio in various formats such as WAV, MP3, and OGG. Here’s how you can do that:
- Go to File > Export.
- You will see several options like Export as MP3, Export as WAV, or Export Selected Audio. Choose the format that suits your needs.
- After selecting your desired format, a dialog box will appear where you can choose the location on your computer where the file will be saved. Don't forget to give your file a meaningful name!
- Click Save, and if you're exporting as MP3, you’ll have the option to input metadata like artist name, album, and genre. Fill this in if applicable.
- Finally, click OK to complete the export.
And that's it! Your audio file is now saved in the format you chose, ready for uploading, sharing, or just enjoying. Remember to keep your original project file (.aup) safe. It allows you to revisit and redo any edits in the future if necessary!
Also Read This: What Channel Is YouTube on DirecTV
10. Conclusion
Recording audio from YouTube using Audacity can be a straightforward process if you follow the steps outlined in this guide. You've learned how to download and install Audacity, set it up for optimal recording, and, most importantly, how to capture audio directly from a YouTube video.
But that's not all! You've also explored how to edit your recordings and finally save and export your audio files in a format that works for you. Whether it’s for a podcast, a personal project, or just for fun, having these skills under your belt opens up a world of possibilities!
Before you rush off to start your audio adventures, here are a few quick takeaways to remember:
- Always check your recording levels! This will help you avoid distortion or poor sound quality.
- Utilize Audacity's editing tools. Don’t hesitate to trim, cut, or enhance your recordings as necessary.
- Export your finishes files wisely. Choose the format that best serves your intended use.
As a final note, make sure to respect copyright and fair use when recording audio from YouTube. Always ensure you have permission or that your intended use falls under fair use guidelines.
Now, it’s time to get creative! Dive into Audacity, record some audio, and let your projects come to life. Happy recording!
Frequently Asked Questions
When it comes to recording audio from YouTube using Audacity, many users have a variety of questions. Here are some common queries along with their answers:
1. Is it legal to record audio from YouTube?
Recording audio from YouTube can fall into a gray area of copyright law. Generally, you should only record content that you own or have permission to use. Always check the license of the content on YouTube.
2. Do I need any special settings in Audacity?
Yes, you may need to configure Audacity to ensure it captures the audio correctly. Consider the following settings:
- Set the host to Windows WASAPI for Windows users or Core Audio for Mac.
- Select the correct playback device (such as your speakers or headphones).
- Choose the appropriate input source, often labeled as "Speaker Output" or similar.
3. What format should I save my audio in?
For most uses, saving your audio in MP3 or WAV format is recommended. MP3 files are smaller and more manageable, while WAV files retain higher quality.
4. Can I edit the audio after recording?
Absolutely! Audacity provides a range of powerful editing features, including noise reduction, trimming, and adding effects. Experiment with these tools to enhance your audio.
5. What if I have audio quality issues?
Ensure you have the right input settings and check your computer’s audio output settings. Using headphones can also help reduce feedback and improve quality.
In conclusion, recording audio from YouTube via Audacity can be straightforward if you understand the legalities and technical requirements involved. By following best practices and tweaking settings, you can achieve great results and enjoy your favorite content offline.
 admin
admin


