Image resolution is a key aspect of digital
images that affects their quality and clarity. When using GIMP, a popular open-source image editing tool, understanding how to manage resolution can help you produce better
images for various purposes.
Understanding Image Resolution

Image resolution refers to the amount of detail an image holds, typically measured in pixels. The higher the resolution, the more detail the image can display. Here are some key points to consider:
- Pixels: The basic unit of digital images, represented as tiny dots on your screen.
- Resolution Units: Commonly expressed in pixels per inch (PPI) or dots per inch (DPI).
- Print vs. Screen: Images for print usually require higher resolution (300 DPI), while images for web can be lower (72 PPI).
- File Size: Higher resolution images take up more storage space, which can affect loading times for websites.
Understanding these aspects will help you make informed decisions about your
images based on their intended use.
How to Check Image Resolution in GIMP
Checking the resolution of an image in GIMP is a straightforward process. Follow these steps to find out the resolution of your image:
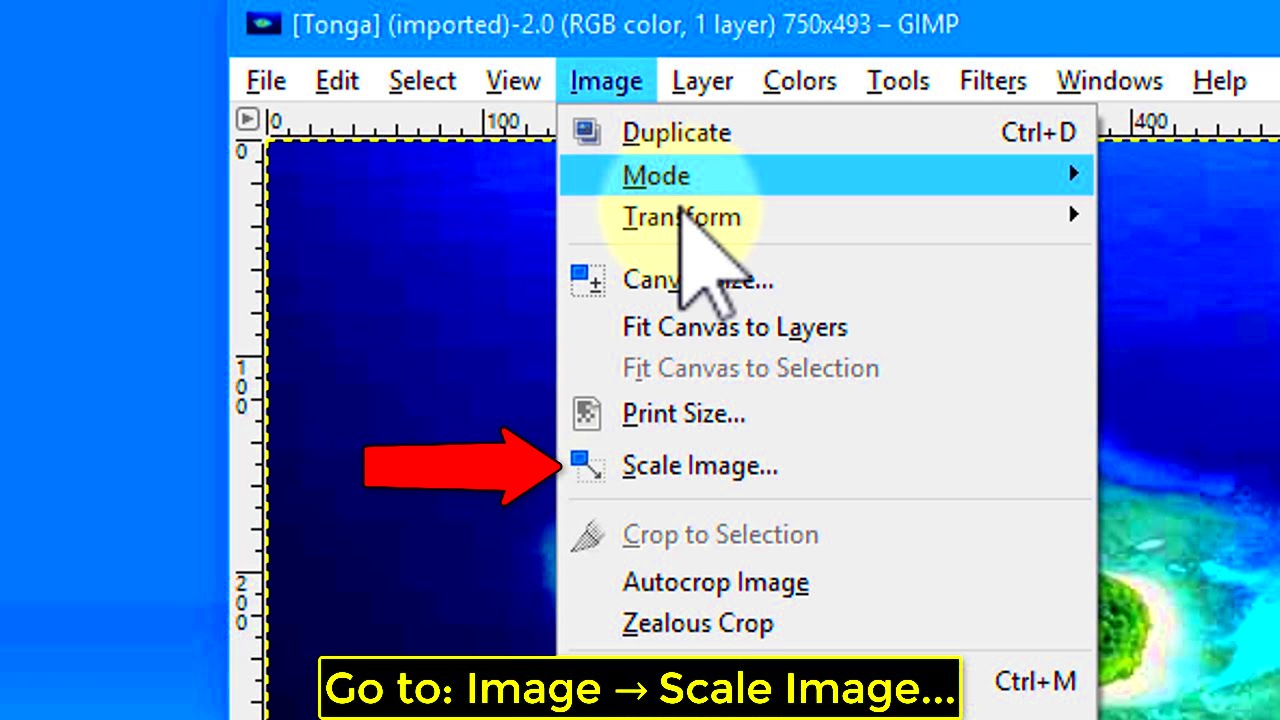
- Open your image in GIMP.
- Go to the menu bar and click on Image.
- Select Scale Image from the dropdown menu.
A window will pop up displaying important information about the image. Look for the following:
- Width and Height: This shows the image dimensions in pixels.
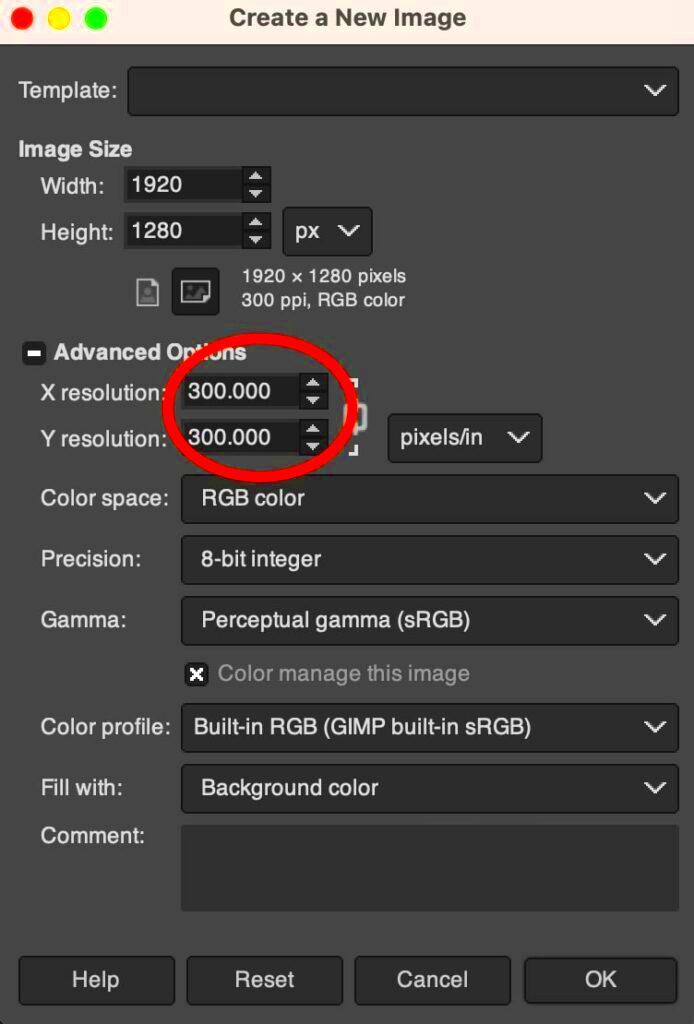
- X and Y Resolution: This indicates the PPI for width and height.
Take note of these values, as they will guide you in making adjustments as needed. Understanding how to check resolution in GIMP sets the foundation for effective image editing and optimization.
Steps to Change Image Resolution in GIMP
Changing the resolution of an image in GIMP is a simple yet effective way to improve its quality. Whether you're preparing an image for print or web use, follow these easy steps:
- Open your image in GIMP.
- Navigate to the menu bar at the top and click on Image.
- Select Scale Image from the dropdown options.
A new window will open, showing various settings. Here's what to do next:
- Set the Width and Height: You can change the dimensions of the image. Make sure to keep the chain icon linked to maintain the aspect ratio.
- Adjust the X and Y Resolution: Enter the desired resolution (for example, 300 PPI for print or 72 PPI for web).
- Choose Resampling Method: Select a method from the dropdown (e.g., Cubic or Linear) for better quality.
- Click on Scale to apply the changes.
And that's it! You have successfully changed the image resolution. Remember to save your edited image by clicking on
File and then
Save As to keep the original intact.
Resampling Images for Better Quality
When you change the resolution of an image, especially when increasing it, resampling is crucial to maintain quality. Resampling involves altering the number of pixels in the image. Here are some tips for effective resampling:
- Choose the Right Resampling Method: GIMP offers several methods:
- None: No resampling, not recommended for quality changes.
- Linear: A quick method, but may result in lower quality.
- Cubic: Provides smoother results and better quality for enlargements.
- LoHalo: Great for high-quality enlargements with less artifacting.
- Use High-Quality Images: Starting with a high-resolution image makes it easier to maintain quality during resampling.
- Preview Changes: Always check the preview in GIMP before finalizing the changes to ensure you're satisfied with the outcome.
Resampling is a powerful tool in GIMP that can significantly improve your
images. Always experiment with different methods to find what works best for your specific needs.
Common Issues When Changing Resolution
While changing resolution in GIMP is usually straightforward, you might run into some common issues. Here’s a rundown of potential problems and how to address them:
- Loss of Quality: Increasing the resolution can lead to blurry or pixelated images if the original file isn’t high enough quality. Always start with the best source possible.
- Distortion: Changing the aspect ratio can stretch or compress your image. Keep the chain icon linked in the scaling options to maintain proportions.
- File Size Issues: Higher resolution images result in larger file sizes, which can be challenging for storage or online use. Consider saving a lower resolution version for web use.
- Resampling Artifacts: Sometimes, artifacts can appear when enlarging images. Use better resampling methods like LoHalo to minimize this effect.
By being aware of these common issues, you can better prepare yourself to tackle them and achieve the best possible results when changing image resolution in GIMP.
Best Practices for Image Resolution
When it comes to image resolution, following best practices can make a huge difference in the quality of your final product. Here are some key tips to keep in mind:
- Know Your Purpose: Understand where and how the image will be used. For print materials, aim for at least 300 DPI, while web images typically require 72 PPI.
- Start High: Always work with the highest resolution image available. This gives you more flexibility when editing and resizing.
- Maintain Aspect Ratio: To avoid distortion, keep the aspect ratio consistent. Use the chain link in GIMP to lock the proportions when resizing.
- Use Proper Formats: Save images in the correct formats for their intended use. For instance, JPEG is good for photos, while PNG is ideal for images with transparency.
- Check File Sizes: Before uploading images online, ensure the file size is optimized for fast loading without sacrificing quality.
- Experiment with Resampling: Try different resampling methods in GIMP when changing resolution to find the best quality output.
By keeping these practices in mind, you can ensure your
images look great and are suitable for their intended purpose.
Frequently Asked Questions
As you dive into changing image resolution in GIMP, you might have a few questions. Here are some common queries along with their answers:
- What is the difference between DPI and PPI? DPI (dots per inch) refers to printed images, while PPI (pixels per inch) applies to digital images on screens.
- Can I increase the resolution without losing quality? You can increase resolution, but you may lose quality if the original image is low-resolution. Always start with the highest quality source.
- What resampling method should I use? For best results, use the Cubic or LoHalo methods in GIMP for enlarging images.
- Is it possible to change resolution without GIMP? Yes, there are other image editing tools available, but GIMP offers powerful features that are user-friendly and effective.
- How can I optimize my images for the web? Use lower resolutions (72 PPI), save in appropriate formats (like JPEG or PNG), and compress file sizes to ensure quick loading times.
Conclusion
Understanding and managing image resolution in GIMP is essential for producing high-quality
images for various uses. By following the steps outlined in this guide, you can confidently change resolution, resample
images for better quality, and address common issues that may arise. Remember to adhere to best practices, such as knowing your image's purpose and starting with high-quality files.
 Image resolution refers to the amount of detail an image holds, typically measured in pixels. The higher the resolution, the more detail the image can display. Here are some key points to consider:
 admin
admin


