Printing images on T-shirts is a fantastic way to show off your unique style. Whether you’re a beginner or someone looking to create personalized gifts, learning how to print your designs can be incredibly rewarding. In this guide, we’ll take you through each step of DIY T-shirt printing, from picking the right image to ensuring your design lasts. Let’s dive into the world of custom T-shirts and explore how you can bring your ideas to life.
How to Choose the Right Image for T-Shirt Printing

Choosing the right image is crucial to making your T-shirt stand out. Not all images will look great on fabric, so it’s essential to pick ones that are high-quality, clear, and suited to the size of your shirt. Here are some tips to consider:
- Resolution Matters: Select images with a high resolution (at least 300 DPI) to ensure clarity and prevent pixelation on the shirt.
- Consider Contrast: High-contrast images with distinct colors work better, especially on darker shirts. Low-contrast designs might not stand out as much.
- Image Type: Vector files (.svg, .ai) often produce cleaner prints compared to raster files (.jpg, .png). Vectors can be resized without losing quality.
- Color Limitation: Simplify your design if possible, as fewer colors are often easier to print and can keep costs lower.
- Personalization: Choose an image that reflects your personality, whether it’s a favorite quote, a personal photo, or artwork you love.
Picking the perfect image doesn’t have to be overwhelming. Just focus on these factors, and you’ll have a design that looks great on any T-shirt.
Also Read This: How to Wear Hijab Styles on Dailymotion
Essential Materials for Printing Images on T-Shirts

Before you begin, it’s essential to gather the right materials for a successful DIY print. Here’s a list of must-haves:
| Material | Description |
|---|---|
| Blank T-Shirts | Choose a T-shirt made of cotton or a cotton blend for best results, as they hold prints well. |
| Transfer Paper | For inkjet or laser printers, use transfer paper that matches your printer type. Dark T-shirt transfer paper is also available. |
| Printer | A good-quality inkjet or laser printer is necessary. Make sure the printer ink is compatible with your transfer paper. |
| Heat Press or Iron | Using a heat press gives more consistent results, but a household iron can work for smaller projects. |
| Parchment Paper | Place this over the transfer paper when ironing or pressing to prevent sticking and ensure even heat distribution. |
| Scissors | Useful for trimming around the design before transferring to the T-shirt. |
Having the right materials makes the process smoother and ensures a lasting, quality print on your T-shirts.
Also Read This: Learn How to Create a TED Ed Video and Showcase Your Talent
Preparing Your Design for the Perfect Print

Getting your design ready is key to achieving a great print on your T-shirt. By prepping your image correctly, you can ensure a smoother transfer and a more vibrant, lasting design. Let’s go over the basics to help you make the most of your design.
Here are some steps to prepare your design:
- Resize Your Image: Adjust your image to fit the size you want on the T-shirt. Standard sizes for front prints are typically around 10-12 inches wide.
- Use Design Software: Programs like Adobe Illustrator, Photoshop, or even online tools like Canva can help you adjust brightness, contrast, and sharpness to ensure your design looks clear and vibrant.
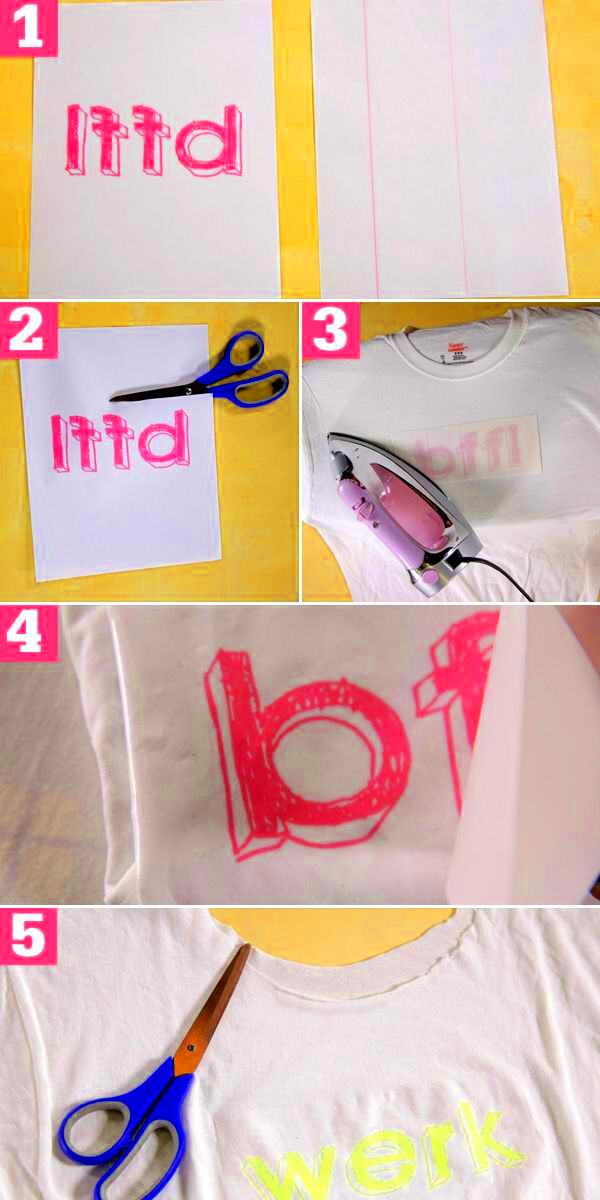
- Flip the Image for Transfer: For iron-on transfers, remember to mirror or flip the image horizontally, especially if it includes text, so it transfers correctly onto the T-shirt.
- Test Print: Print your design on regular paper first to check for clarity, size, and color accuracy. This helps you avoid mistakes before using transfer paper.
- Trim Unnecessary Areas: Carefully cut around your design on the transfer paper to reduce excess, which can make your print look cleaner and prevent unintended white edges.
Taking time to properly prepare your design will pay off in the final look of your DIY T-shirt, ensuring the image transfers perfectly onto the fabric.
Also Read This: Creating a Website Using Notepad – A Comprehensive HTML Guide
Step-by-Step Guide to Printing on T-Shirts

Printing your design on a T-shirt might seem tricky, but following these steps can make the process easier. Whether using a heat press or a household iron, this guide can help you achieve a professional look from home.
- Set Up Your Work Area: Choose a flat, heat-resistant surface. Ensure you have easy access to all materials, including your T-shirt, transfer paper, parchment paper, and a heat source.
- Pre-Wash the T-Shirt: Washing the T-shirt before printing can remove any residue that might affect adhesion, and it prevents shrinkage after the print is applied.
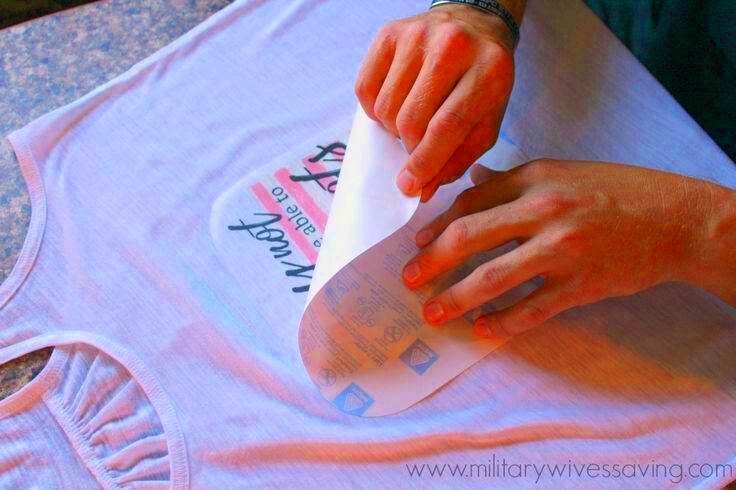
- Place the Transfer Paper: Lay your T-shirt flat and position the transfer paper, design-side down, on the desired area.
- Apply Heat: Use an iron or heat press at the recommended temperature (often around 300°F or as instructed on your transfer paper). Press firmly and evenly for the specified time.
- Let It Cool: Allow the T-shirt to cool for a few minutes, then carefully peel off the transfer paper, starting from one corner to check if it’s fully adhered.
- Final Touch: Press again briefly with parchment paper on top if needed to help seal the design, especially around the edges.
With these steps, you’ll have a custom-printed T-shirt that you can proudly wear or gift to others.
Also Read This: Here’s How to Get Shutterstock Images for Free Without Watermark
Troubleshooting Common Printing Issues
DIY T-shirt printing can sometimes lead to a few common issues, but with some adjustments, they’re usually easy to fix. Here are solutions for typical problems to help you get a clean, professional look.
- Faded Colors: This often happens if the image wasn’t prepared with enough contrast or if the transfer paper quality is low. Try boosting color saturation or using higher-quality paper for a more vibrant print.
- Image Not Adhering: If the image peels off or doesn’t fully stick, make sure you’re applying enough heat and pressure. Also, check the transfer paper instructions for the correct temperature and time.
- White Edges Around Design: If there’s an unwanted white border, trim closer to the design before transferring. This will give a cleaner finish.
- Cracking After Washing: Cracks can occur if the T-shirt wasn’t pre-washed or if the heat wasn’t evenly applied. Wash the shirt inside out in cold water to reduce wear and tear on the print.
- Image Blurring: Blurry images may result from a low-resolution file. Always use high-resolution images (300 DPI or more) for printing.
By addressing these issues, you can improve your printing technique and create custom T-shirts that look great and last longer.
Also Read This: Become a Contributor on Getty Images and Start Earning Income
Tips for Long-Lasting Printed Designs
Ensuring that your printed design lasts on a T-shirt takes a bit of care, but it’s worth the effort to keep your custom T-shirts looking fresh. With some simple practices, you can prevent fading, cracking, and peeling to enjoy your creations for years.
Follow these tips to extend the life of your printed designs:
- Wash Inside Out: Always wash T-shirts with printed designs inside out to reduce direct friction on the print.
- Use Cold Water: Washing in cold water minimizes the chance of ink fading or shrinking of the fabric, keeping the design intact.
- Avoid Harsh Detergents: Stick to mild detergents and avoid bleach or fabric softeners, as they can damage the print over time.
- Air Dry When Possible: Air drying is gentler on the print. If you must use a dryer, opt for the lowest heat setting.
- Iron Carefully: Avoid direct contact with the printed area while ironing. Place a thin cloth over the design or iron inside out to protect the print.
- Store Properly: Hang or fold your T-shirts neatly. Avoid tight folding on the design, as this can cause creases and cracks.
By adopting these simple habits, your printed designs can maintain their vibrant look, helping you enjoy your DIY T-shirts for a long time.
Also Read This: How to Export from Photoshop to Behance and Share Your Designs with the World
Creative Ideas for Customizing Your T-Shirt Prints
Customizing your T-shirts is all about making them uniquely yours. There are countless ways to add a personal touch beyond the basic image transfer. Let’s explore some creative ideas for taking your T-shirt prints to the next level.
- Add Textures: Try using fabric paint or embroidery to add texture around your printed design. This can give your T-shirt an extra dimension and a unique handmade feel.
- Mix and Match Materials: Combine fabric patches, rhinestones, or sequins with your printed design to create a mixed-media look.
- Play with Placement: Instead of centering your design, place it on the pocket area, back, or even along the sleeves for a different vibe.
- Layer Different Prints: Use smaller designs layered or scattered across the shirt for a collage effect. It adds an artistic, one-of-a-kind look.
- Combine Techniques: Try mixing screen printing with heat transfer for added texture and depth. Experimenting with multiple techniques can make your design stand out.
Get creative with these ideas and let your personality shine through in every shirt. Customization is all about having fun and exploring new possibilities.
Also Read This: How to Delete Photos from Adobe Stock
FAQs About DIY T-Shirt Printing
New to T-shirt printing? Here are answers to some common questions to help you get started and avoid common pitfalls. DIY printing doesn’t have to be complicated—these FAQs can simplify the process.
- What type of printer is best for T-shirt printing?
Inkjet and laser printers are commonly used. Inkjet printers are generally better for vibrant colors, while laser printers may require special transfer paper. - Can I print on any T-shirt fabric?
Cotton or cotton blends work best because they absorb ink well. Polyester can work with certain transfer papers, but results may vary. - How long does a printed design last?
With proper care, most designs last up to 50 washes. Following care tips like washing inside out and air drying can extend the life of the print. - Do I need special software for preparing designs?
Software like Photoshop or Illustrator is helpful but not necessary. Free online tools like Canva can also help you prepare simple designs. - Can I remove a design if I make a mistake?
Unfortunately, it’s difficult to remove a transfer without damaging the fabric. Testing your design on paper first can help you avoid mistakes.
These FAQs cover the basics, helping you feel more confident as you start your DIY T-shirt printing journey. Each answer provides practical advice for smooth, successful printing at home.
Final Thoughts on DIY T-Shirt Printing
DIY T-shirt printing is an exciting and accessible way to bring your creative ideas to life. With the right materials, a little preparation, and a few helpful tips, you can create unique, high-quality designs that stand the test of time. From selecting the perfect image to mastering your printing technique, each step adds to the fun of designing something personal. Whether it’s for yourself or a special gift, DIY printing lets you express yourself through wearable art. With some practice, you’ll be making professional-looking T-shirts from the comfort of home. Enjoy the process and happy printing!

 admin
admin


