Printing a large image across multiple pages is a great way to bring big ideas to life, especially when you need a poster-size print but don't have access to a large-format printer. By splitting the image into smaller sections, you can print it on standard letter-sized or A4 paper and assemble the pieces into one large picture. Whether you’re preparing for a presentation, creating wall art, or putting together a project, this method allows you to scale up your visuals without the cost of specialized printing services.
In this guide, we’ll walk you through the reasons why you might want to use this technique, the steps to take, and the tools that can help make the process easier and more efficient.
Why You Might Need to Print a Large Image Across Multiple Pages

There are several reasons why you may want to print a large image across multiple pages. Here are some of the most common scenarios:
- Creating Posters or Banners: If you need a large image for a presentation, event, or decoration, printing it across multiple pages allows you to create posters that can be assembled into one large visual.
- Cost Savings: Large-format printing can be expensive. Printing your image on regular paper and assembling the pieces yourself is often a much cheaper alternative.
- Lack of Access to Large-Format Printers: Not everyone has access to a large-format printer, but you can print on standard printers and achieve similar results.
- DIY Projects: Whether it's for a school project, home decor, or event, this method is ideal for those looking to add a personal touch with minimal investment.
With the right tools and preparation, printing a large image on multiple pages can be a straightforward process that gives you flexibility in design and execution.
Also Read This: Creating an Impressive Behance Portfolio to Attract Clients
Step-by-Step Guide to Printing a Large Image Across Multiple Pages

Printing a large image across multiple pages may sound complicated, but with the right approach, it’s a simple and satisfying process. Here’s a step-by-step guide to help you get started:
1. Choose the Right Image
Not all images are suited for printing across multiple pages. For best results, use high-resolution images. The resolution should be at least 300 DPI (dots per inch) to ensure that the print is clear and sharp. Images with low resolution may appear pixelated when enlarged.
2. Decide on the Size of the Final Print
Determine the size of your final printed image. For instance, if you want an image that measures 24” x 36” (a standard poster size), you’ll need to figure out how many standard letter-size pages (8.5” x 11”) it will take to cover that area. Here's an example:
| Final Image Size | Paper Size | Number of Pages |
|---|---|---|
| 24” x 36” | 8.5” x 11” | 12 pages |
This calculation depends on your printer settings and the size of the paper you use. Be sure to leave some room for margins and trimming when planning your layout.
3. Use Software to Split the Image
Now that you know the size and resolution of your image, you need software to split the image across multiple pages. Popular programs include:
- Adobe Acrobat: Ideal for creating PDF files and splitting images across pages.
- Rasterbator: A free online tool that allows you to upload an image and choose how it will be split across multiple pages.
- Microsoft Paint: A simple tool for basic splitting if you’re on a tight budget or need a quick solution.
These tools will allow you to configure how your image is divided. Typically, they allow you to set the scale, adjust the margins, and even add overlapping sections for easy alignment during assembly.
4. Print Your Image
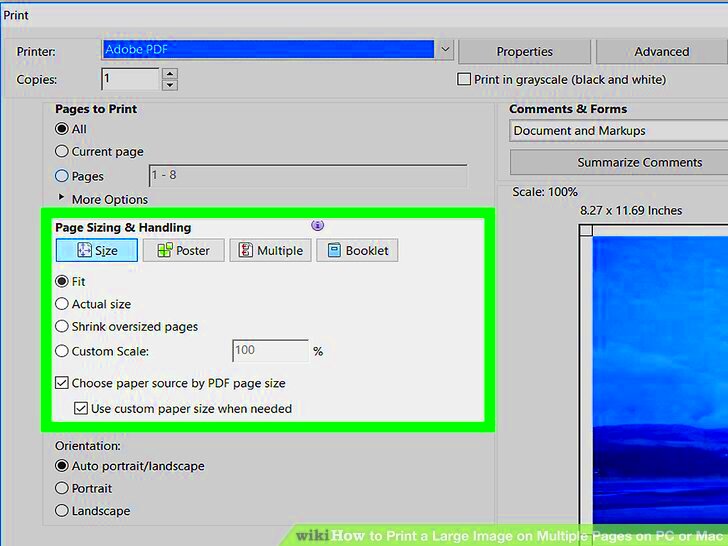
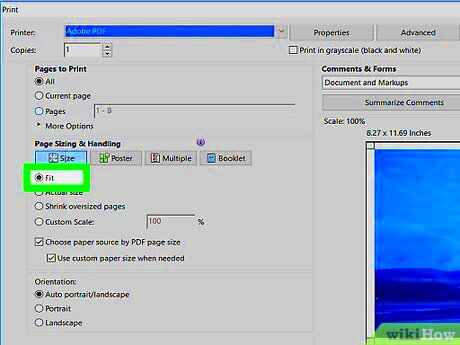
Once the image is split, it’s time to print. Ensure that your printer is set to print the pages without scaling the image (you want it to be printed at actual size). Double-check the settings, especially if you’re using Adobe Acrobat or similar software, to ensure the layout and alignment are correct.
5. Assemble the Printed Pages
After printing, carefully cut away any excess paper around the edges of each page. Lay the pages flat on a clean surface, and start assembling them by aligning the edges. You can use tape or glue to hold the pages in place. Depending on the number of pages, it may be helpful to work on the assembly in sections.
Once all the pages are joined together, you’ll have a large, high-quality image made from multiple smaller pages!
Also Read This: How to Convert YouTube Video to MP4 with a Step-by-Step Guide for Downloading
Choosing the Right Image for Printing
When it comes to printing a large image across multiple pages, choosing the right image is crucial. Not every image is suitable for enlargement and printing, especially when splitting it into several parts. Here’s how you can pick the best one for your project:
1. Image Resolution
The most important factor is the resolution of the image. A low-resolution image will appear blurry or pixelated when printed in a large format. Ideally, your image should have at least 300 DPI (dots per inch) for sharp, clear prints. Higher resolution images will provide better results when enlarged.
2. Image Composition
Consider the composition of the image. Avoid images with small text or intricate details, as these might become hard to read or unclear once printed on multiple pages. Simple, bold images with clear lines and shapes usually work best. High-contrast images with bright colors can also enhance the print quality when enlarged.
3. Aspect Ratio
Make sure the aspect ratio (the width-to-height ratio) of your image is suited for printing across multiple pages. If the image is too narrow or too wide, it could be difficult to scale it without distorting the proportions. Keep the aspect ratio as close to your paper size as possible to minimize issues during the printing and assembly process.
4. Image Editing
Before printing, you may need to adjust the image's brightness, contrast, or saturation to ensure that it looks good on paper. Tools like Adobe Photoshop or GIMP can help you enhance the image quality before you start the printing process.
By choosing the right image—one with high resolution, clear composition, and the right aspect ratio—you’ll be on your way to creating a great-looking print on multiple pages.
Also Read This: Simple Ways to Find the Resolution of an Image on Mac
Preparing Your Image for Printing Across Pages
Once you've selected the perfect image, it's time to prepare it for printing across multiple pages. This step ensures that the image prints seamlessly and is easy to assemble. Here’s how to get it ready:
1. Resize the Image
Before splitting the image, you’ll need to resize it to match the final size you want. If you're printing a large poster, for example, you might want to resize the image to a size that's several times larger than the standard paper size. Use image-editing software to resize the image to the correct dimensions.
2. Split the Image into Sections
The next step is to divide the image into multiple parts that will fit onto individual sheets of paper. There are different methods for this, depending on the software you're using. For instance, software like Adobe Acrobat or Rasterbator allows you to split your image automatically, while you can manually split it using a program like Microsoft Paint or GIMP.
3. Set Overlap for Easy Alignment
When splitting the image, it's helpful to set a small overlap between the edges of each section. This ensures that the parts can be easily aligned and taped or glued together. Most software tools that split images allow you to adjust this overlap setting.
4. Consider Margins
Don’t forget to account for printer margins. Most printers can’t print all the way to the edges of the paper, so you’ll need to leave a small margin around the edges of each page to avoid cutting off parts of the image. Some programs let you adjust the margins to minimize wasted space.
5. Save the Image Files
Finally, save each section of the image as a separate file, ideally in PDF or high-quality image formats (like JPEG or PNG). Ensure the resolution remains high and that the files are organized for easy printing.
With your image properly resized, split, and formatted, you're ready to start printing and assembling the pages.
Also Read This: A Comprehensive Guide to Downloading Vectors from 123RF
Best Tools and Software for Printing Large Images
To make printing a large image across multiple pages easier, you’ll need the right tools and software. The right software can help you split your image accurately, adjust settings for proper alignment, and ensure high-quality results. Here are some of the best tools for this task:
1. Adobe Acrobat
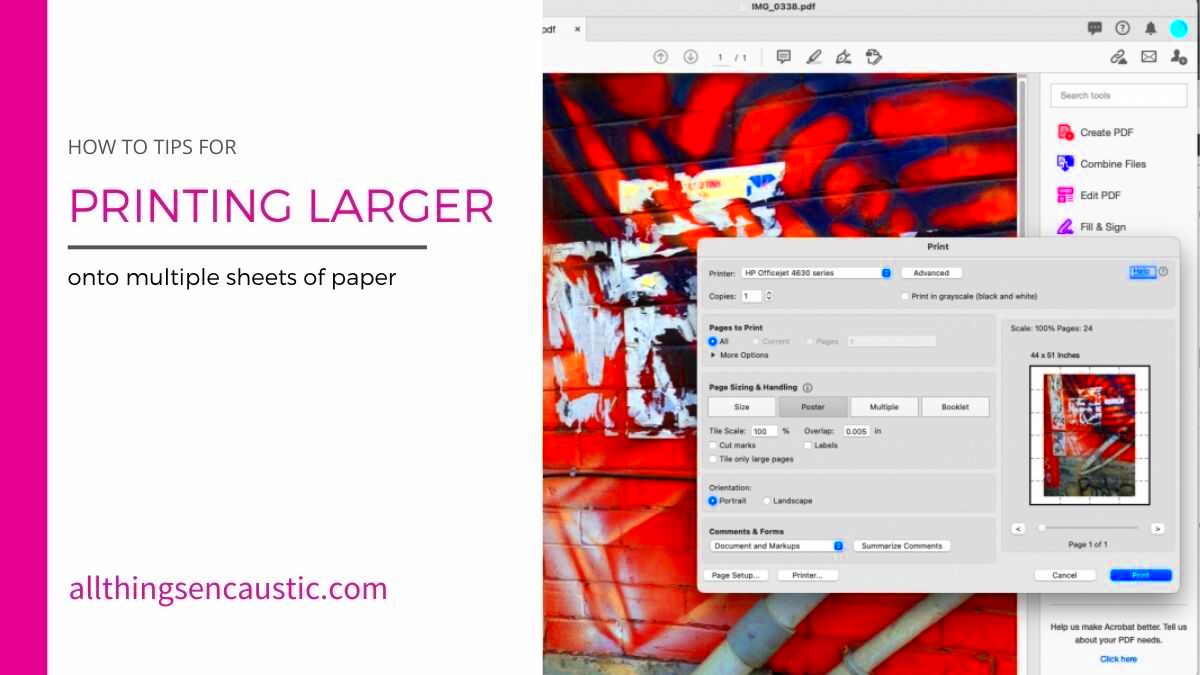
Adobe Acrobat is a powerful tool for working with PDFs, and it’s ideal for printing large images across multiple pages. You can use the “Poster” option in the print settings to split an image into multiple pages. This option also lets you control the overlap between pages to make assembly easier.
2. Rasterbator
Rasterbator is a free online tool specifically designed for enlarging images and printing them across multiple pages. The process is simple: you upload the image, select the size, and Rasterbator generates the image split into several pages. It’s a great option for quick, large-scale prints, and it offers various customization options like adding borders and adjusting the output size.
3. Microsoft Paint
While it’s not as advanced as other programs, Microsoft Paint can be used to manually split images into sections. If you’re looking for a free, easy-to-use option, this might work for you, especially for simpler images that don’t require much editing. You can also use Paint to adjust the size of the image before printing.
4. GIMP
GIMP is a free and open-source image editor that rivals Photoshop. While it’s primarily used for image manipulation, GIMP can also be used to prepare images for printing across multiple pages. You can resize images, adjust resolution, and manually split the image into multiple sections.
5. Adobe Photoshop
Adobe Photoshop is a professional image-editing tool that provides detailed control over image size, resolution, and quality. It’s perfect for preparing high-resolution images before splitting them. Although Photoshop doesn’t have a built-in feature to split images for printing, you can easily divide the image into sections using the slice tool or by manually cropping and saving each section as a separate file.
6. Online Tools
There are many online tools available that allow you to split images across multiple pages without needing to download any software. Some popular options include Print Studio, BlockPosters, and Easy Poster Printer. These tools are often free and easy to use, making them ideal for simple projects.
Choosing the right software or tool will depend on your specific needs and the level of customization you require. Whether you’re looking for an easy, quick solution or a more professional approach, there’s a tool for every situation.
Also Read This: How Can AI-Enhanced Stock Photos Transform Your Website Design?
Common Issues and How to Avoid Them When Printing Large Images
Printing a large image across multiple pages can be a rewarding experience, but it comes with its own set of challenges. From alignment issues to color discrepancies, understanding these common problems can help you avoid them and ensure a smooth printing process. Here's a look at some of the most frequent issues and how to prevent them:
1. Misalignment of Pages
Misalignment is one of the most common issues when assembling large prints. If the individual pages aren’t lined up correctly, the image will look uneven or fragmented.
- Solution: Use overlap features in your software to ensure parts of the image slightly overlap on each page. This helps with alignment when you put the pieces together. Additionally, double-check your printer settings to ensure accurate scaling.
2. Poor Print Quality or Blurriness
Low-resolution images often appear blurry when printed at large sizes. This can ruin the overall look of your print, especially if you’ve gone to the trouble of printing on multiple pages.
- Solution: Always use high-resolution images. For a sharp result, aim for at least 300 DPI. If you’re enlarging a low-resolution image, consider using image-editing software like Photoshop to enhance the resolution before printing.
3. Printer Margin Issues
Many printers can’t print all the way to the edges of the paper, which can lead to cutting off part of the image or uneven borders between pages.
- Solution: Ensure you leave sufficient margin space around your image. Most printers have a non-printable border, so check your printer’s specs to avoid printing outside the printable area.
4. Ink or Toner Running Out
Large images require a lot of ink or toner, and running out mid-print can create gaps in your image, or worse, ruin your whole project.
- Solution: Before starting the print job, check ink levels. If you’re printing a large image, it’s wise to have extra ink or toner on hand. Consider printing a test page to ensure everything works smoothly.
5. Paper Size and Printer Compatibility
If your image spans more pages than your printer can handle, it can lead to paper jams or printing errors.
- Solution: Ensure that your printer can accommodate the paper size you plan to use. For instance, larger paper may not fit in certain printers. Double-check the paper tray and choose paper sizes that match your printer’s specifications.
By understanding and preparing for these common issues, you can ensure that your large image prints are accurate, clear, and professional-looking.
Also Read This: How to Remove Backgrounds from Images in Paint for Clean Edits
FAQ: Frequently Asked Questions about Printing Large Images
If you're new to printing large images across multiple pages, you probably have a lot of questions. Below are some of the most frequently asked questions, along with their answers, to help guide you through the process:
1. What is the best resolution for printing large images?
For the best results, aim for a resolution of at least 300 DPI (dots per inch). This ensures that the image remains sharp and clear when printed at a larger size. If you’re printing a very large image, make sure the original image has a high enough resolution to support the enlargement without becoming pixelated.
2. Can I print a large image without specialized printing equipment?
Yes! With the right software, you can print large images across multiple pages using a standard printer. By splitting the image into smaller sections and printing them on regular-sized paper, you can assemble them into a large print. This method works well for posters, banners, and other large visuals.
3. How do I align the printed pages correctly?
Most image-splitting software, like Adobe Acrobat or Rasterbator, includes an overlap feature that lets you create slight margins between the pages. This overlap ensures the parts of the image can be aligned properly when you assemble them. You can also trim any excess paper and carefully tape or glue the sections together.
4. Should I print in color or black and white for large images?
It depends on the image and its intended use. For vibrant, high-contrast images like artwork or photographs, printing in color is the best option to preserve the details. However, for simpler graphics, text-heavy designs, or cost-saving measures, printing in black and white may be sufficient.
5. How do I avoid cutting off parts of the image when printing?
To prevent this, ensure that your printer’s margins are properly set and that you leave enough space around the edges of the image. When using software to split the image, select the option that allows for a slight overlap between pages, which will help you align the sections correctly and avoid cutting important parts of the image.
By addressing these frequently asked questions, you can approach the process of printing large images with more confidence and understanding.
Conclusion: Tips for Successful Large Image Printing
Printing a large image across multiple pages can be a rewarding project, but it requires some careful planning. Here are a few tips to ensure your large prints turn out great:
1. Plan Ahead
Before you start printing, take some time to plan the size of your final print and the number of pages it will take. Consider the paper size and your printer’s specifications to avoid unnecessary issues during the process.
2. Choose a High-Quality Image
Always choose a high-resolution image. The clearer the image, the better it will look when printed on multiple pages. Avoid low-quality or pixelated images that will degrade in quality when enlarged.
3. Use the Right Software
Choose software that allows you to split images into sections easily, with options for overlap and margin adjustments. Popular choices include Adobe Acrobat, Rasterbator, and GIMP.
4. Test Your Printer
Before printing the entire project, do a test print to ensure your printer settings are correct and the image looks good. This helps avoid wasting ink and paper on a print that doesn’t meet your expectations.
5. Take Your Time When Assembling
Once you’ve printed the pages, take your time to carefully assemble them. Ensure the edges are aligned properly and use tape or glue sparingly to avoid damaging the print. The more time you spend aligning the pages, the better your final result will look.
With these tips, you’ll be able to create stunning large prints without hassle. Whether for a personal project or a professional presentation, printing large images across multiple pages can be a fun and cost-effective way to make an impact.

 admin
admin


